Talk to a Mustang Sales Tech
1-877-887-1105
M-F 8:30A-11P, Sat-Sun 8:30A-9P
$20K Sweeps! 10 Chances to Win! Enter Daily >

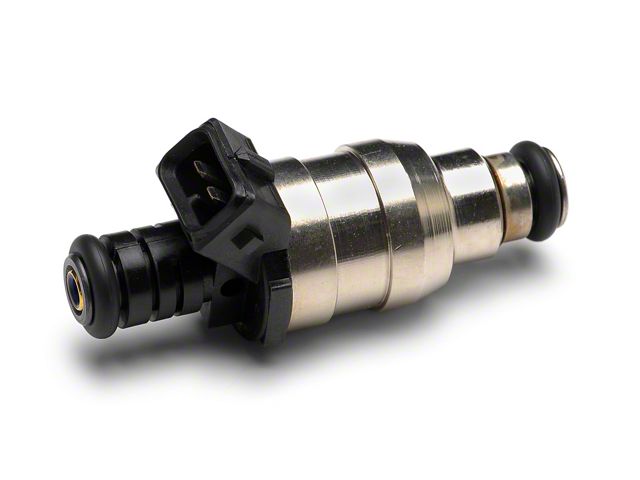
Accel High Performance EV1 Fuel Injectors; 19 lb. (87-04 V8 Mustang)

Item 37262
Verify parts fit and get product recommendations.
Mustang Sales Techs: Connect Now M-F 8:30A-11P, Sat-Sun 8:30A-9P
$0.00
Our Price

$420.95 (set of 8)

FREE Shipping Market Price $484.99 You Save 13% ($64.04) Up to 10% off for Military & First Responders! See Details

Will this fit your Vehicle?

Select a different vehicle Help?
Update or Change Vehicle
Ship to: Ashburn - 20149
Sorry, please enter a valid US or CA postal code
We're sorry, zip can't be updated at this time.
    Create a list
    Add to New List

    Saved - View your saved items

    We're sorry. We couldn't save this product at this time.

    or use

      Video Review & Installation

      Hey, guys. Today we're gonna be taking a look at and installing the Accel High Performance Fuel Injectors for 1987 to 2004 V8 Mustangs. These injectors here are 19-pound an hour injectors so they're stock size replacements. They are high-performance fuel injectors though so what I can say about them is that they have a very fine fuel spray and that's gonna help with fuel atomization and with burn efficiency as well. These are EV1 body style fuel injectors. They come with O-rings already on them and they are sold as a set of eight. They cost about $300. Because they are 19 pound an hour injectors, I will say that they're gonna be best suited for naturally aspirated builds. Anything more than that is gonna require more fuel than what these injectors can deliver.As far as the install goes, I'll call it a two out of three wrenches in the difficulty meter and, of course, we'll show you how to get them installed now. For this install, we used a 3/8 drive impact gun, a small extension, a ¼ inch ratchet, an 8-millimeter socket both in ¼ inch and 3/8, a 5-millimeter Allen key, a flathead screwdriver, and an adjustable wrench.All right, guys. So we're gonna start the install by disconnecting our intake. Now we have an AirRaid cold air intake on this car. You may have a different intake or even a stock intake. I know that we're gonna be using an 8-millimeter socket in order to undo this. I'm gonna leave the air filter and mass air flow sensor in place and just remove our tube here and all of the lines connecting.All right, guys. Now we're gonna get ready and go ahead and pull the BBK throttle body intake off. So depending on your exact setup at home, it's gonna be a little bit different probably but it's still gonna be really similar to this. We're gonna go ahead and disconnect all of our electrical connections and all the vacuum lines. All right. The next thing we're gonna do is actually disconnect our EGR. I have an adjustable here.All right. So now we're gonna completely remove the BBK throttle body intake and what I've done is I've left everything connected as far as the bracket and the throttle cable goes. You'll see what I'm gonna do. I'm literally just gonna lift this off and set it over to the side. Now, you may or may not be able to do that at home depending on what exactly you're working with. If you have a stock intake manifold, you're probably gonna have to completely remove it from the car and not leave it sitting over on the side like we're gonna be able to do with the BBK here. So we're gonna go ahead, remove all four bolts, and then set this off to the side.All right, guys. So next we're gonna unplug all of our injectors and get the harness out of the way. All right, so my plan for this is actually to leave the fuel rail in the car and I'm gonna swap injectors out right here so we're not even gonna disconnect our fuel rail.So we have a little keeper here on our harness. You guys can disconnect the sensor if you'd like to as well. Just move it out of the way. And we have two 8-millimeter bolts that are holding our fuel rail in place on the manifold. So we'll go ahead. We're gonna loosen those. The second one's back here. You may just have to hold this hose out of the way. All right, so we'll do the same thing on this side. We're gonna go ahead, disconnect our injectors. Then we're gonna move this harness out of the way.All right, guys. So what we're gonna do now is we are going to lift our fuel rail and our injectors up. We'll do one side at a time. So what I'm gonna do is I want to remove the fuel injector from the intake manifold. I don't want the fuel injector to stay in the intake manifold and pop out of the rail up here. So I'm gonna grab each injector. I'm gonna wiggle them a little bit because they're held in place by O-rings. And I'll pull them. And see how all my injectors stayed in the fuel rail? What I'm gonna do now is I'm gonna grab a rag and then I'll just pull each injector out of the fuel rail.All right, so now I'm gonna take a shop rag and I'm actually gonna wrap it around the injector because I'm expecting some fuel when I pull the injector out of the fuel rail here and I just want the rag to soak it up. So I have the rag wrapped around the injector and I'm going to wiggle the injector out of the fuel rail. I'm just gonna hold here for a second because I can feel fuel spilling and I just want the rag to soak it up. Two things I wanna point out. Since our new injectors have O-rings on them already, once you pull your injectors, you're gonna wanna check both the top and the bottom to make sure the O-rings stayed on. It looks like the bottom O-ring is still in place on this injector but the top O-ring is still in the fuel rail. So I wanna make sure that I pull that O-ring out of the fuel rail before I install the new injector. All right, so I'm gonna take a little flathead screwdriver. I'm gonna reach up inside the fuel rail here and I can already feel the O-ring. I'm just gonna pull it out.All right. So now we'll grab a new injector. We'll get that seated into the fuel rail. It just pops right into place. And for now, we're gonna leave this sitting up and we're gonna replace all of the other injectors the same way. All right, so once again, we'll wrap our rag around the injector. We'll wiggle the injector out of place. We're gonna check for our O-ring which stayed on. In both cases both top and bottom so we know we're good to go.All right. So we're gonna do the same thing on this side. We'll grab our injectors, wiggle them out of the manifold, take our rag, wrap it around our injector. We'll check for our O-ring. It's still on here. So we can grab a new injector, get that seated in the fuel rail, and move on to the next one. All right. So with all of our injectors in place, what we're gonna do is we're gonna line up the fuel rail and seat the injectors into the intake manifold and bolt our fuel rail back down. All right. So we're gonna get our bolts back in place.All right. So now we'll bring our harness back into place. We have a couple of connections to plug back in. And then we'll head over to the other side and bolt it down over there. All right. So move the harness out of the way. We'll get our fuel injectors seated into the intake manifold, grab our bolts. Now we'll plug our injectors back in. All right. So now we're gonna get our throttle body and intake in place. All right. So now we are going to get our EGR back into place and tighten it down. All right. Now at this point, with our intake manifold back in place, we are going to make all of our vacuum line and electrical connections.All right. Now we're gonna get our intake tube back in place. So I'm making sure that my clamp is ready to go. Gonna slide into our coupler down here. All right. And now we can tighten down our clamps. All right. And all we have left to do is reconnect our connections here.All right, guys. That's gonna wrap up this review and install. Keep in mind that you can always check these fuel injectors out more online right here at americanmuscle.com.

      Product Information

      Features, Description, Reviews, Q&A, Specs & Installation

      Features

      • 19 lbs./Hr. Flow Rate
      • 14.4 Ohms Impedance
      • EV1 Body Style
      • Bosch/Amp-Style (Jetronic/Minitimer) Connector
      • Sold as a Set of 8
      • Fits 1987-2004 5.0L, GT, Bullitt and 94-98 Cobra Mustangs

      Description

      Improves Performance. A brand new set of Accel High Performance fuel injectors will provide precise control of fuel delivery and atomization for increased power, improved throttle response, and better fuel economy.

      Superior Design. Utilizing a new low-mass disc design that ensures an ultra-fine spray pattern for better atomization and improved burn efficiency, these Accel High Performance Mustang fuel injectors come complete and ready for installation with precision-molded O-rings and fine-mesh fuel strainers.

      Application. These 19lb Accel High Performance fuel injectors work best on naturally aspirated 1987 to 2004 V8 Mustangs, including the 5.0 LX, GT, Bullitt and 94-98 SVT Cobra models. These do not fit 1999-2004 SVT Cobra or 2003-2004 Mach 1 Mustangs.

      Fitment:

      Details

      Accel 150819

      CA Residents: WARNING: Cancer and Reproductive Harm - www.P65Warnings.ca.gov

      Installation & What's in the Box

      Installation Info

      What's in the Box

      • (8) Fuel Injectors

      Tech Specs

      • Injector Advertised Flow Rate (lbs/hr): 19
      • Injector Advertised Flow Rate (cc/min): 202
      • Quantity Sold as a set of 8
      • Injector Impedance: 14.4 ohms
      • Driver Type: 12 V saturated circuit
      • Overall Height (in): 2.88
      • Seat to Seat Height (in): 2.27
      • Manifold O-ring Outside Diameter (in): 0.573
      • Fuel Rail O-ring Outside Diameter (in): 0.574
      • Outside Diameter (in): 0.943
      • Injector Plug Style: Bosch/Amp Style (Jetronic/Minitimer)
      • Body Style: EV1
      • O-Rings Included: Yes
      4.8

      Customer Reviews (120)

        Questions & Answers

        10 More Questions

        Will It Fit My Mustang

        • Bullitt - 01
        • Cobra - 93, 94, 95, 96, 97, 98, 99, 01, 03, 04
        • Cobra R - 93, 95, 00
        • GT - 87, 88, 89, 90, 91, 92, 93, 94, 95, 96, 97, 98, 99, 00, 01, 02, 03, 04
        • LX - 87, 88, 89, 90, 91, 92, 93
        • Mach 1 - 03, 04

            Related All Categories