 FREE 1 to 3-Day Delivery on Orders $119+ Details
Best Sellers


How to Install Hood Mount Turn Signal Kit - Amber LED on your Mustang
Installation Time
1 hours
Tools Required
- • Flat head screwdriver
- • Phillips screwdriver
- • Ratchet & Socket set
- Pliers
Shop Parts in this Guide
Please familiarize yourself with the parts included as well as the instructions before attempting installation. Please seek the help of a certified technician if you feel unable to complete the installation safely and properly. Failure to read and follow the instructions below may result in personal injury or damage to property.
Mounting the Turn Signals:
Before beginning the steps below, turn off the vehicle, remove key, and engage the emergency brake. Our brackets are designed to mount to factory GT heat extractors and sit directly behind the mesh vent. They can also be installed into Roush® heat extractors. If you are installing these on a set of Roush heat extractors, please visit page 4 for separate installation information.
1. Open hood of car and make sure hood is held open securely.
2. Remove the 4 push pins holding the hood insulation pad in place circled in picture 1. The pins are ribbed so you'll have to pry them out with a flat head screwdriver.
3. Use a deep well socket to remove the 2 - 9mm nuts attached to each heat extractor. See picture 2.
4. Remove the black plastic retaining plate shown in picture 2. The plate is held on with double sided adhesive tape so you'll need to use some force to remove it.
5. Now carefully remove the heat extractor. Start at the end closest to the nose of the car and work your way back. Use a flat head screwdriver to release the clips holding the heat extractors in place. See picture 3.
6. Repeat the process to remove the other heat extractor.
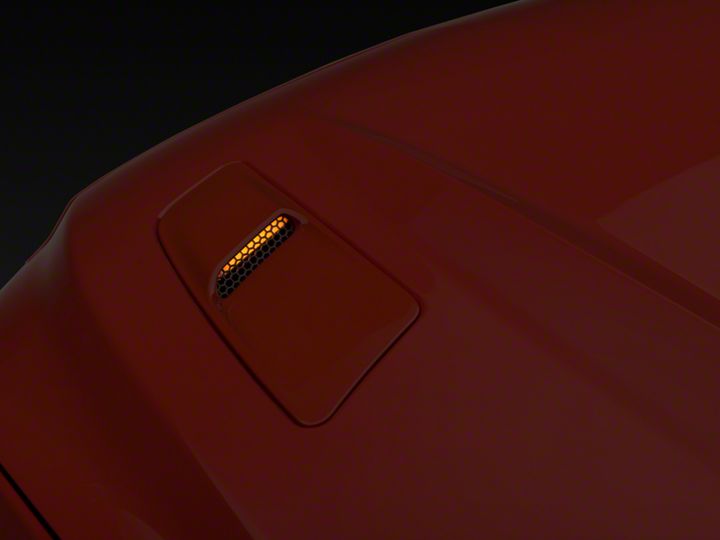
7. Locate the correct lamp for the side you plan to work on first. The lamps come pre-installed on the brackets so that all you have to do is attach the bracket to the heat extractor. Hold the lamp/bracket in place while looking at it from the topside of the heat extractor so you have an idea of how it will need to be oriented. See picture 4/5 for a view of the lamp after it has been installed.
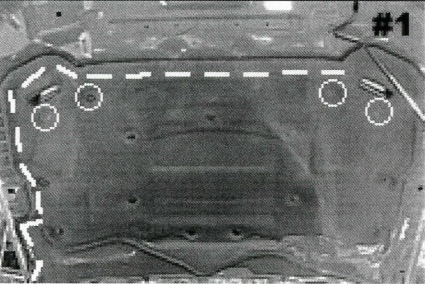
Remove 4 circled pins. Route wiring along dashed line.
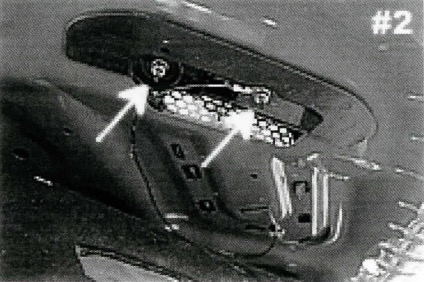
Remove the 2 - 9mm nuts and black retaining plate that secure extractor.
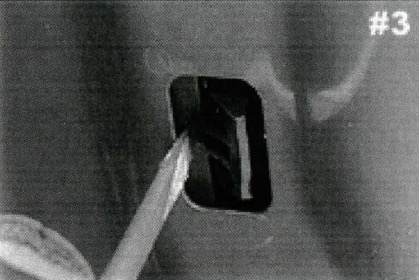
Use a flat head screwdriver to carefully un-clip heat extractors.
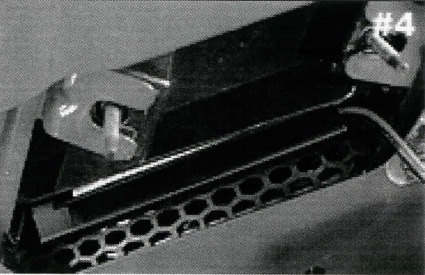
Shown is how the lamp/ bracket will look installed on the heat extractor.
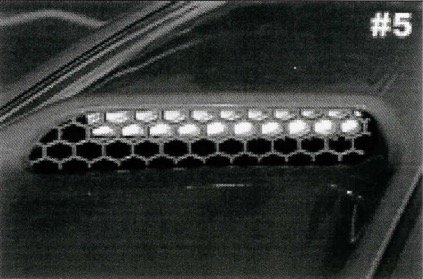
Shown is another view of the lamp after it has been installed.
Use zip ties to secure wiring at hood base - follow washer fluid hose.
At this point you want to have a very good idea of where the lamp needs to be placed. In the following steps we will prep the surface and apply an adhesion promotor to ensure a strong bond. Once the bracket is attached, it will be difficult to move so you want to be sure of the placement.
8. Put on a set of protective gloves.
9. Use the included alcohol prep pad to wipe the surface down where the bracket will be attached.
3M™ Adhesion Promoter 06396 is supplied in an easy-to-use sponge applicator packet. Hold packet upright and avoid squeezing an opened packet to prevent spillage of liquid contents. The packet can be opened by tearing across the top of the packet at the notches. This will expose the sponge applicator. Do not remove the sponge or squeeze a freshly opened packet. Handling the bottom section of the packet should enable application of adhesion promotor with no mess.
10. Apply a thin, uniform coating to the general area on the underside of the heat extractor where the VHB tape will be applied. Wait 30-90 seconds for the coating to dry completely.
11. Peel off the tape backing and carefully place the first bracket onto the heat extractor. Be sure to press down firmly on the back of the bracket to make sure it adheres properly. REMEMBERonce you place the bracket, it cannot be easily removed.
12. Repeat the process on the other side.
Connecting the Wiring:
Familiarize yourself with the wiring harness included with the kit. Locate the two gray connectors that plug into each tum signal lamp.
1. Plug the gray connectors into the corresponding tum signal lamps.
2. Route the wiring under the hood insulation down toward the passenger side. See the dashed line in picture 1 that shows the path you should follow when routing your wiring.
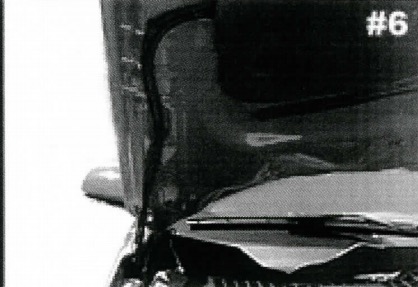
3. Secure the wiring at the base of the hood with supplied zip ties. Be sure to leave just enough slack to allow the hood to open and close properly, but not so much that it will get smashed from the hoods hinges. Follow the washer fluid hose. Do not zip tie to the hinge! See picture 6.
4. Remove the battery cover on the passenger side. It is held on by 3 caps that you can unscrew by hand. Lift cover off and save for re-attachment later.
5. Use a 10mm socket to attach the black ground wire to the ground cable connected to the battery. See picture 7. Re-attach the bolt making sure it is tight so the ring terminal makes proper contact.
6. Route the wiring down the passenger side fender towards the headlight. Run the wiring under the battery cover and follow existing factory wiring. See dashed line on picture 7.
7. Remove the black panel which covers the radiator shown in picture 8. The panel is attached by 8 plastic pins. The pins are removed by prying up on center part and then prying up on the body of the pin. See picture 9. Save pins and black panel for re-installation later.
