Talk to a Mustang Sales Tech
1-877-887-1105
M-F 8:30A-11P, Sat-Sun 8:30A-9P
$20K Sweeps! 10 Chances to Win! Enter Daily >

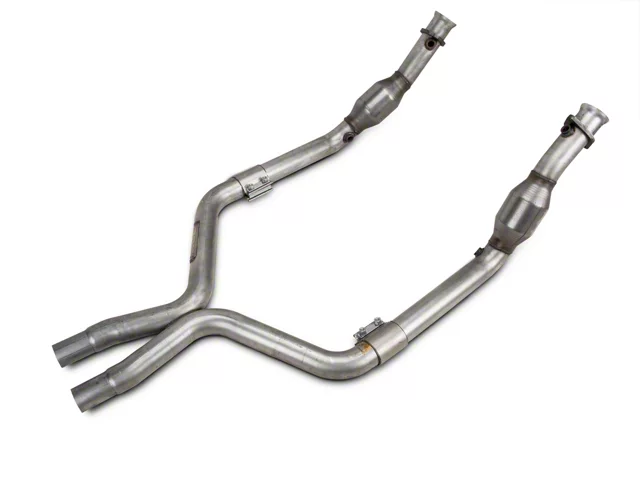
BBK Catted X-Pipe (11-14 Mustang V6)

Item 56232
Verify parts fit and get product recommendations.
Mustang Sales Techs: Connect Now M-F 8:30A-11P, Sat-Sun 8:30A-9P
$0.00
Our Price

$619.99

FREE Shipping Market Price $712.99 You Save 13% ($93.00) Up to 10% off for Military & First Responders! See Details

Will this fit your Vehicle?

Select a different vehicle Help?
Update or Change Vehicle
Ship to: Ashburn - 20149
Sorry, please enter a valid US or CA postal code
We're sorry, zip can't be updated at this time.
Recommended Install Shops
How It Works
Install Shops are available near Ashburn - 20149

Add Local Shop Installation

Total cost of service $249.00
    Create a list
    Add to New List

    Saved - View your saved items

    We're sorry. We couldn't save this product at this time.

      Video Review & Installation

      Justin: Hey, everybody. Justin here with americanmuscle.com, and today we're breaking down and showing you the install of the BBK Catted X-Pipe, fitting all 2011 through 2014 V6 Mustangs equipped with the factory manifold or a set of aftermarket shorty headers.Now, you should be checking out the BBK option for your V6 if you're looking to increase the flow of exhaust while also adding a little bit more rasp and volume at the same time. Now, piping is gonna be 2.5-inch mandrel bent throughout. The aluminized steel will include a couple of high-flow cats and all of the hardware needed for the install, and your price point's gonna land you right in that mid to high $600 range.All right, guys, so as you may or may not know, the factory mid pipes on the stock V6 Mustangs really do nothing in regards to improving your performance or improving your sound. And that's where the BBK option comes into play. Now, this particular X-pipe will replace those OE or factory cats on your factory midpipe with a pair of high-flow options that in turn will really open up the flow compared to your stockers that you are replacing.Now, by increasing that flow overall, 3.7 owners can look forward to a nice little increase in performance along with a more aggressive exhaust note after the install.Material-wise, you are looking at CNC mandrel-bent aluminized steel tubing here throughout with a 2.5-inch diameter from tip to tip. Now, that aluminized steel, guys, should be noted, not the best when it comes to corrosion resistance. So, if you're the type that dailies your '11 to '14 V6 and you live in a snowy or salty climate, this thing might end up corroding on you a little faster than you like. And at that point, maybe you might wanna consider a 409 or 304-grade stainless option instead.Now, outside of the 2.5-inch aluminized steel tubing here, the BBK kit does include those two high-flow cats, which we've already talked about a little bit. Certainly, gonna outflow the stockers, but because you are upgrading to a high-flow cat, this mid-pipe will not be CARB-certified. Now, you are also receiving two factory-style tubal flanges here, which are included with the kit. Of course, all of the O2 bungs are pre-welded for you in the factory location.And I do wanna point out again, just in case you missed it in the beginning of the video, you can use this mid-pipe with either your stock manifolds or stock headers or a set of aftermarket shorty headers that are gonna connect in the same location. At the same time, you can also use this with your stock or aftermarket cat-back exhaust as long as it hooks up in that factory connection with the slip clamps here at the mid-pipe connection.Last but not least, here in our construction block, we have to talk about that X-pipe design, as you guys can see right here. Personally, I think the 3.7 is a great-sounding engine for a V6. The X-pipe design will certainly give the system a little bit more of that raspy growl, as we like to call it, adding just a little bit more volume, of course, at the same time.Now, at the end of the day, this really is magnified on cars with louder aftermarket exhaust systems and, you know, still will be slightly noticeable even on your stock cat-back, but expect the final outcome to vary greatly depending on your exhaust system.Price point for the Catted BBK option here is gonna land you in that mid to high $600 ballpark, which at the time of this video, does put it right in line with some of your other full-length mid-pipe options for the '11 to '14 V6, such as the options for pipes or even solo performance.Now, one thing I do wanna point out here, guys, that when you do cross-shop some of these other similarly priced options, just make sure you're double-checking that material because a lot of times, again, aluminized steel, certainly more budget-friendly material, might corrode a little faster at the end of the day. So make sure you're checking the price points. And if you can, grab a full stainless-steel option for those daily drivers out there. Always gonna be a great idea.But now we wanna shift gears and talk about the install a little bit more here, guys, show you what it takes to get this thing done at home. Now, the site's gonna call this one a pretty strong two out of three wrenches on the difficulty meter here, taking you at least two hours to complete from start to finish.Now, I say at least because these cars are getting a little older now, they might be a little corroded on some of your connections, so that kind of stuff can snowball pretty quickly. However, to give you a better idea of just how exactly this one will go down in the garage or driveway at home, we're actually gonna throw it to an AM customer now for a detailed walkthrough and tool breakdown. Check it out.Man: The tools used for this job are laying out right here. They have a 17-millimeter open end...or not a 17-millimeter, a 7/8 open end wrench for taking the oxygen sensors out. They may have been metric, but I grabbed the seven 7/8 to begin with, and that's what worked. The next one is an 8-millimeter wrench. That was to remove the negative side of the battery so I could reset the ECU so it can recalculate the airflow on it since these are high-flow cats versus stock. It'd be better to do that now so we don't start having engine trouble.The flathead screwdriver was just used to lift the clip off of the stock clamp from the stock pipe that had a little nub that kept it so it wouldn't fall off. I have two 3/8 extensions, one of the 10-inch, one of the 9-inch. You could probably get away with 8-inch ones, but you need somewhere between 16 and 20 inches so your ratchet will clear the exhaust pipe when you're trying to take the nuts from the header off.The one here has a pivot head. That was very beneficial because if you just have it work, the straight one like this one, when the socket gets onto the nut, it won't line up as well and you may have issues with it. So having that swivel head works really well, or you could use a universal joint, that would work also.To take those nuts off, you use a 17-millimeter socket. A deep well works best because some of those bolts are kind of long. And then I've got a 15-millimeter socket here. I would recommend this deep well. I do have a standard one also. Just because I had it, I could use it, but the deep well, I ended up needing to use that most because of some of the screws on the clamps that hold the pipes together, the standard one started sliding off the nut. So the deep well one would be preferred.I've got two 1/4-inch...or three, 3/8-inch ratchets. One of them is a flex head. You don't need both of them. I just have both of them and I used them because I've got them. The flex head, though, works really well to get out of the way while you're trying to take the nuts off of the header. I used a rubber mallet to pound the stock clamp onto the BBK X-pipe. When they swedged it down, it wasn't quite as small as the stock pipes, so I had to pound it on. Not real hard, but I didn't want to use a regular hammer and possibly damage it, so I used a rubber mallet since I have it.To get the oxygen sensors out, they were seized up when I first started. So I put a little bit of the PB B'laster on it, the penetrating oil to loosen it up, let it sit for about an hour. Then they popped loose real nice. I used some anti-seize lubricant to put them back in, so hopefully, if they fail or if I need to take these things apart again, they'll come out a lot easier. So these are all the tools that I used. I could have probably got away with, you know... Didn't have to use all of them, but I did.To start the installation, what we need to do is we need to pull off...take off these nuts. Since I've already put the BBK shorty headers on it, these bolts are not seized on anymore because it was just done a couple months ago. So you have to take off this one. And there's one more on the top that you can't see from down here. And then one of the other things you want to do... This is the passenger side. You're gonna have to pull out the oxygen sensor. This is the back flow one... Yeah, and that's the upflow one, one of the two.So those two...the O2 sensors, I pre-sprayed them down with penetrating oil because they were seized in. I ended up letting them sit for about an hour or so, and then I was able to break those loose on this side. That's the same that goes for on the driver's side. You have the two nuts, the bottom and the top. And then you have your two oxygen sensors right there with the connectors that are... Oops.So you can see that connector where we get the signal focuses. Right there, the black connector, and then the blue wire, which is up a little bit higher. That connector also. The way those connectors come off is there's a little tab on them. You push it in which unhooks and then you could pull it off. They're a little bit difficult to pull off, especially this one, because the tab is on the top and it's hard to push the tab and grab onto it and pull it off together.On the back, you have those two brackets or connectors that you just loosen up. Those take 15-millimeter socket to take those off. The bolts in the front take a 17-millimeter. Those have also been loosened up several times when we put on the pipe bomb exhaust system that's currently on it. So those are loose, so I didn't have to use penetrating oil on those. And you can see this is the, I think...i believe this is called the mixed HX pipe or something like that that is the stock pipe on the car. It's a 2.25-inch exhaust system and the new system is a 2.5-inch.So we are going to...I'm gonna start by taking out all the oxygen sensors so they don't get in the way and then I'll take the bolts off. Should go pretty quick. For taking off the oxygen, well, first I'm gonna unplug all the oxygen sensors so I don't twist up the cables. So you push this tab, push this tab, and then you pull them. This is a little tight. You want to make sure the transmission is cooled down or you'll burn your hand.So we've got that one. And then I am using a 7/8 open-end wrench, and I pre-loosen these guys up to that. Because they were seized in, I used the penetrating oil to get them so that they broke loose. And now the front. Oops. Exhaust is still a little hot. Ouch. Should have had this thing cooled down more. That one's too hot to deal with right now. I'm gonna do this other one instead for right now because the exhaust pipe is still too hot. This is what I gotta do this way. This one has the little clip on the top, so it's a lot harder to work on. There we go. Let's see if I can get this one off a little bit easier.Keep track of which one is the front one and which one is the back one because it appears that they are different. And they do have different connectors, so that should make it easier to determine if you forget which one is which. All right, so let's go back. We're gonna loosen up the back ones. Those take a 15-millimeter socket. To do these front nuts, they're 17-millimeter. I've got two 10-inch extensions, and the front one has a semi-swivel head on the extension, which is very helpful. You can also use a universal joint if you don't have one of these. You can also do the other side.Okay. All the bolts are out of it. And I think there's... Are there any hooks on it? Doesn't look like it. So now we just need to pull this thing back. One's disconnected. They're pretty close. You have to reuse these clamps, so you need to take these off. There's a little clip or a nub right here that this clip is holding it on. So you have to lift over the top of that. I'm going to just use a screwdriver. [Inaudible 00:17:31] And now we can put the new exhaust system on.So we're gonna start by putting on the front section with the cat first because the back half has...is just hanging on the ground. And by putting the X-pipe on that, it's just going to hang down even worse. So I'm going to put this on. First, pretty straightforward, just put it up with your washers, regular flat washer, then a lock washer, and the nut.The oxygen sensor connections go on the inside. I'm gonna put the nut on this one end. There. Now I'll put the other one on first. Just trying to hold all three of these washer and both washers and the nut and keep the sink from sliding off the bolts is not the easiest thing to do. So I just put one of the nuts on to hold it in place. Come on. There we go. Now we can take this one back off.All right, now we're back in business. We're just going to leave these loose right at the moment. And now lets put these other ones on. All right, now we can go underneath and finish this up. So right here's the center. So this is where we wanna keep this thing halfway. Right there. And the center is right there. Okay. So this is on, that's on. Now we just need to tighten. I'm gonna tighten these up a little bit. Now I'm just trying to position this thing in the middle. These take 15-millimeter. It's not... 15-millimeter just like the back ones. We'll have to check the exhaust pipes to make sure they line up too.So these are only somewhat tightened up just so they don't move around too much. Make sure everything's aligned before you tighten everything down. We'll tighten the cats up all the way up here for the headers. So you don't wanna tighten these things down one side real tight away. You want to kind of go both ways in case the thing gets cocked on there so that way you can...it goes on straight. All right, that's tight enough for these. Let's get this other one. Make sure these things are sitting out here nice, little no exhaust leak.All right, now that this stuff all lined and pushed back up, tighten everything back down. All right, that's so good. We'll tighten these up before we pull hammer out. Now it's time to put oxygen sensors back in. So the one that happens to have the blue shrink wrap on it is the up upstream one. So I'm going to put that one in first because it's hard to get to. But one of the things I am going to do is put some anti-seize on it so that it's easier to take out the next time if I have to, or if they go bad. Doesn't take a lot.Plus, this stuff gets all over the place. Okay. Where are you? There is the bolt. This is a 7/8 wrench. Come on. There we go. Make sure you tighten up. And let's plug it in. It's hard to see up there because there's not a lot of room. And there it clicked in. Make sure the wires aren't touching anything. Those are good. Let's put back the downflow one on. This is the downflow one. That's good enough. This one's easy one. Threads aren't the greatest. There we go. That one's in. Now let's do the driver side.Justin: So, guys, wrapping this one up, if you are looking to uncork the exhaust on your '11 to '14 V6 Mustang while increasing the sound at the same time, then you have to check out this Catted Mid-Pipe here from BBK, available at americanmuscle.com.

      Product Information

      Features, Description, Reviews, Q&A, Specs & Installation

      Features & Specs

      • Improves Exhaust Flow and Sound
      • For Use with Shorty Headers or Stock Manifolds
      • High Flow Catalytic Converters Included
      • 2.5" Mandrel-Bent Aluminized Tubing
      • Fits All 2011-2014 V6 Mustangs

      Description

      Increases Overall Performance. Add even more horsepower and torque to the rear wheels of your 3.7L V6 Pony by replacing those restrictive factory cats with a brand new BBK Catted X-Pipe that features high-flow catalytic converters. A BBK catted X-Pipe will significantly improve your pony's exhaust flow to increase overall performance.

      Race Car Growl. This free flowing BBK x-pipe for the 3.7L V6 Mustangs not only increases power, but it also adds a crisp raspy, race car growl to the sound of your exhaust with its modern "X" crossover pipe design.

      Durable Construction. BBK's X-Pipes use a free-flowing 2-1/2" diameter CNC mandrel bent aluminized steel tubing and a merged X crossover to improve flow. This X-Pipe features High flow catalytic converters to provide a significant horsepower increase over the restrictive stock cats.

      Application. This BBK Performance Catted X-Pipe is designed to be a direct bolt-on for the 2011-2014 3.7L V6 Mustangs with either aftermarket short tube headers or the factory manifolds installed.

      Please Note. Stock 2011 V6 Mustangs come stock with a Mid Pipe that resembles both the H-Pipe and X-Pipe designs. This hybrid Mid Pipe was created by Ford to help add additional power and sound to the V6 straight out of the factory. This BBK aftermarket X-Pipe will further help you reach maximum air-flow equaling additional power.

      Fitment:

      Details

      BBK 1814

      CA Residents: WARNING: Cancer and Reproductive Harm - www.P65Warnings.ca.gov

      Installation & What's in the Box

      Installation Info

      What's in the Box

      • (1) Catted X-pipe

      4.6

      Customer Reviews (422)

        Questions & Answers

        10 More Questions

        Will It Fit My Mustang

            Related Mustang Categories