 FREE 1 to 3-Day Delivery on Orders $119+ Details
Best Sellers


How to Install a CDC Shaker System on your 2005-2009 Mustang V6
Installation Time
1 days
Tools Required
- Masking Tape
- Center Punch
- Drill and sharp drill bits
- Sabre Saw with fine tooth metal blade
- Hobby knife / Utility knife
- Rivet gun
- Fine grit sandpaper (120 recommended)
- Socket set with drive extension
- Drop cloth
- 5/32" Allen wrench
Shop Parts in this Guide
Installation
1. Purpose of the kit
This kit is a ‘cold air shaker intake hood scoop’ kit. As a multi-purpose kit, it does a number of functions. Some are strictly for looks, but others are for performance reasons.
For performance, this kit offers a less restrictive airflow than what would normally be pre-air filter box. Just by adding the kit you add additional airflow to the intake. Depending on other interactions, this may or may not be a limiting factor on your Mustang, however most stock 4.0L V6 Mustangs should benefit. If headers have been installed as well, it should certainly change the performance of the vehicle.
Also for performance, this kit brings ambient air to the intake. With stock configurations, intake manifold air temps can rise as the vehicle slows and the cooling system blows off excess heat by turning on the radiator fan. Without this kit the engines sucks in hot air, which can be 50 degrees or more above ambient.
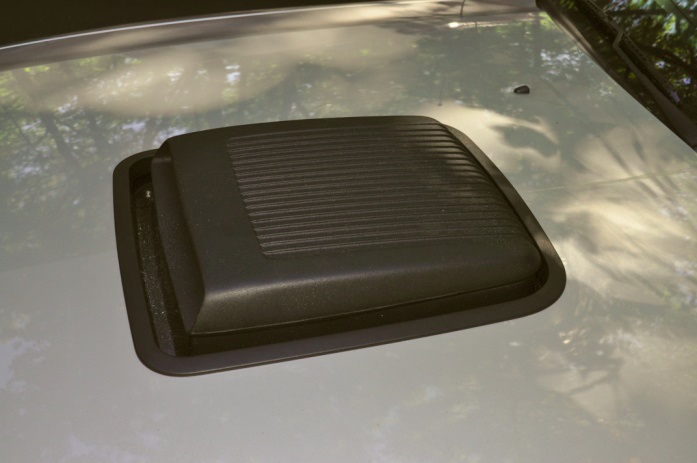
Strictly for looks, this kit brings to mind the hood scoops of the 60s. And being a ‘shaker’, the scoop move with the engine as it strains against the engine mounts.
2. Purpose
The purpose of this procedure is to provide an alternative installation manual to help individuals that are apprehensive about doing the installation themselves on their own vehicle. And to help fill in some of the blank spots left in the factory installation instructions.
This is NOT intended to be a replacement for the original factory install procedure, but rather another point of view to help clarify the factory procedure.
3. Parts of the process
There are a number of parts to the process of installing this kit, and I’ll break them down here before we start
- Move things out of the way
- Modify the air intake
- Cut the hood
- Mount the scoop
- Trim the hood
Moving things out of the way is mostly fairly simple, however the high voltage pack for the ignition system will need to be lowered. To do that involves cutting the bracket. Other things that need moved are pretty much just repositioning.
Modification of the air intake involves cutting a new hole in the air filter box and installing a new tube.
Cutting the hood is the most stressful part of the installation. This involves drilling, cutting, sanding, and manipulating the hood and thermal blanket. While there is little room for error, it’s not as difficult as it sounds, and hopefully the pics in this procedure will help.
Mounting of the scoop is fairly straightforward, but there are a few things to watch for.
Final trim is what makes your installation look sharp. It’s a fairly simple procedure, but you cannot cut corners if you want it to come out right.
4. Tools needed for this install
There are certain tools that you will need for this job. Some tools just make the job easier. Others make it possible. Not having the right tool can make the difference in a job that looks like a hack instead of a job that looks factory designed. While some tools can be improvised, having the right tool for the job always helps. Here is a list of what you’ll need. But remember, this is a recommended list, not a required list. Also, some additional tools may be required based on considerations of what is actually in your vehicle.
See above for tools required.
5. Cautions and Caveats
As can be imagined, there are a lot of cautions and caveats in this process. Most are common sense, but listing them here should just make sure they are remembered.
Always use eye protection when appropriate. That means anytime something could get into or near your eyes. While cutting is obvious, but also while doing sanding or working with chemicals.
Measure twice, cut once. You are cutting your HOOD!! Don’t rush and make a mistake. Replacement hoods are expensive. Measure again and again to make SURE you have it right. Then sit back, look at what you’re about to do, and make sure it’s appropriate and looks right. If in doubt, back off and take a break, then look again.
Keep metal parts from flying everywhere when cutting. Put a tarp or blanket on the engine if you are cutting the hood while still on the vehicle.
Make sure of what you’re cutting! This sounds simple, but if you just start cutting the hood and don’t take into consideration how deep the blade can go, you can end up with a seriously damaged intake manifold housing, or cut plug wires, or… The list can get long and expensive!
6. Getting Started – Moving things that are in the way
While the original manual suggest cutting the hood as the first step, I found it a lot less intimidating to do other things first. Make sure they fit, and then cut the hood. That means the first thing I did was get things out of the way.
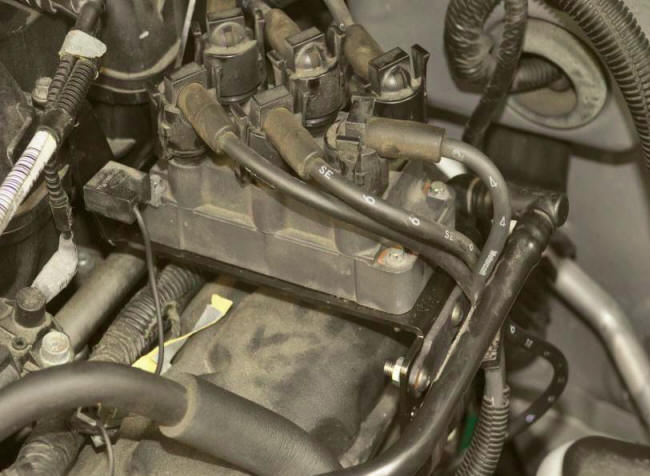
Moving the coil pack.
Moving the coil pack involves lowering it by about an inch. The bracket that holds the coil pack is a ‘stepped’ metal frame. To lower the pack you need to cut the old frame into two pieces then bolt on a new piece that acts as the coil pack base to the original lower leg.
Remove the 4 coil pack bolts from the coil pack. These should be 7mm bolts. Lift the pack up off the bracket. Use a screwdriver to carefully pop the wire holders where they snap into the bracket and behind the intake manifold.
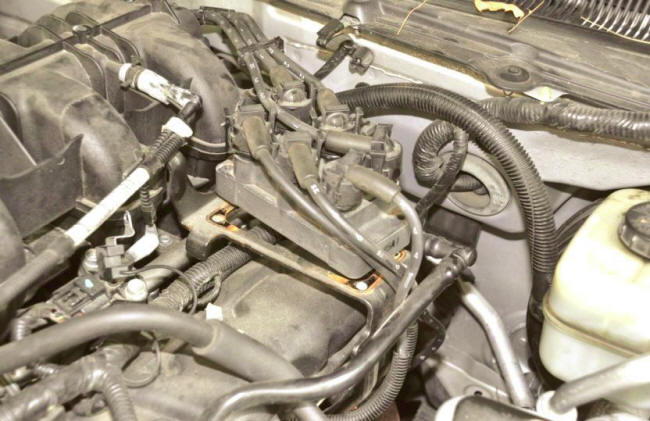
You need to swing the evac hose, pictured above against the HV wires, out of the way. I found it easiest to disconnect the hose at the OTHER end and just swing it up out of the way.
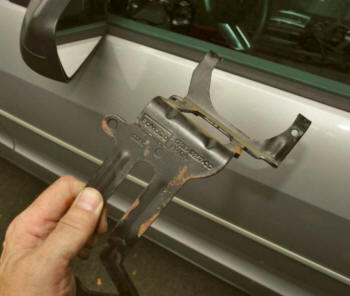
Once the coil pack is off the bracket, remove the 2 8mm bolts holding the bracket to the top of the intake manifold. Then remove the two bolts that hold the bracket down by the exhaust. These may be 10mm and 15mm on a stock engine, but may be other sizes (13mm) if you have had headers previously installed.
With the bracket removed, you can see the Ford name in the rectangle stamped on the bracket. Scratch a line across the bracket even with the bottom of the rectangle and cut the bracket in two. After cutting you may want to clean up the edge a bit and spray it with black paint. The bracket should look like this after cutting
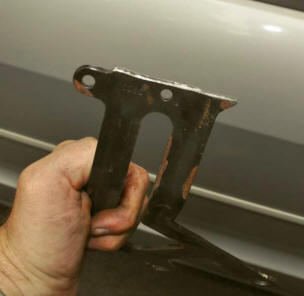
One the bracket is cut, mount the supplied piece to the bracket with the button head screws and flange nuts. Put the bracket together loosely and attach it to the engine, THEN tighten up the screws. Use a 5/32” Allen tool and a 7/16” wrench on the new bolts. The shelf for the coil pack should now be sitting about an inch lower.
Do NOT forget to hook the coil pack ground connection back up are the front left bolt as viewed above or you risk destruction of electronics!
Reconnect the evac hose that you swung out of the way.
When you are done, the installation should look something like the next photo. Notice that I swung the HV lead for #3 to the right to allow for the HV wires to be more easily tucked behind the intake manifold instead of going over the top.
Moving wires and pipes
Note that the high voltage wires will have to be repositioned slightly, so as to be out of the way between the intake manifold and the firewall, NOT over the top of the engine.
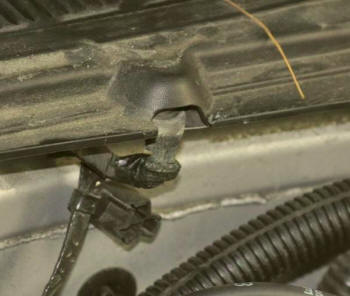
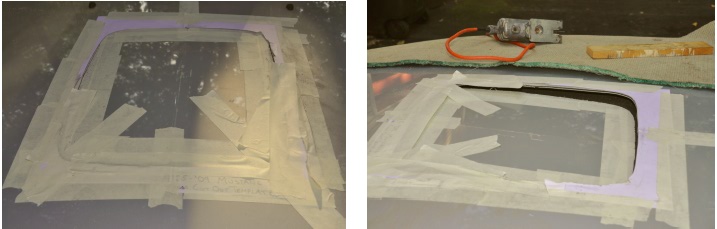
The wires on the firewall that are attached at the top edge behind the motor need to have the mounts all ‘bent down’ so as to be out of the way of the shroud, as in the left photo below.
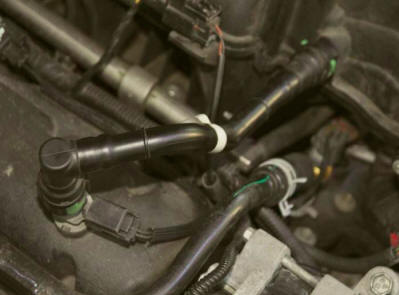
The tube on the right side valve cover needs moved slightly. Loosen the fittings as much as possible and turn the fitting that goes into the valve cover so as to come off slightly to the right instead of straight up. It won’t move far, but it doesn’t need to, as in the right photo.
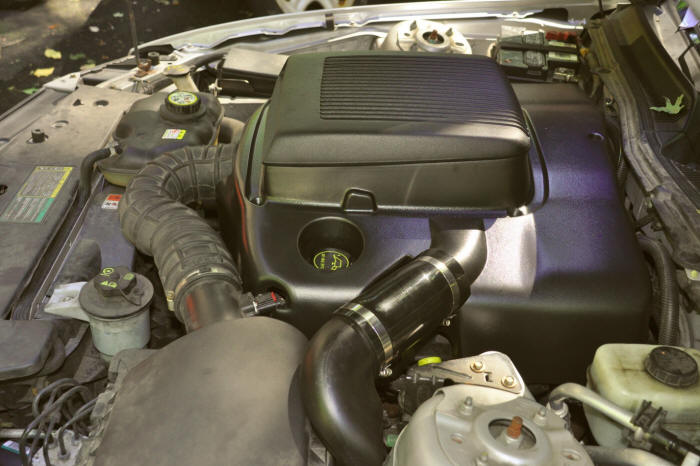
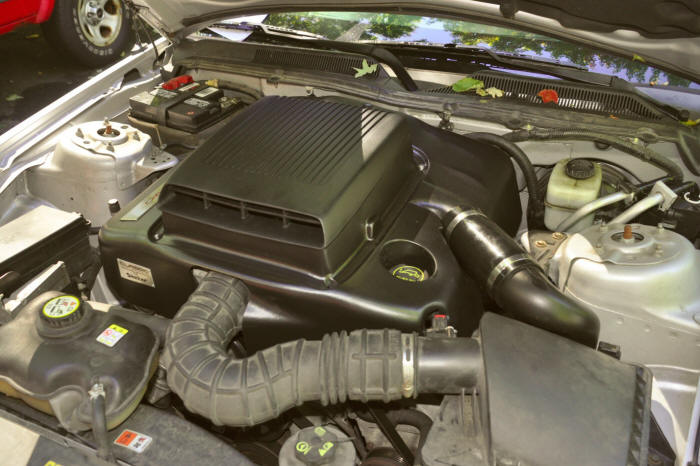
7. Modify the Air Intake
The air intake obviously needs modified, as that is what this whole kit is about. This involves removing the air cleaner box, cutting a hole, snapping in a new feed attachment, and reinstalling it. This is fairly simple, but again, care should be taken to position the modification correctly. Measure twice, cut once.
It’s easiest if the whole box is removed. Carefully unplug the MAF sensor at the connection in the big pipe by the air box. Be careful not to damage the connector or loose the red lock piece. Disconnect the pipe with an 8mm socket at the clamp. Unsnap and life off the air cleaner box top and set it aside. Use a 10mm socket to unbolt the lower box assembly. The bolt is between the box and the fender.
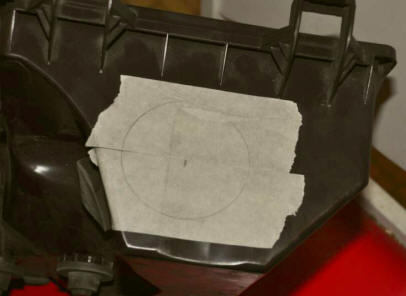
On the back page of the factory instructions, there is a template. This can be taped over the air box and then transferred to the box. Alternatively, you can use the template to position the ‘center point’ with the cross, then scribe a circle on the box.
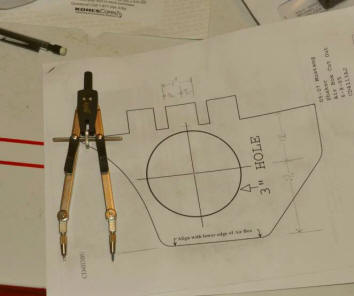
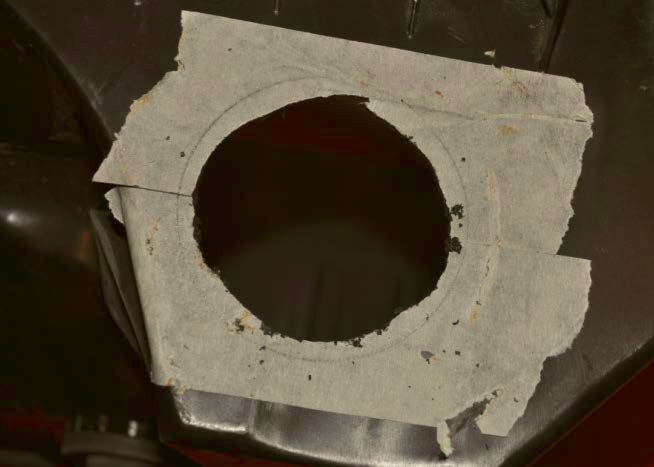
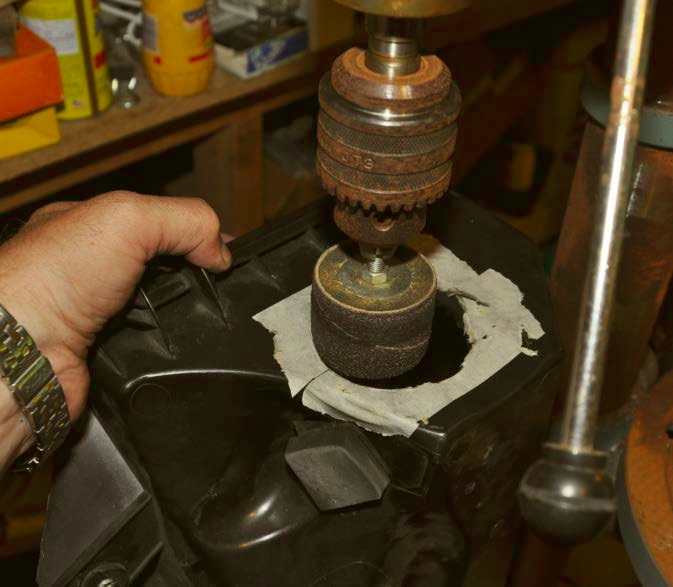
Once you have the positioned accurately marked, cut it out. A hole saw would normally seem to be the best, but if it cuts any bigger than 3” exactly, the new tube will not snap in place correctly. The manual suggest cutting a smaller hole and then filing. This is essentially how I did it. I cut the main hole then used a sanding drum on my drill press to enlarge it, very carefully, a little at a time. Once the hole was the right size, I realized that there was ‘ribbing’ on the inside of the air box that interfered with the air tube snapping properly in place and I had to sand that flush to make it fit properly as well. When done, the new air tube should snap and stay in place and come out towards the top.
Reinstall the air box into the vehicle, snap on the air filter cover, and hook up the tube at the MAF sensor. You do NOT need to hook the MAF sensor up yet, unless you plan to drive the vehicle. (Which is possible at this point.)
8. Cutting the Hood
This is the most critical portion of installing the kit, and the scariest. Measure twice, cut once. Heck, measure 10 times before you cut!
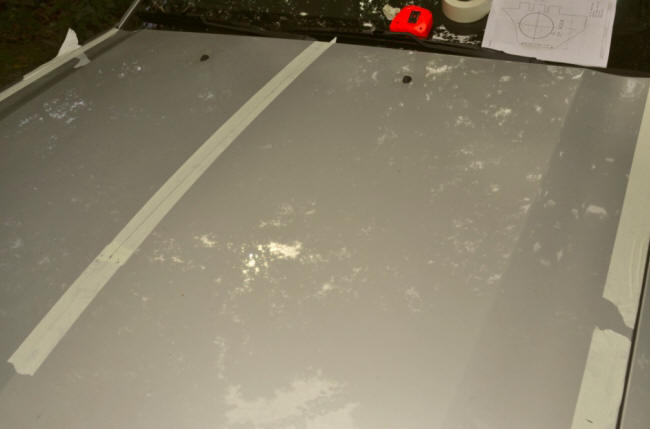
The first thing that needs to be done is to find the exact centerline of the hood. I put a piece of tape down the approximate center of the hood and down each edge. I then measured 7” from the rear corners on each side. From there I measured across the hood and marked 29-1/2” from each side. The marks should be about ¼” apart. I then measured to the exact center between the two marks. I then measured 38” from the rear on each side of the hood, then measured 28-1/2” inch from each side toward the centerline. Again, the marks were about ¼” apart. I centered a mark. Now I have two points on the centerline. I drew a line down the center to give me the overall hood centerline.
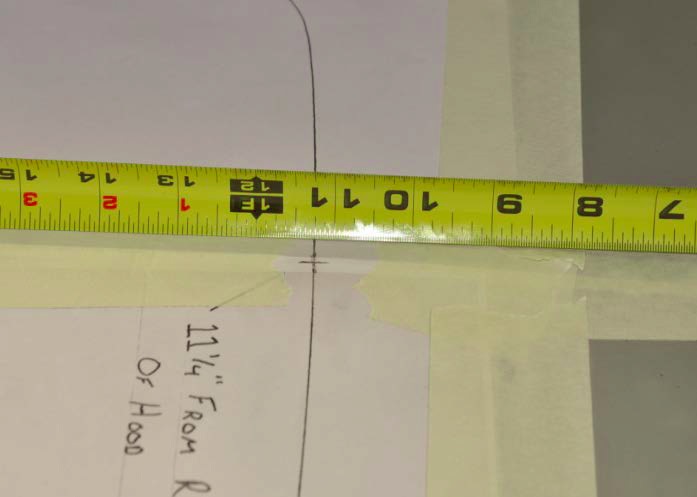
Then I measured along the centerline from the rear edge of the hood at the windshield and marked 11-1/4”. This measurement is VERY critical, as this sets the clearance to the back of the scoop as it sticks up through the hood and lets the hood clear the scoop when the hood is opened.
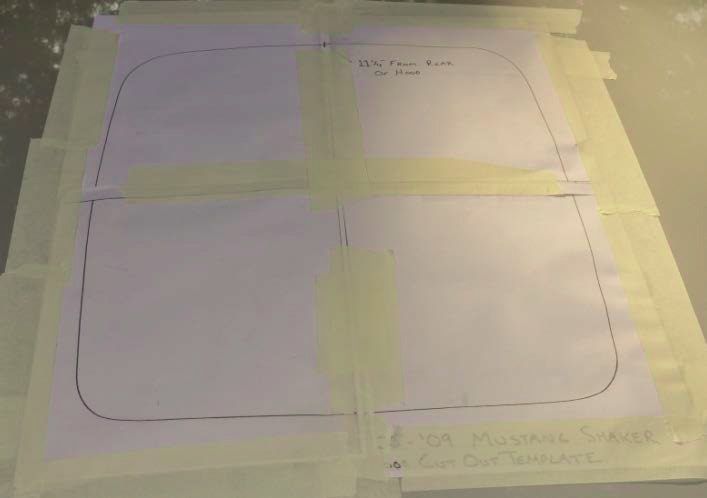
Here the instructions say to cover the entire scoop area with tape and then tape the template to the hood. In my case, I elected to NOT use the original template, but instead used a copy machine to copy the original template onto 4 separate sheets of paper. I then placed each of the sheets on the hood in the position indicated.
Folding up the paper, I placed wide masking tape on the hood to make sure I would be cutting tape underneath the outline on the template.
I verified the position of the copy with the original by doing multiple measurements of where the lines and edges were. This was strictly for my benefit of not destroying the original template, and double-checked the offset from the rear of the hood at 11-1/4”.
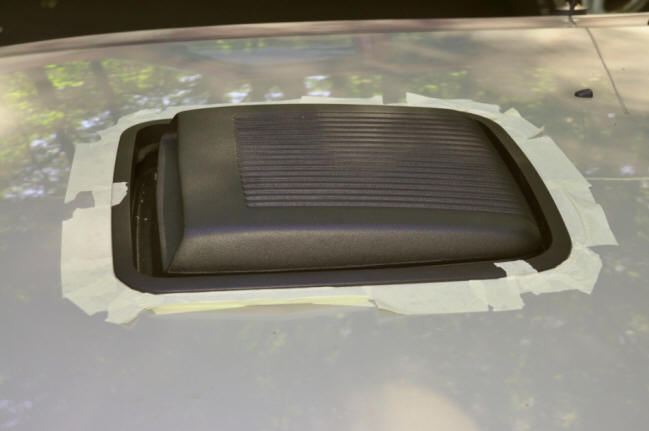
Once I was sure it was positioned correctly, I carefully traced the outline using a utility knife, tracing the outline multiple times to make sure I was through the paper, tape, clearcoat, and paint. You want to cut down to the metal to make sure that sawing will not cause paint to chip outside the coverage area of the trim ring.
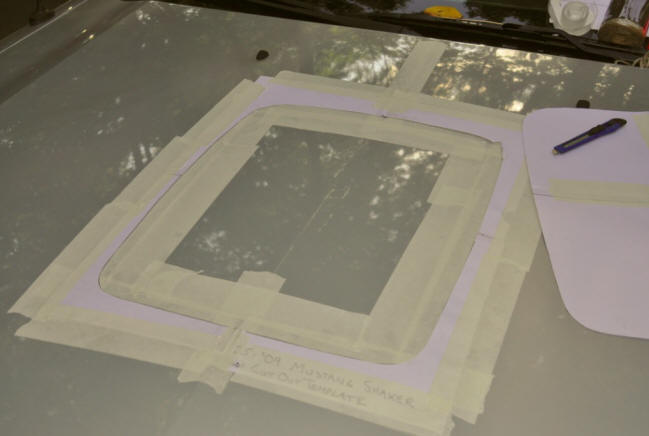
You can see how I put plenty of tape down.
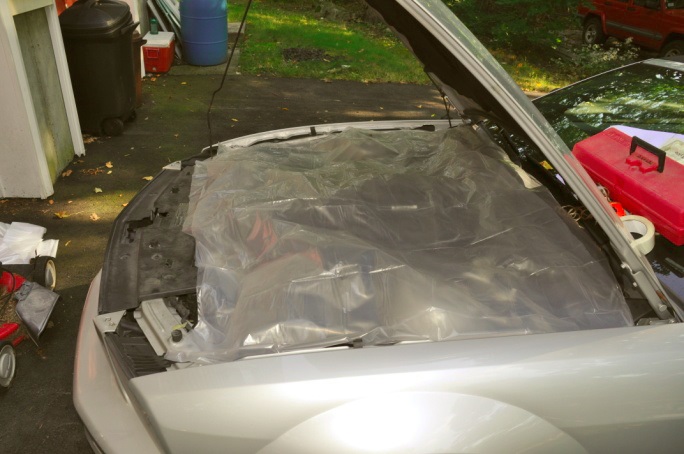
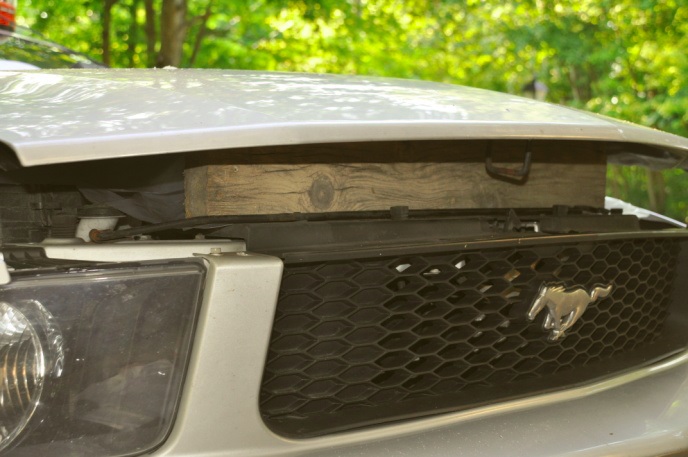
Before you start to cut, you need to protect the engine. I used two layers of 3mil painter drop plastic, draped over the engine. And since I left the hood on the vehicle, I used a 2x6 piece of wood on edge to prop the hood open for extra clearance from the blade to intake manifold.
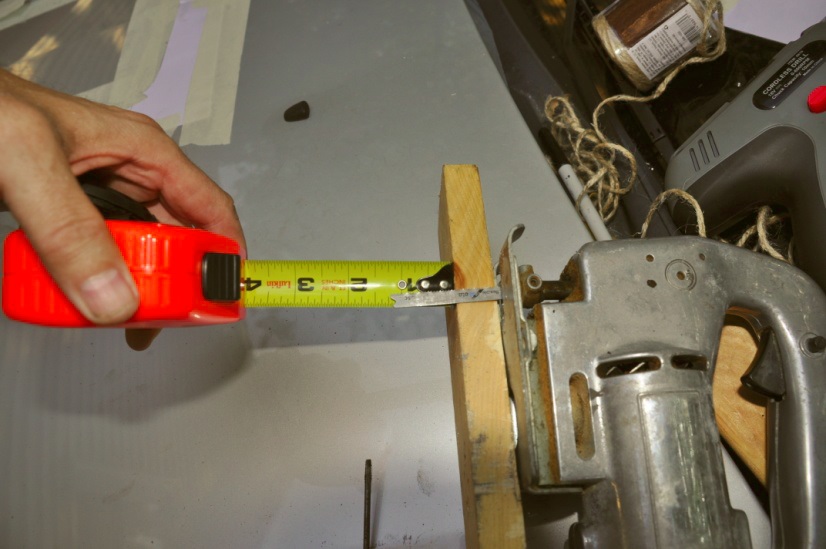
The original instructions recommend removing the thermal blanket from the underside of the hood, but I didn’t have access to a fork tool and elected to just cut from the top. I used a hand electric sabre saw with a fine pitch 24tpi (tooth per inch) metal blade. I also used a piece of wood furring strip to offset the sabre saw so at to limit the penetration of the blade below the hood.
Drill a ¼” or larger hole inside the cutout area to start the blade and then carefully follow the template marking for 1 side only. Once you cut one edge, use tape over the cut to make sure the metal cannot ‘flop around’ as you cut. Carefully cut the second edge and then again use tape to stabilize the cutout. If the panel flops around from cutting, it could dent the hood or chip the paint.
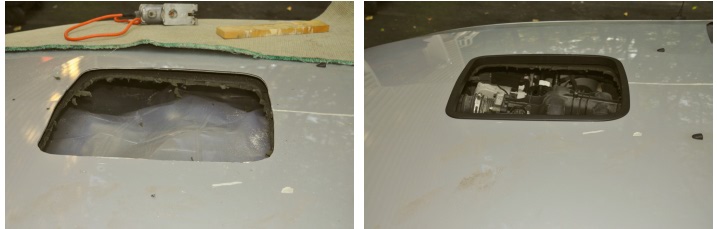
Make sure your cut has clean edges. Use your utility knife to trim the thermal blanket, angling the utility knife so that you cut the opening in the thermal blanket slightly larger than the opening in the metal by about ¼” or less. Then drop in the trim ring to make sure it fits. Once it fits, open the hood and carefully vacuum up any metal filings from the edge of the thermal blanket. Finally, remove your tarp without spilling the metal filings onto the engine.
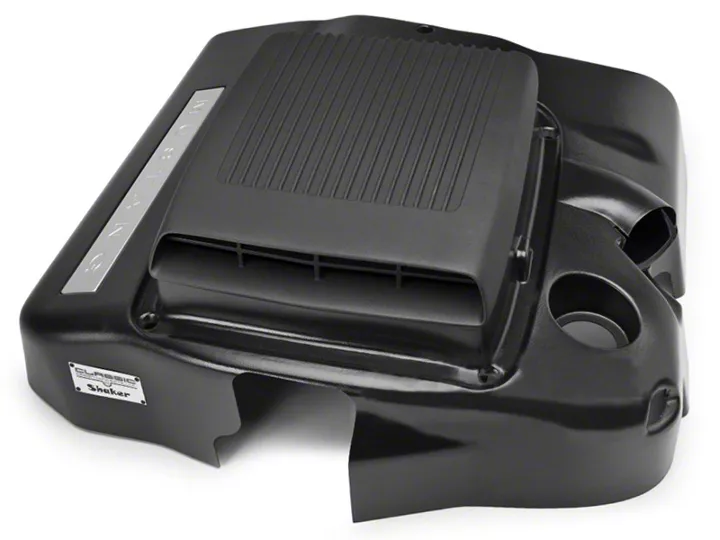
9. Mounting the Scoop
Now is the time to actually mount the scoop on the engine!
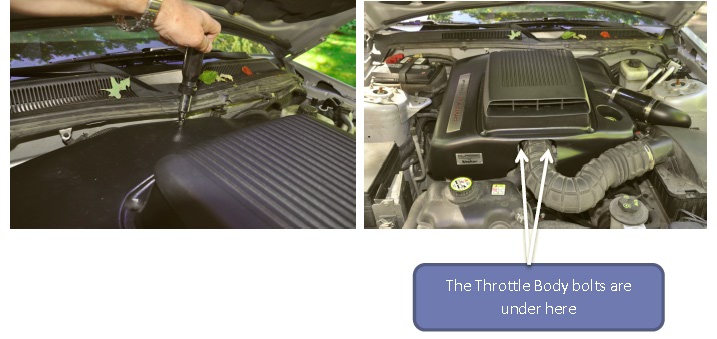
Look at the underside of the scoop and notice that on the bottom of the shroud of the shaker box, there is a metal bracket towards the front. This will fasten to the throttle body using the top two bolts. At the rear of the shroud there is a recessed hole. You will be inserting a bolt through that hole that will go into a small metal 'D' shaped insert. This insert will slip into the cavity on the top of the intake manifold near the rear on the top.
First place the small metal insert into the cavity on the rear of the intake manifold. Insert the curved edge first with the threaded hole straight up so that a bolt can be inserted from the top. Gently tap the insert so that it is fully seated into the cavity and the threaded hole is visible through the hole.
Now remove the top two 8mm bolts that hold the throttle body to the engine.
Feed the wiring harness that attaches to the MAF sensor in the air line near the air filter box through the opening of the shroud and place the shaker box onto the top of the engine. Carefully position it so that you can see the silver of the metal insert in the manifold through the hole at the rear. Now slide the shroud back and forth left to right slightly to make sure it is positioned on the throttle body plate. Once it's in position, insert the small bolt that came with the kit into the hole to mate with the insert you placed at the back of the engine. Give a few turns with a 5/32” hex key to make sure the bolt is in the threads and cannot come loose but DO NOT TIGHTEN it down, as shown in the left photo. The shroud needs to move.
Press down hard on the rubber air intake tube from the air cleaner box where it goes under the shroud to get it out of the way, and using an 8mm socket on an extension bar, start the bolt on the RIGHT side of the throttle body. Once it takes to the threads, turn it a few more turns but make sure the shroud stays loose. Now do the same to the bolt on the left side.
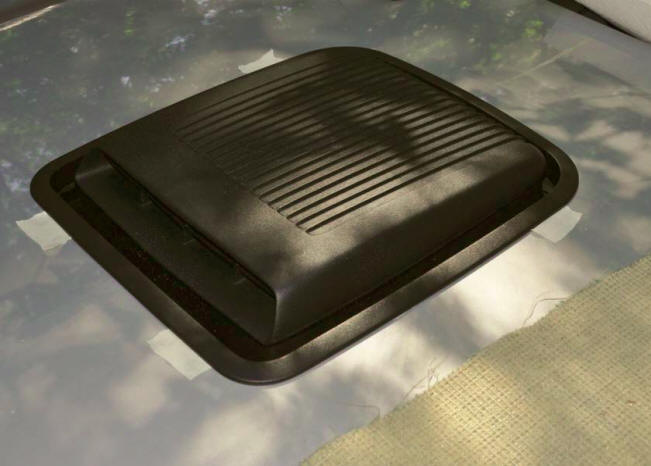
Carefully close the hood and make sure the scoop centers properly and shift the scoop so that it is in-line with the vehicle, and not pointing left or right. Now is the time to make sure it is straight. Once it's in position, open the hood and tighten things down, starting at the rear. When you tighten the front bolts, gently press down on the shroud to make sure the tolerances in the holes keep the scoop level and not 'tipped' to one side. Once it is all tightened down, gently close the hood and make sure the position of scoop is still centered in your opening and inline front to back, not pointing to the side.
Close the hood again and drop in the trim ring to check for fit. You should be able to position the ring so that gaps are similar left and right and the trim ring covers any chips or mars in the hood finish.
At this time you can hook up the air tube to the shroud and connect it to the air box with the two hose clamps. The tube is fairly soft rubber, so it should slip on easily. Just to make the installation look clean and neat, position the screws on the clamps on the BOTTOM out of sight. It's a little tougher to tighten, but it makes the installation work look a lot cleaner.
Hint... When doing the bolts to the throttle body, it is a tight fit. The bolts will be slightly 'behind' the air tube, so it will have to be pressed out of the way. A 1/4" drive socket with a long extension will give you the best clearance and make the job easiest. Using any socket with an 'adapter' to a different size extension will put the adapter against the air tube and be hard to work around, but it can still be done.
10. Trim the Hood
The last step is to trim the hood by mounting the trim rings.
Close the hood and set the top trim ring in place, putting the 'dent' on the bottom towards the windshield. There is a front and a back to the ring, and the bottom that is not 'straight' needs to go to towards the windshield. With the hood open, snap in the trim ring bottom piece. This is not permanent, but just a check to make sure the insulation mat and the hole are correct and there won't be fitting problems later. Carefully let the hood down and make sure everything will go where you need it to go. You should be able to slide the ring around about 1/4" inch or less. If not, or it's a tight fit, you may have to trim out your cut on the hood, or the thermal blanket.
Now remove the bottom ring and carefully shut the hood. Position the top ring so that it has the best 'coverage' of any nicks or otherwise perfect cuts in the hood. Look for equal and straight spacing on both the left side and right side of the scoop... Position the ring forward and backward until you have a good fit. If anything, the trim ring around the scoop can be slightly 'forward' of being centered, as the hood will rise slightly to the rear as it is opened.
Once the ring is in position, use a couple of pieces of masking tape to hold it in position and carefully open the hood to make sure there are no issues underneath. Carefully shut the hood and latch it.
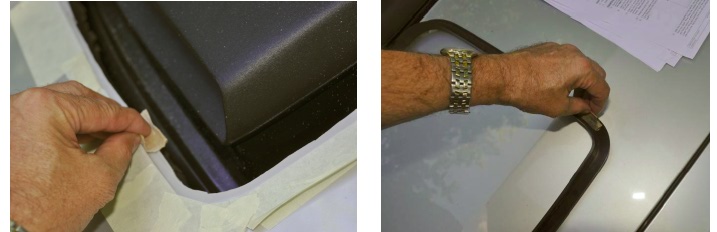
Now you need to place an 'outline' of tape around the trim ring. Carefully put down masking tape as if you were masking the trim ring to paint it and not get paint on the hood. You want a tape outline that exactly follows the trim ring. There should be no gaps of hood visible between the trim ring and the tape. This means you could actually put the tape SLIGHTLY under the edge of the trim ring, but no more than 1/16"!!
Once the trim ring is outlined, carefully remove the tape holding the trim ring in position and finish the outline in the areas previously covered by the hold-down tape. Once you are satisfied, gently lift out the ring and make sure your 'tape outline' on the hood is complete with no gaps.
Take a 2" x 4" piece of 180 or finer sandpaper and fold it so that it's easy to handle. Carefully sand the surface of the hood that would be UNDER the trim ring. Be careful while sanding not to 'roll up' the tape and accidently scratch the hood where it could be seen. You don't need to sand to metal or even primer. You just need to put a nice satin surface on the paint for the adhesive used later to be able to really grab on.
Invert the trim ring and sand the underside that will be out of sight. It is not necessary to sand the 'lip'. You want to sand the flat area under the trim ring, specifically toward the lip on the edge. Shortly you will be placing a tape in the flat groove.
Once everything is 'roughed up', take a cotton or other lint free towel (a 'shop rag' is fine) and moisten it with alcohol. You can use the alcohol wipe with isopropanol provided in the kit, or you can use denatured alcohol that you can get at most hardware and paint stores. If you buy isopropanol, make sure it has low water content. Wipe the surface of the hood where you sanded to remove all the dust and contaminants. Also wipe the area of the trim ring that you sanded. Wait for it to dry and DO NOT TOUCH IT!! You do not want to get oil from your fingerprints on the surfaces. Don't soak anything with alcohol. You want to do a 'damp wipe' and it should dry in seconds.
In the kit with your scoop, there is a package of 'activator'. This is a nasty mix of chemicals that will 'sensitize' anything it touches with a corresponding chemical for the adhesive on the tape and pretty much bond instantly to it, making it impossible to remove. CAREFULLY tear open the pack and remove the small sponge soaked in the activator compound. Give a single wipe on the hood area you sanded to coat it from the sponge. Now pick up the trim ring and also give a wipe to the area that you sanded and then cleaned. Be careful not to touch anything where you placed the activator compound.
Set the trim ring aside, wrap the wipe in a paper towel to toss in the trash, and go wash your hands while it dries!
At this point, remove most of the masking tape on the hood, but leave a few small pieces to show where the ring needs to mount. I left a small piece on each side towards the back edge and two on the front edge, as shown in the pictures below.
Before you start the next step, realize that the trim ring is 'sensitized' with the glue accelerant. Touching that surface with the tape means it will stay there. PERIOD! No, you CANNOT pull it off and reposition it. Touch it and it stays, like the guy in the commercial that glues his hard hat to the I-beam and then hangs from it. BE VERY CAREFUL in the next few steps!!!
Take the rubberized tape provided in your kit and unroll about 3 inches or so. DO NOT REMOVE THE RED TAPE!! Try to limit your touching of the sticky surface as you unwind it. Begin placing the tape 'in the groove' on the bottom of the trim ring that you sanded, cleaned, and sensitized, keeping the red tape UP so as to protect the top edge. START AT THE BACK OF THE RING, preferably near the center of the back edge. There will always be a slight gap in the tape, and you don't want the opening to be at the leading edge! When you place the tape, keep it as CLOSE TO THE EDGE AS POSSIBLE without getting 'on top' of the lip. This will mean it will be about at the same height as the lip, but that is ok.
Do NOT try to position the tape towards the center of the trim ring, always place it as tight as possible to the edge!! Do NOT try to 'stretch' the tape to make it fit. That will 'thin out' the tape and could lead to a poor strength bond. Be careful not to touch the sensitized area of the ring as you position the tape, and try to limit your touching of the sticky surface of the tape as you position it.
Once you get around the ring and back to the starting point, carefully cut the tape with a pair of scissors and try to get the tape to 'butt up' the start to the finish. Do NOT overlap the tape at all, as then the ring won't lay flat. If you accidently do overlap, you can use a razor blade to trim the tape as the piece on the top will not stick to the piece on the bottom due to the red tape.
Once the tape is totally in position, using a finger, slide it around the ring, pressing down slightly on the red tape to make sure the sticky underside bonds to the trim ring.
Now peel about 2" of the red tape up from both the start and finish of the tape ring. DO NOT TOUCH THE STICKY RUBBER SURFACE UNDER THE TAPE!!! Once you have these two 'pigtails', carefully set the trim ring over the cutout on the hood but keeping the BACK EDGE with the pigtails OFF THE SURFACE by an inch or so. Realize that if ring touches the hood where the red tape is peeled back, that's where it stays. There is NO WAY to remove it and reposition it without breaking it.
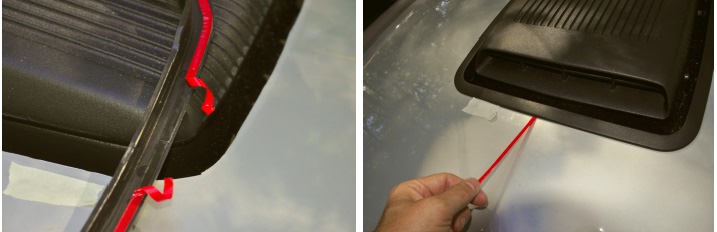
Keeping the back edge off the surface of the hood, carefully position the trim ring so that it centers on the tape still on the hood from when you sanded it. Once you are satisfied with its position, carefully let the back of the ring set down on the hood. Now, keeping the ring in position, carefully and slowly pull out the red tape from under the ring. As you pull the tape out, you can lightly touch down on the ring to 'set' it into position. Be careful in this step, as pulling too hard or fast on the tape can slightly 'warp' the ring and now the bottom ring will not snap into place correctly when you are done. And you absolutely do not want to break the tape! Once all the red tape is pulled out, run your thumb around the ring to press it down. Do it lightly at first so as to not distort it as areas make first contact, but then more firmly as you do it multiple times.
Once the ring is entirely in place, open the hood and snap the underside piece into position with the top ring to hold the insulation blanket in place. Shut the hood carefully and everything should be in the correct position.
Carefully peel up the last of the masking tape you used to outline the ring position.
Open the hood and install two pop-rivets in the two holes in the ring towards the windshield. This will insure that the two rings cannot separate under adverse conditions, such as winter weather with cold and ice.

110447 Install by AmericanMuscle Customer Mike Yetsko 10/22/2012
