 FREE 1 to 3-Day Delivery on Orders $119+ Details
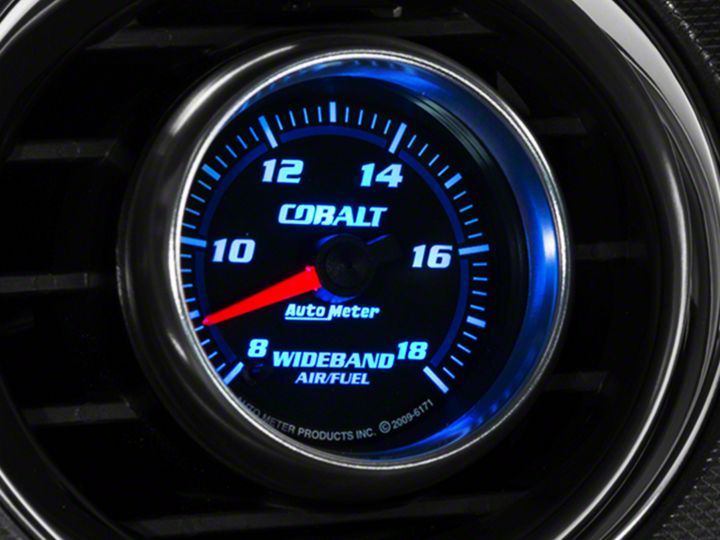
How to Install a Wideband Air/Fuel Ratio Gauge on your 1979-2014 Mustang
Installation Time
2 hours
Tools Required
- Ratchet T-15 Torx driver Wire strippers Solder (or crimp connectors) 7/8" wrench Razor knife Jack 2 jack stands 7mm socket 8mm socket Small flat-head screw driver
Shop Parts in this Guide
Installation
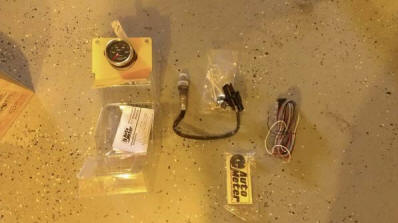
In the box:
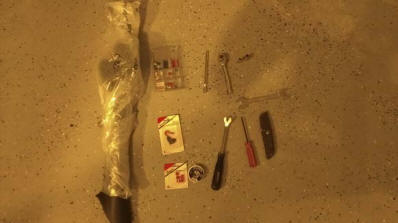
Tools and extra pieces needed:
Before you begin:
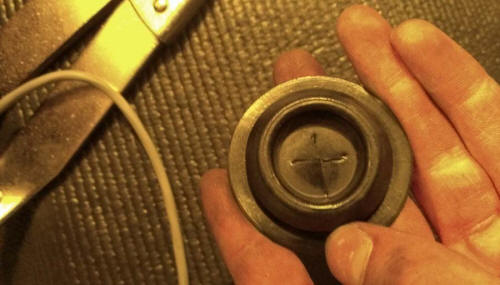
- Before you get your Air/Fuel gauge installation under way, you are going to need to weld on the included oxygen sensor bung, or have an exhaust shop do it for you.
- Auto Meter includes a plug for this bung, so you can have the bung welded on, then install the plug and drive your car safely, without an exhaust leak, until you are able to remove the plug, and then install the sensor.
- The bung needs to be welded as close to the headers as possible, in front of any catalytic converters, if your vehicle is equipped with them.
- For best results, weld the bung at least 10* above the middle of your exhaust pipe, to avoid from getting moister inside the exhaust on the Oxygen sensor.
Removal of stock trim pieces:
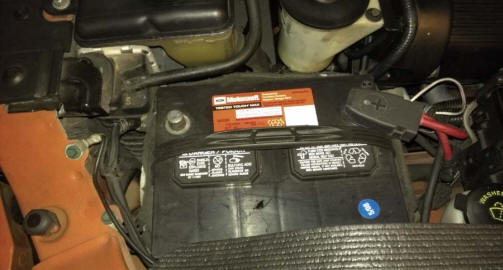
1. As when working with any project involving electronics, it is always a good idea to first disconnect the battery to protect both yourself and your car. Loosen the negative battery terminal with an 8mm socket, and hang it safely aside.
2. First locate and remove the (2) T-15 Torx screws on the top of the gauge bezel.
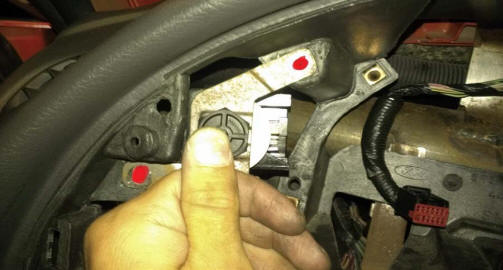
3. Now remove the headlight knob. There is a small clip in a grove on the back of the switch. Using the small flat-head screw driver, carefully disengage this clip and slide the switch off.
4. Remove the gauge bezel. Using the trim tool, or a large screw driver wrapped in fabric, carefully pry around the edges of the bezel until you can wiggle it free.
5. Remove the (4) T-15 Torx screws holding the instrument cluster in place.
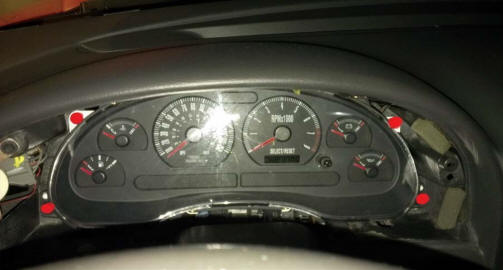
6. Carefully rotate the instrument cluster forward, and unplug the two connections in the back.
7. Remove the (2) 7mm screws holding the headlight switch in place, and unplug and remove the switch.
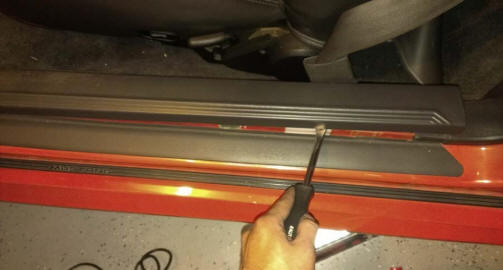
8. Turn your attention to the door sill plate. The trim tool, or screw driver comes in very handy here. Carefully go down the length of the piece prying upward on the clips that hold it to the body.
9. Next, remove the driver’s side kick panel. Using the trim tool, or a screw driver, first remove the plastic push pin holding the kick panel in place.
10. With the push pin removed, the kick panel can easily be removed by pulling outward, and towards the back of the car.
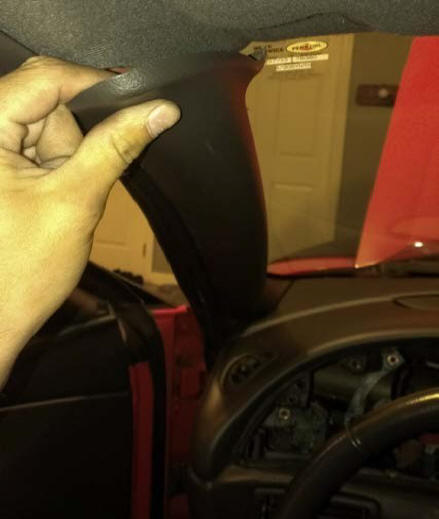
11. Remove the driver’s side A pillar. Using the trim tool, or screw driver, very carefully pry along the length of the trim piece, until the clips begin to release. I found it easiest to then use my finger tips to gently wiggle the piece out.
12. With your Mustang in gear, and the emergency brake engaged, jack up the front of the vehicle. Support it using at least (2) jack stands.
13. Make sure to use eye protection when working under the car to avoid debris falling into your eyes.
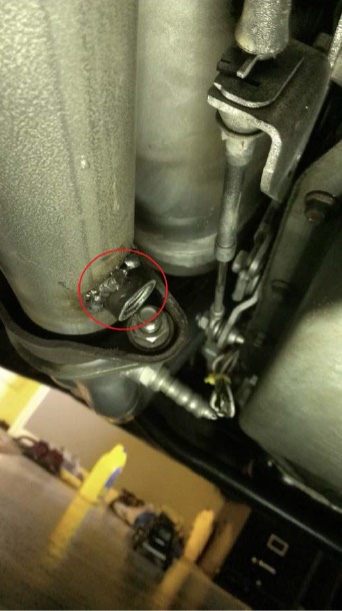
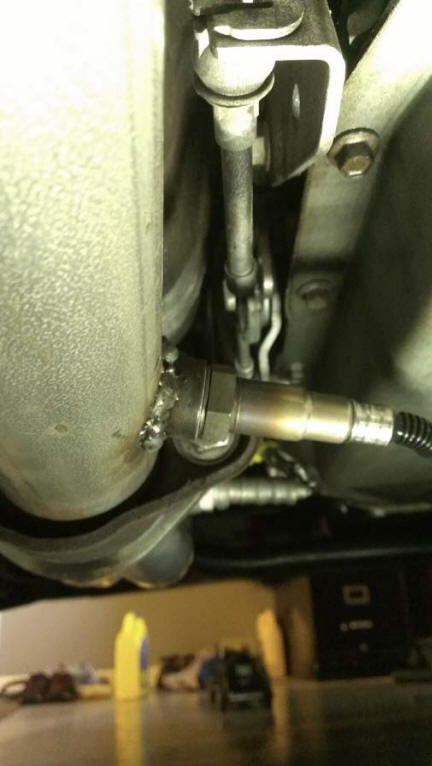
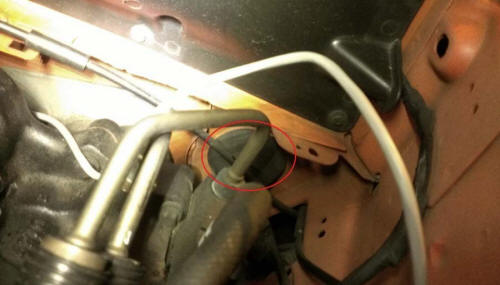
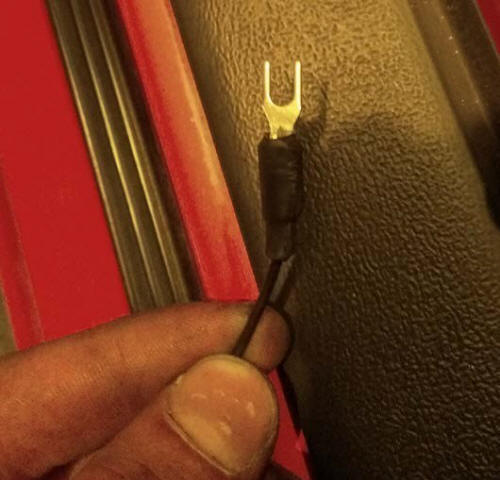
14. Crawl under the vehicle to the bung that you welded on your mid pipe. If you installed the threaded plug, remove it now.
15. Using the 7/8th wrench, install the Oxygen sensor included with your gauge kit.
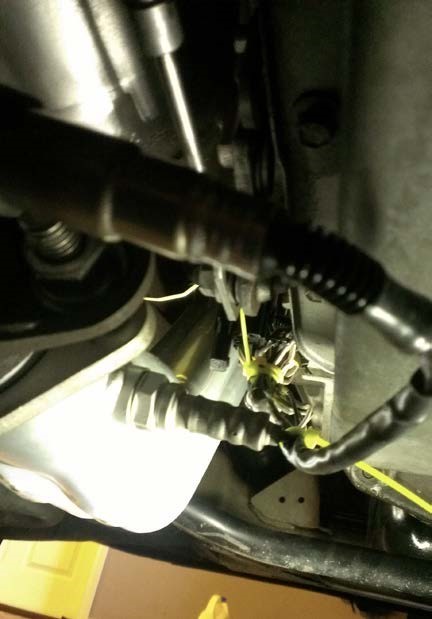
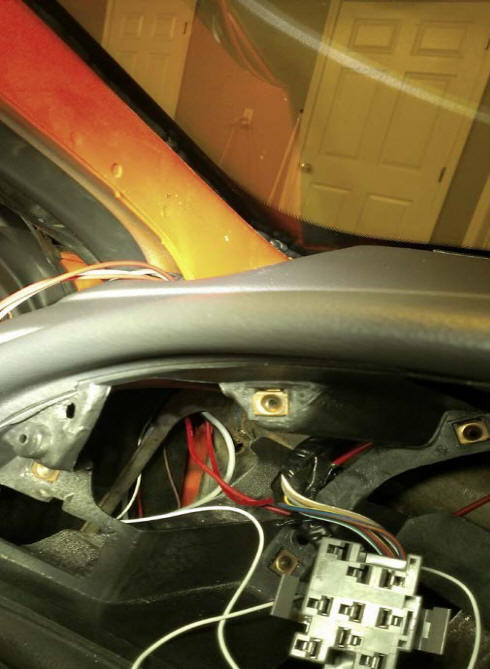
16. Make sure the wires are routed towards the front of the car.
17. Using zip ties, carefully secure the wire away from your exhaust system. I found that the factory Oxygen sensor wiring was a secure location to attach the wires to.
18. Moving back to the top of the vehicle, remove the wiring harness for the Air/Fuel gauge from the packaging.
19. Run these wires behind the driver’s side valve cover, down the back of the engine towards your exhaust system. Be very carefully to avoid parts that get hot. The goal is to get the wiring as flush with the firewall as possible.
20. Moving back under the vehicle, route the wiring away from the headers, and secure it with zip ties.
21. Connect the wiring from the gauge to the Oxygen sensor.
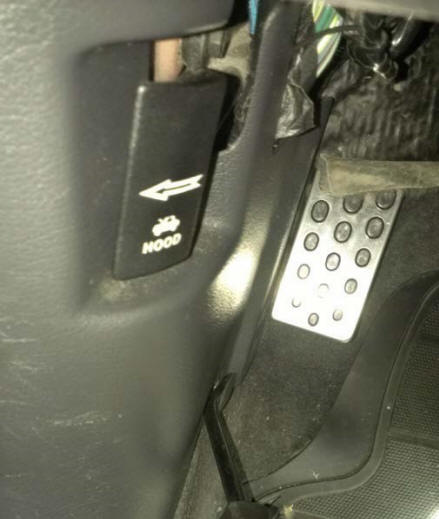
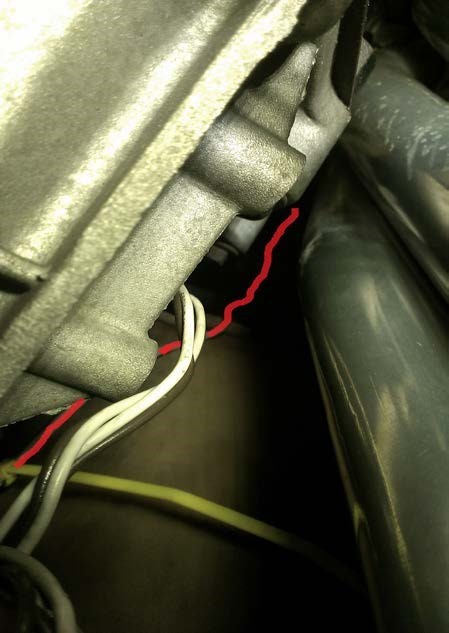
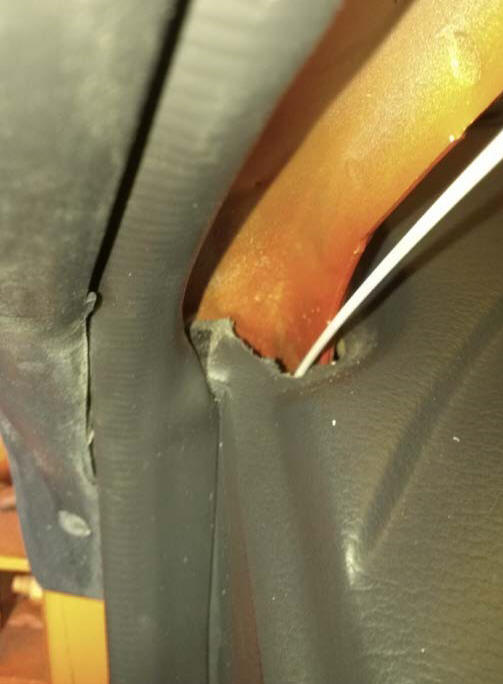
22. Going back under the hood, remove the grommet in the firewall, as shown.

23. NOTE: on some Mustangs, the clutch cable may not allow room for the Oxygen sensor wiring to pass through the grommet. Alternatively, you can use the grommet for the hood cable, shown below.
24. With the grommet removed, carefully cut an ‘X’ in the center of the grommet using the razor knife.
25. Route the wiring for the Air/Fuel gauge through the grommet, into the firewall, as shown.

26. Pull the excess wire inside the car, and secure the wiring under the hood with zip ties.
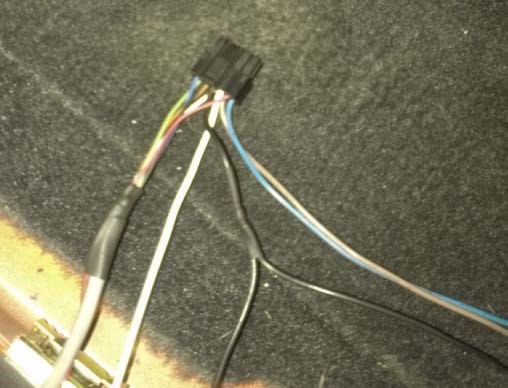
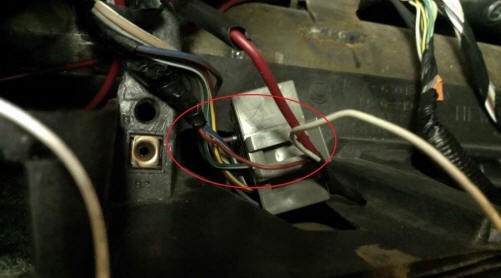
27. Moving inside the car, locate the male plug on the other end of the wiring.
28. Separate out the blue and one of the black wires. These are for data logging, and will not be used at this point in the installation.
29. The brown wire, which is a heater circuit bypass, will also not be used.
30. Take the black wire that you did not separate out from the harness, and crimp on the 22 gauge spade connector as shown.
31. Take the black wire that you did not separate out from the harness, and crimp on the 22 gauge spade connector as shown.
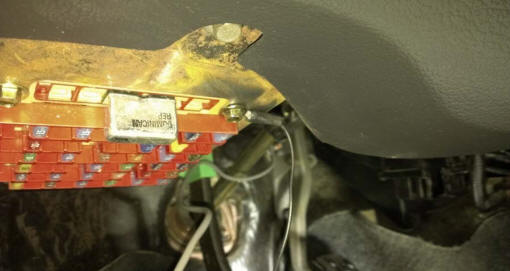
32. Moving under the dash, remove one of the 7mm screws holding on the fuse box, as shown.

33. With the screw removed, use sand paper to clean the metal surface of any rust or debris.
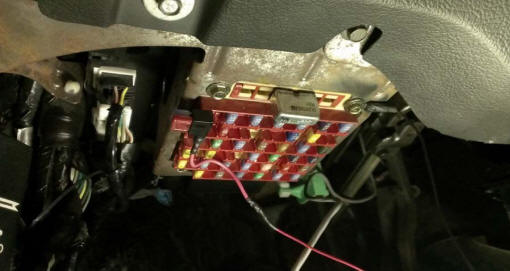
34. Install the spade connector attached to the black wire coming from the Air/Fuel gauge wiring harness and the 7mm screw.
35. Take the red wire from the Air/Fuel gauge wiring, and install (1) 10amp fuse into the add-a-circuit.
36. Remove fuse number 5 from the fuse box, and put this into the other slot in the add-a-circuit.
37. Plug the add-a-circuit into the number 5 fuse slot as shown.
38. Moving to the top side of the dash, carefully snake a straightened coat hanger, or stiff piece of wire down through the hole that was covered by the A pillar, into the kick panel area.
39. NOTE: In some cases, it may be necessary to use a small file or Dremel tool to slightly elongate the hole covered by the A pillar. This will be totally invisible with the A pillar reinstalled.
40. With the coat hanger, or wire, through the dash, tape the end to the plug from your Air/Fuel gauge wiring harness. Then pull the wire back up through the dash. Be very patient when doing this step, as to not damage the wiring harness.
41. With the wiring harness pulled through the dash, look through the hole left by the factory instrument cluster, and pull the white wire through as shown.
42. Looking at the back of the headlight switch, carefully strip a small section insulation off of the blue/white dimmer wire, and attach the white wire from your gauge harness as shown. This is will allow your Air/Fuel gauge to turn light up and dim with your instrument cluster.
43. NOTE: I first spliced in a small piece of red wire to my blue/white dimmer wire, in order to make it easier to install other accessories in the future. I then attached the white wire. This step is completely optional.
44. With the wires spliced together, secure the connection with shrink wrap or electoral tape, and tuck the excess wire away.
45. Back on top of the dash, line your aftermarket gauge pillar up to the A pillar location, and pull the Air/Fuel gauge harness through the back as shown.
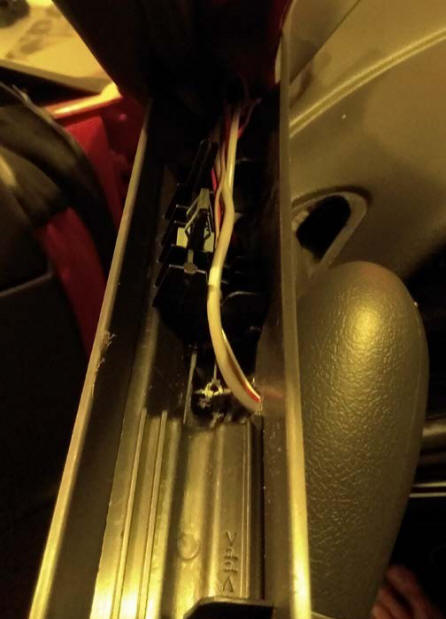
46. Carefully install your Auto Meter Air/Fuel gauge into the front of your gauge pillar, and plug the wiring harness into the back.
47. Reinstall the gauge pillar, carefully tucking any excess wire as you go.
48. Plug the headlight switch back in, and reinstall it, along with the instrument cluster.
49. Replace all trim pieces, and tuck any excess wire under the dash away with zip ties.
50. Double check all connections under the vehicle, and make sure all zip ties are tight, and the Oxygen Sensor wiring is secure away from the exhaust system.
51. Remove the car from jack stands, and replace the negative battery cable onto its post.
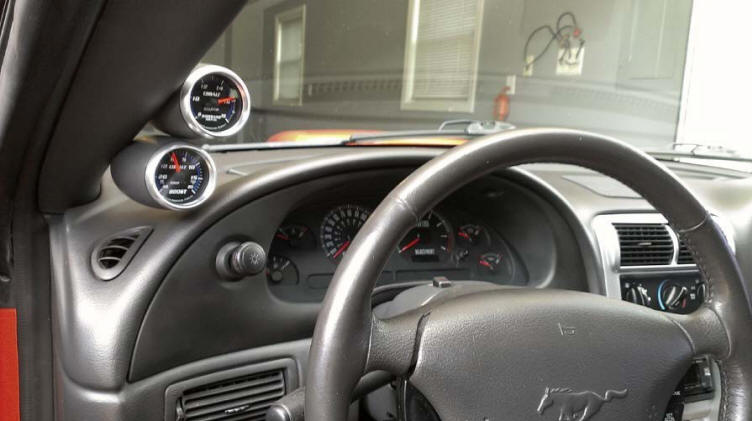
52. Start your Mustang, and admire your work!
53. NOTE: Auto Meter states in their manual that the Air/Fuel gauge will go back and forth between the 8-9 mark until the Oxygen Sensor is heated. The gauge will begin reading your air/fuel ratio within several seconds of the car running.
54. Stand back and admire your work!
Installation Instructions Written By AmericanMuscle Customer Jake Anderson 8.21.2013
