 FREE 1 to 3-Day Delivery on Orders $119+ Details
Best Sellers


How to Install a Covercraft Bra on your 2010-2012 Mustang V6
Installation
Note: Before installation, carefully read the enclosed instruction sheet (fonn 2327001). Note all warnings, recommendations and cleaning instructions.
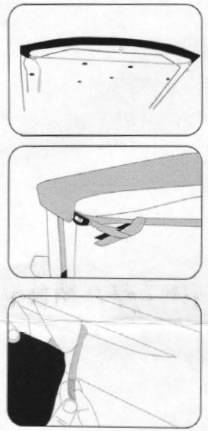
1. Open hood, install hood piece.
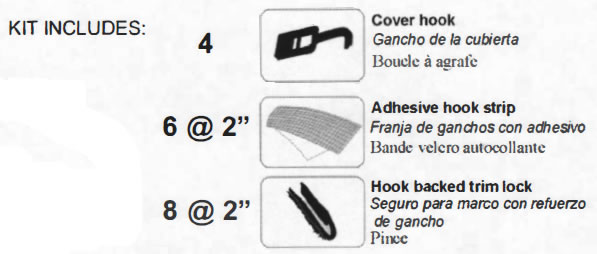
2. Thread webbing strap through buckles/cover hooks as provided.
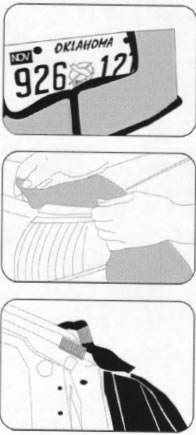
3. Remove front license plate flap if necessary.
4. Align mask around driver's side headlight.
5. Attach with pocket and/or adhesive backed hook strip.
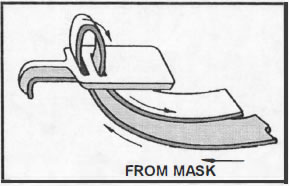
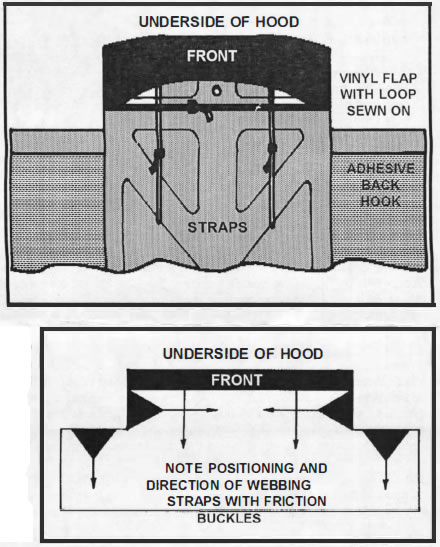
FRICTION BUCKLES
Some designs have webbing straps sewn directly on the mask. Thread each webbing strap through the friction buckle as shown in the diagram. Attach the buckles to the vehicle. Pull the straps snug, but do not overtighten as this can cause the mask to distort or be pulled out of place. Tie a knot in the end of the straps to prevent the friction buckles from being lost when the mask is not being used. These webbing straps are another way your Covercraft mask is adjustable after the vinyl expands or contracts, depending on the weather.
ATTACHMENT OF THE HOOD NOSE PIECE
Position the loop or pocket around the front leading edge of the fender above the lights.
A. Open the hood and secure in position, in some cases with a hood support rod.
B. On the underside of the mask some designs have a hood pocket, some have flaps with webbing straps attached, others have loop strips sewn on or there can be the combination of all methods. Determine the methods used in your design.
C. Center the nose piece over the front leading edge of the hood.
1. Snugly fit the front leading edge and corners of the hood into the pocket.
2. Fold the flaps around the underside of the hood. Thread the webbing strap sewn on the driver's side through the tension adjuster sewn on the left side and pull the strap tight. Do not overtighten because this can cause the mask to distort or be pulled out of position.
3. In some cases thread the webbing straps on the mask through the friction buckles and attach to the holes in the underside of the hood. Pull the straps snug but do not overtighten as this can cause the mask to distort or be pulled out of position.
4. Securely attach a corresponding length of ADHESIVE BACKED hook to the UNDERSIDE of the hood corresponding to the length of the loop strips sewn on the mask. Fold the loop strips around the edge of the hood and securely mate with the adhesive backed hook installed on the underside of the hood.
5. Some designs have a foam flap (usually one-piece style, "M" series masks). Snugly fit the flap between the body panels or between the hood opening and body. It may be necessary to push on a body panel to position the flap properly. (Fig. 10)
6. On some models there may be a small loop or pocket corresponding to the front edge of the fender above the lights.
ATTACHMENT AT THE TOP OF THE FENDERS AND ENGINE COMPARTMENT AREA
A. Align the mask around the fender and light contour on the driver's side. Open the hood and look for one or more of the following different types of attachments used for mounting the mask to the vehicle.
1. If there is a small pocket or loop corresponding to the front corner of the fender above the lights, position this pocket or flap around the edge of the fender.
2. Some designs have a flap with a hole in it. Slip this flap OVER the hood adjustment button. When the hood is closed the mask will be secured.
3. If there is a strip of loop tape sewn on the edge of the vinyl, attach a corresponding length of self-adhesive hook tape at the location INSIDE the engine compartment. Attach the hook and loop together.
4. When the flap is plain, secure it in position over a body panel using a piece of plain " U" shaped trim-lock. (Refer to diagram - next page)
5. If there is a plastic piece sewn on the vinyl, fit this plastic flap between the fender and body panel.
6. For those designs that use a flap with a webbing strap attached, thread a cover hook through the strap and attach the hook to any convenient location inside the engine compartment. Pull the strap snug, but do not overtighten.
B. Repeat the mask alignment and attachment on the passenger's side.
