 FREE 1 to 3-Day Delivery on Orders $149+ Details
Ford Racing GT Short Shifter w/ Handle ('05-'09) - Installation Instructions
Installation
1. Place shifter in neutral position.
2. Work upper part of shift boot out of retainer groove of shifter knob and slide down onto stick.
3. Remove shifter knob from stick by turning counter-clockwise.
4. Using both hands, place fingers underneath front outer edges of shifter boot and pull up to release and remove from console. Slide boot up and over shifter stick.
5. Remove large dust boot by pulling out of floor pan opening and sliding up over shifter stick.
6. Raise vehicle to an adequate height using appropriate lifting device to gain access to the underside of the shifter assembly. Support vehicle using automotive approved support stands having adequate load capacity.
CAUTION:To avoid any possibility of bodily injury or damage to vehicle, do not attempt shifter installation until you are confident that vehicle is safely secured and will not move or fall from its raised position.
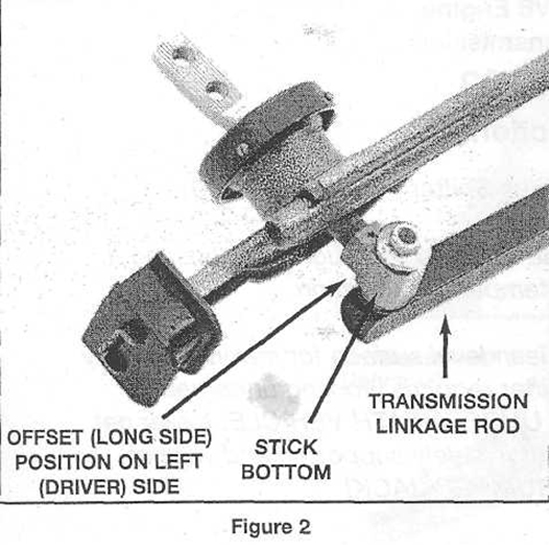
7. From underneath the car, use a 13mm wrench to remove the hex nut that secures the transmission linkage rod to the bottom of the factory shifter (see fig.2). Disconnect the rod by pulling it out of the shifter stick bottom.
8. Using a 10 mm wench, remove the front bolt that secures the shifter assembly arm to the transmission and set aside.
9. Using a 10 mm wrench or deep well socket, remove the two (2) hex nuts that secure the rear mount of the shifter assembly to the floor pan and set aside.
10. From inside the car, carefully pull the shifter assembly out.
Note:A helper is recommended from underneath to assist in the removal process.
11. Place factory shifter on workbench and remove the two (2) plastic bushings from the bottom of the shifter. Remove the metal bracket from the rear rubber mount and the two (2) metal flanged sleeves from the front rubber bushings located in the shifter assembly arm. Set parts aside for use in Hurst shifter assembly.
Hurst Shifter Installation
1. Place Hurst shifter assembly on workbench. Insert the two (2) metal-flanged sleeves into the urethane bushings located in the Hurst shifter assembly arm. Insert the two (2) plastic linkage rod bushings into the shifter stick bottom. Lightly lubricate as needed.
2. From inside the car, carefully insert the Hurst shifter assembly through the console and into the opening in the floor tunnel.
3. From underneath the car, attach front shifter arm to the transmission. Lightly lubricate threads and replace hex bolt previously removed but do not tighten.
4. Replace the metal bracket onto the rear urethane mount. Re-attach the rear mount of the shifter assembly to the floor pan studs and replace the hex nuts previously removed. Using a 10mm wrench or socket, tighten securely.
Caution:Use care to not over tighten these nuts to avoid breaking of studs.
5. Using a 10mm wrench, tighten the hex bolt that secures the front shifter arm to the transmission.
6. Lightly lubricate stem on shift rod linkage and - insert into bushings located in shifter stick bottom. Important Offset (long side) of connector located on stick bottom should be positioned to the left (driver) side (see fig.2). Fasten with hex nut previously removed and tighten securely using a 13mm wrench. Note: We recommend using thread locker on the threads to prevent loosening.
7. From inside the car, attach the Hurst upper stick to the stick bottom with the two (2) button head socket bolts and star tooth lock washers supplied.
Important:Be sure that serrations on upper stick engage serrations on stick bottom. Using a 7/32" hex key wrench, tighten bolts 30-35 ft. lbs. torque.
8. Test shifter operation. Move shifter through entire gearshift pattern making sure that it engages each gear fully and that stick moves freely from side to side in "neutral" position.
9. Replace the large rubber dust boot onto the Hurst shifter assembly. Check to be sure that boot seals around shifter base and that groove in dust boot is seated properly into floor tunnel.
Shifter # 391-0200
1. Replace the console shifter boot by sliding it over the new Hurst stick. Position the boot correctly and carefully press around the outer edges until the retainer clips snap firmly into place.
2. Replace the factory shifter knob onto the Hurst stick by turning clockwise until snug and into correct position. Slide top of boot up onto stick and into retainer groove of knob.
Shifter # 391-0201
1. Replace the console shifter boot by sliding it over the new chrome-plated Hurst stick. Position the boot correctly and carefully press around the outer edges until the retainer clips snap firmly into place. Slide the included boot adapter onto the stick and work the boot into the groove of the adapter.
2. Install Hurst shifter knob onto stick, turn to correct position and tighten jam nut against knob using a 9/16" open-end wrench.
Installation instructions provided by Ford Racing
Related Guides
-
Installation
-
Installation
-
Installation
