FREE 1 to 3-Day Delivery on Orders $119+ Details
Best Sellers


How to Install a Prothane Total Bushing Kit on your 2005-2009 Mustang GT
Installation
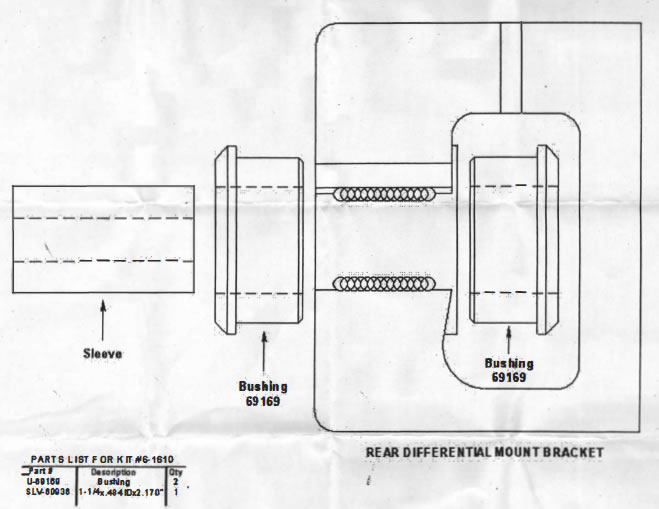
Kit #6-1610 IRS REAR DIFFERENTIAL BUSHING
1. Remove the rear differential mountbracket from the differential cover.
2. Remove the original rubber bushing from the bracket. The bushing can be pressed out with an arbor or hydraulic press. Do not damage the bracket.
3. Clean the inside of the bracket of any debris or grime.
4. Install the new bushings and sleeves as illustrated in the diagram below. No grease is·required.
5. Reinstall the bracket and torque to factory specifications.
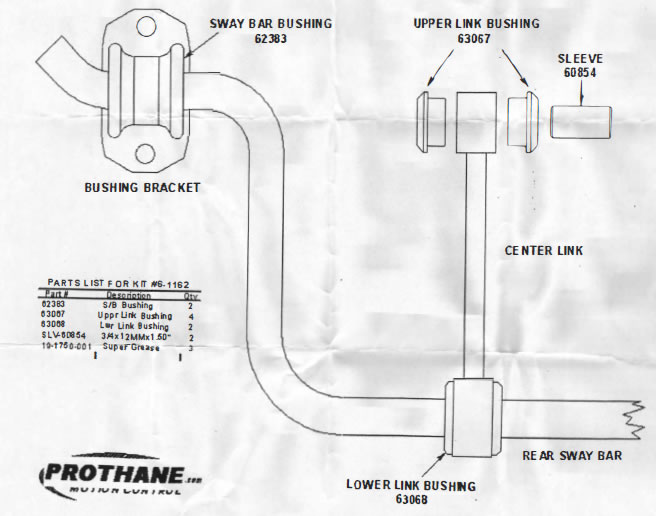
Kit #6·1162 REAR SWAY BAR BUSHINGS
1. Begin the bushing replacement process by removing the entire sway bar assembly from the vehicle. This can be done by removing the bolts that attach the bushing brackets to the shock mount at both ends of the sway bar and the tllru-bolts at the top of both center links.
2. Remove both the sway bar bushings and the center links from the bar by liberally spraying the bar with a penetrating lubricant and sliding them off the end of the bar. Use plenty of lubricant!!
3. Remove the bushings from the center link by trimming the outer lip of the bushings with a utility knife and pressing the bushings out the opposite side.
4. Next, using the grease supplied, grease and install bushings 63067,63068 and sleeve 60854 into the center link as shown in the diagram below.
5. Install the center links back onto the sway bar. To do this grease the inside of bushings 63068, spray liberal amounts of lubricant onto the bar, and slide the links all the way into position.
6. Grease the inside of sway bar bushings 62383 and install onto the bar ends in the original location. Bushings are sliced open on one side to ease installation.
7. Reinstall sway bar assembly back onto vehicle using the Original hardware. Torque all fasteners to factory specifications.
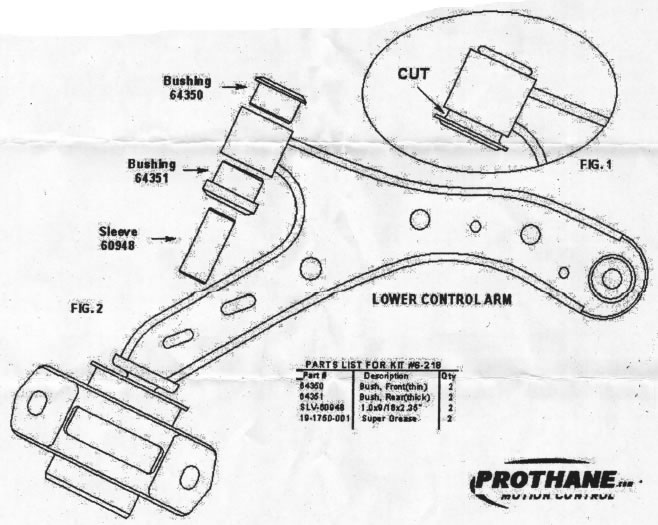
KIT #6-218 FRONT CONTROL ARM BUSHINGS
1. Remove the lower control arm from the vehicle. We recommend you remove one side at a time. In the event you get confused or lost you can refer back to the other side for help.
2. To remove the original rubber bushing and metal shell from the control arm you must first cut the metal flange away from the shell using a cut off or hack saw. (See Fig. 1 for location of cut)
3. Using a hydraulic press and the appropriately sized spacers, press the original bushing/shell out of the arm. Be careful not to damage the arm in the process.
4. Wipe clean any debris from the inside of the arm.
5. Install the new polyurathane bushing 64350 into the front side of the arm using plenty of Prothane Super Grease. (See fig 2)
6. Install the new polyurathane bushing 64351 into the rear side of the arm using plenty of Prothane Super Grease. (see fig 2)
7. Grease and install the new steel inner sleeve 60948 into the polyurethane bushings.
8. Grease the outer face of the bushings and install the control arm back onto vehicle
9. Torque all fasteners to factory specifications.