FREE 1 to 3-Day Delivery on Orders $149+ Details
How to Install QA1 Caster Camber Plates on your 1990-1993 Mustang
Installation Time
4 hours
Tools Required
- Safety Glasses
- Gloves
- 2 Jack Stands
- 1 Floor or Bottle Jack
- 14mm Regular and Impact Socket
- 18mm Regular and Impact Socket
- 19mm Regular and Impact Socket
- 24mm Regular and Impact Socket
- Torque Wrench (0 to 100ft/lbs range)
- Impact Wrench
- Heavy Duty Scissors or Tin Snips
- Round File
- Flat File
Overview:
Included in this guide are the steps involved in the installation of the QA1 Caster/Camber Plates for the 1990-1993 Ford Mustang. This installation guide will be written with the use of an Impact Wrench. Though it is possible to use a set of wrenches when removing the Strut Shaft Bolt, it is highly recommended that an Impact Wrench be used. Using an Impact Wrench will save a significant amount of time in the removal and installation of these plates.
Note that the installation process for these plates is the same on both sides of the car. The pictures below show a Caster/Camber Plate being installed on the passenger side of the car.
Arrange an alignment appointment for your car so that you can have the alignment done as soon as possible after the Caster/Camber Plate installation is completed. Once installed the alignment will be off and having the alignment put to the specs you specify should be done as soon as possible to prevent any harmful/excessive tire wear.
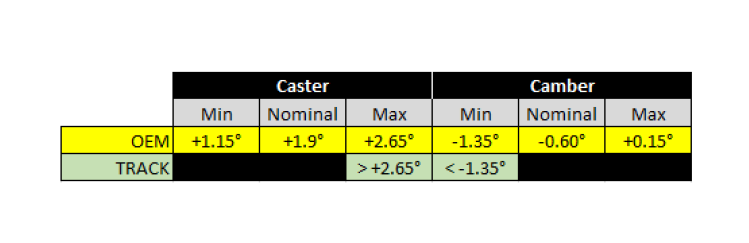
As noted, with the Caster/Camber Plates installed you can specify the setting you want from your alignment shop. Stock and more aggressive settings for better track performance are below. Remember that with aggressive Camber settings tire life can be reduced dramatically through uneven wear:
A: Setup / Preparation:
Prepare the car by placing it on a level surface, setting the Emergency Brake and leaving the car in gear. Before jacking the car up, chock the rear wheels as an additional way of preventing any car movement.
(Optional) Break the lug nuts on the front wheels with a breaker bar/tire iron/impact wrench. The lug nuts should be just loose enough to allow for easier removal later, but should not be completely loosened or removed.
Important Note: For the jack and jack stand steps below, use caution in placing any part of your body under the car before the car is placed on both stands. There can be risk of the car falling while being jacked up, so to reduce risk of injury from the car falling stay out from under the car.
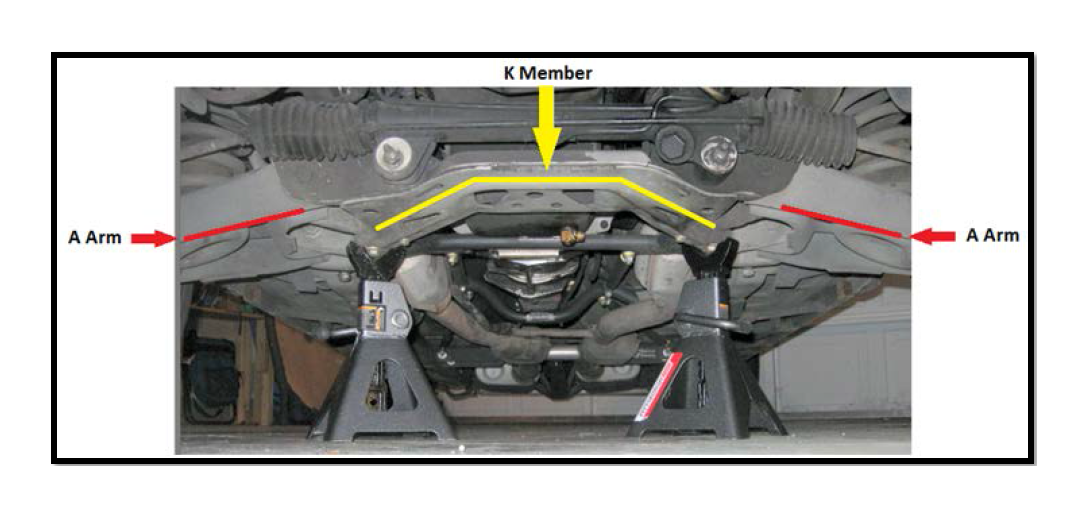
Once ready, jack a front corner of the car up to allow for the placement of a jack stand. The placement of the jack stand will be under the K-Member of the car and not the A Arm or any other moving part. In the end the jack stand needs to be set up to keep the front tire off the ground.
Slowly lower the jack allowing the corner weight of the car rest on the jack stand. Before releasing all the weight off the jack, verify the jack stand it properly placed to hold the car, making sure that it won’t slip
Jack up the other front corner of the car and again install a jack stand. Once set, both jack stands should be at the same height. Again, slowly lower the jack allowing the corner weight of the car rest on the jack stand and verifying jack stand placement before releasing all the car weight off the jack.
With the jack removed, the front of the car should be resting on the jack stands with both front wheels off the ground.
B: Removing the Tires
With the car on jack stands and in the air, remove the front tires and store them for the time being
C: Removing the Stock Caster/Camber Plate
1. Important Note: Removing the stock Caster/Camber parts and installing the new plates will be done one side at a time due to the dangers involved with front springs. Remember that once the top of the Strut is unbolted,
there is nothing to hold the spring, so while working on the Strut a jack should be under the A Arm providing upward pressure and keeping the A Arm and spring combination in place.
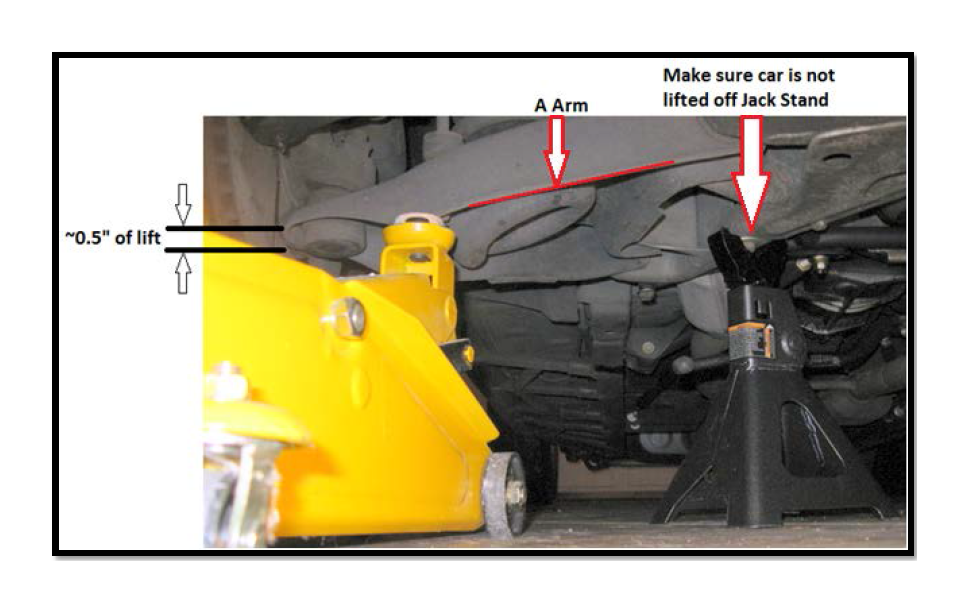
2. Place the jack in an easily viewed location where it will have a good connection with the A Arm. Jack the A Arm up ~ 0.5” verifying that you see the A Arm move upward and do not jack the A Arm up so much that the car is lifted off the jack stand
3. With the A Arm supported, return under the hood and remove the Strut Shaft Nut (24mm). The nut should be highly torqued and removing it with a wrench is difficult as turning the Strut Shaft nut will cause the Strut Shaft to spin. Unless a good grip can be maintained on the Strut Shaft (various manufacturers have different configurations) while turning the Strut Shaft nut with a wrench, removing it is very difficult. To alleviate this problem, the use of an impact wrench can greatly reduce the time to remove this nut. The speed of the impact wrench will allow the nut to be removed, spinning the nut faster than the Strut Shaft can spin.
4. With the shaft nut removed, remove the other three nuts holding the base plate to the Strut Tower (18mm).
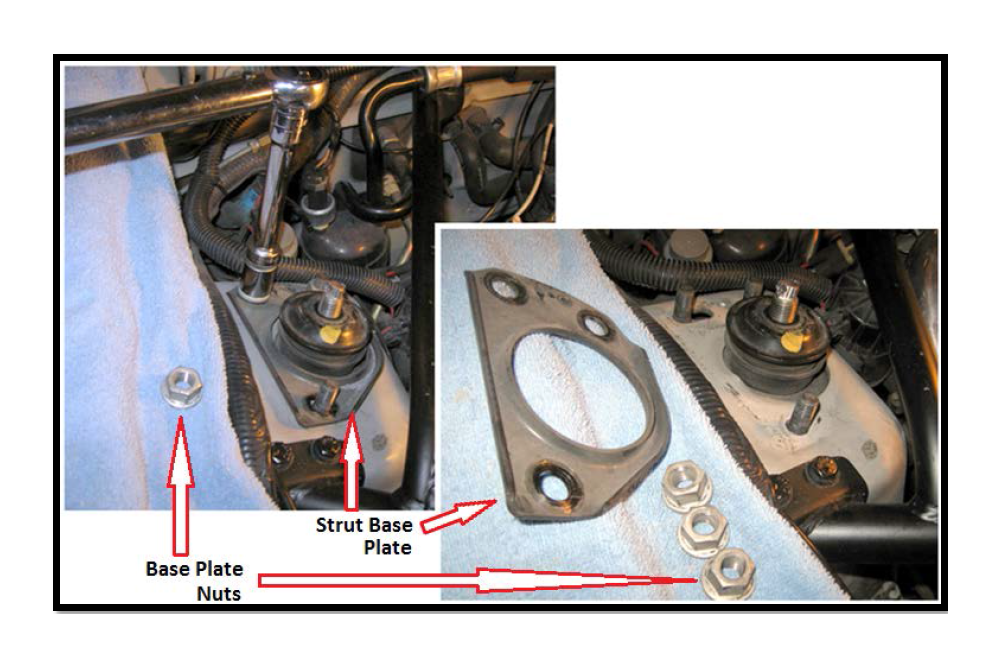
5. With the three nuts removed, pull the plate off the Strut Tower, the dome shaped plate over the rubber bushing, the steel spacer and rubber bushing.
6. With the top parts removed, move down to the wheel well area to remove the Strut Dust Cover and base plate that holds the bolts which poke up through the Strut Tower.
7. As recommended by QA1 and shown/detailed in the picture below, remove the Dust Cover from around the Strut Shaft.
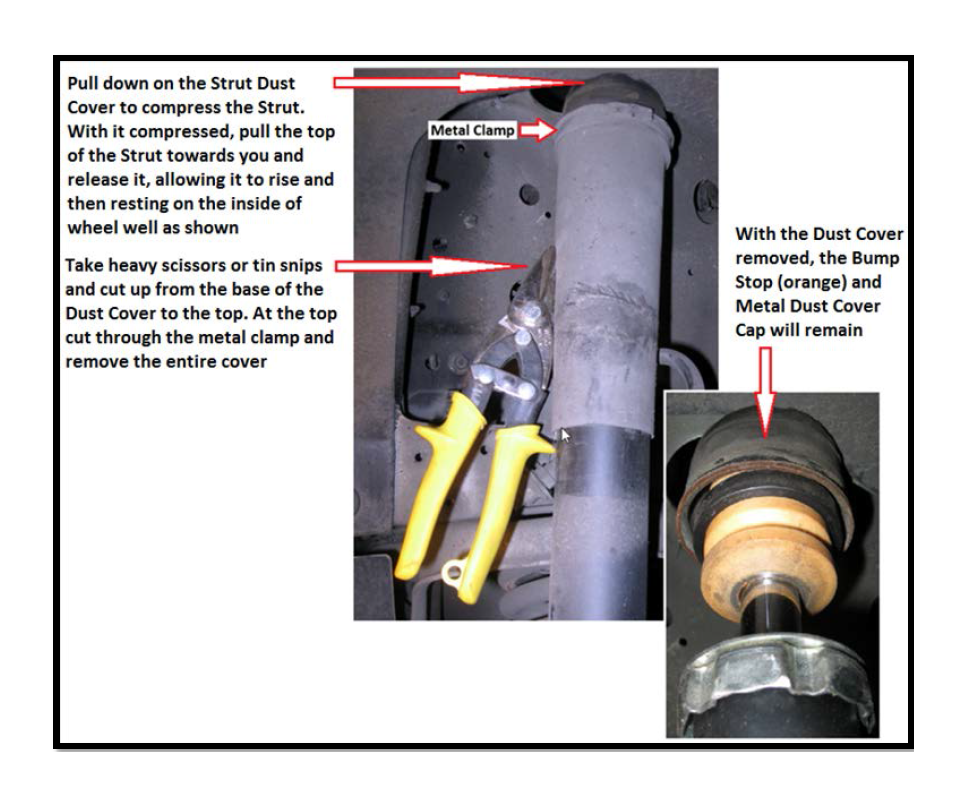
8. With the Dust Cover removed, the Strut bump stop and Dust Cover cap will be revealed.
9. To remove the Dust Cover and Cap and Caster/Camber Plate base, grab the Dust Cover Cap and pull down, compressing the Strut Shaft as far as you can (an assistant may be helpful here). Once compressed reach up and lift the base plate up and over the top of the shaft
10. With the base plate out, you will then need to quickly lift the Dust Cover up and over the top of the Strut Shaft as well. This is difficult as the Strut will begin to return to its normal position as soon as you begin lifting the Dust Cover.
11. When completed, the Strut bump stop should be all that remains.
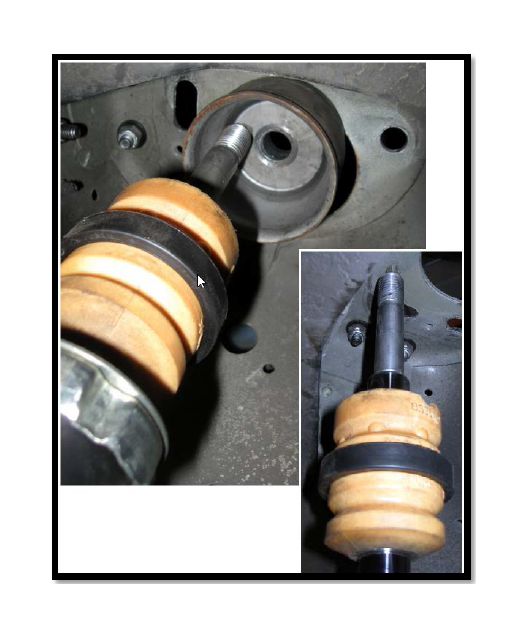
12. With all the parts removed, line up the Strut Shaft to go through the Strut Tower, allowing it to expand and push the Strut Shaft up through the Strut Tower hole.
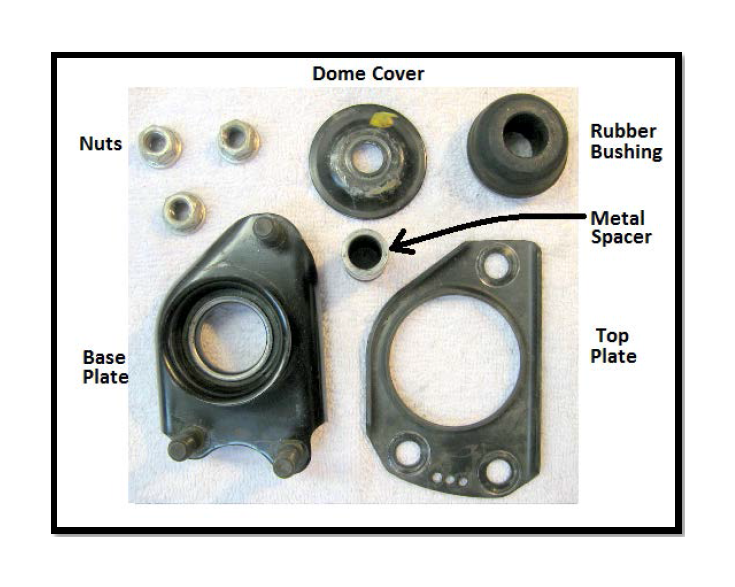
13. The parts removal from the car should be complete. Shown below are all the parts needing removed, there should be two sets of each
D: Installation of the new Caster/Camber Base Plate
1. The new base plate needs to be verified for a correct fit. To do this take the base plate and attempt to install it from the top. What is needed is for the base plate to fit into the three holes correctly and move easily.
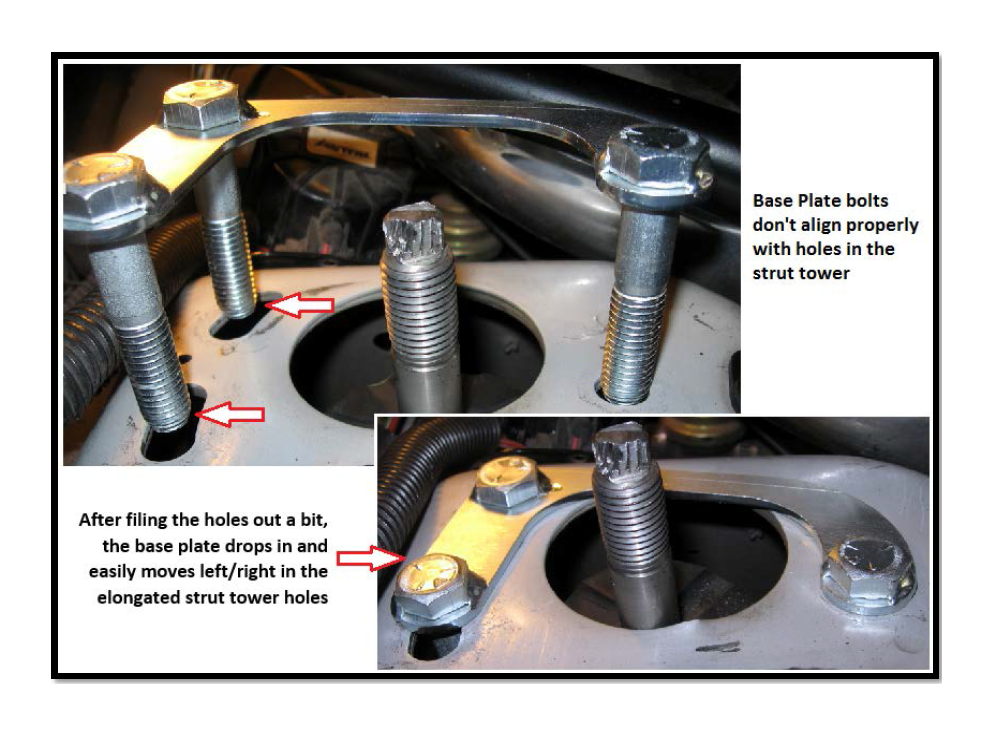
2. As shown to the right the base plate didn’t fit exactly. To resolve an issue like this, file out the three holes until the plate drops in and moves in the holes easily. When finished remove the base plate and set aside.
E: Installation of the new Caster/Camber Assembly
After the base plate fits easily through the Strut Tower holes, assembly of the Caster/Camber Plate can start. An assistant may be helpful during the assembly, but it can be done by one person.
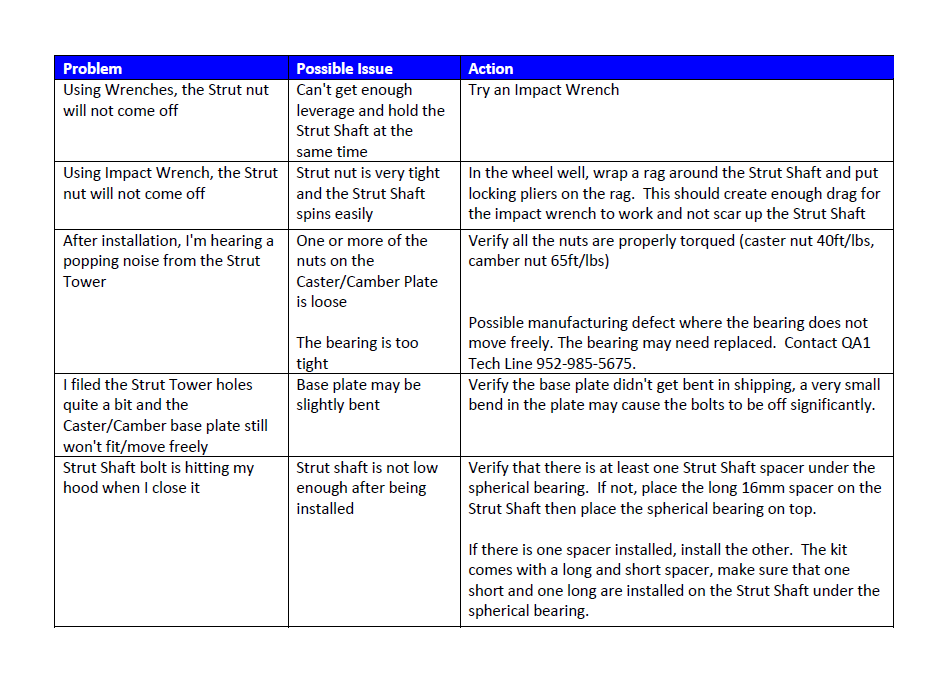
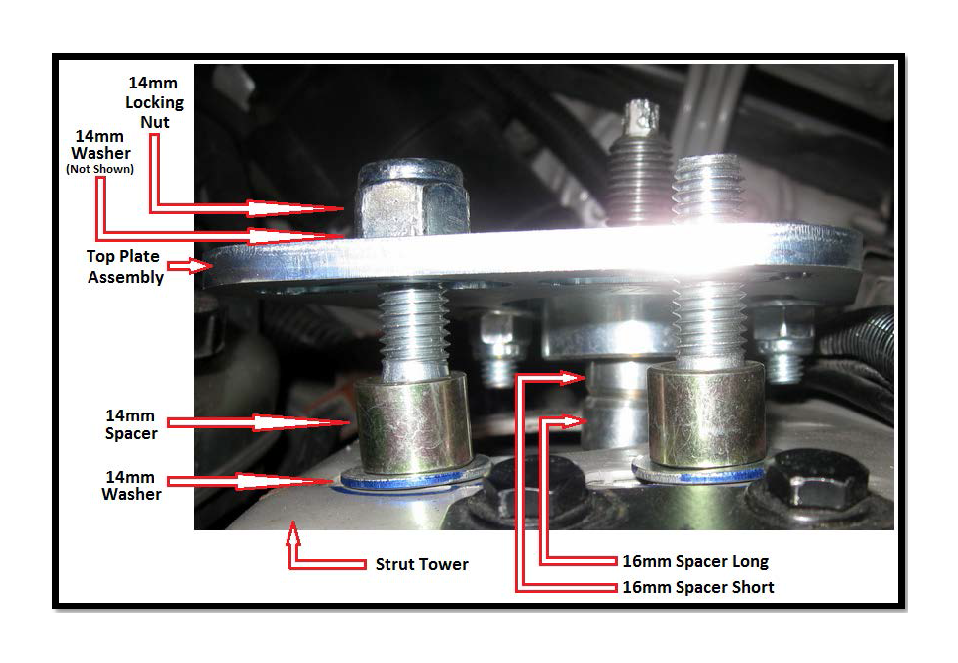
1. Different Struts may vary, but place at least one 16mm spacer on the shaft of the Strut. Note: Not putting enough spacer on the shaft may allow the top of the Strut Shaft to make contact with a close car hood. To prevent this, it will likely be best to install both a long and short 16mm spacer.
2. Lay out all the other parts needed close to the Strut Tower as you will have to hold the base plate in place for a few minutes while assembling all the pieces. You will need:
• 14mm Washers (Qty. 6)
• 14mm Spacers (Qty. 3)
• 14mm Locking Nuts (Qty. 3)
• Top Plate Assembly (Qty. 1)
• Note: Verify that you have the correct Top Plate for the correct side of the car
3. From inside the wheel well, push the base plate up through the Strut Tower and hold in place
4. Place 1 – 14mm washer on each base plate bolt shafts coming up through the Strut Tower
5. Place 1 – 14mm spacer on each bolt shafts coming up through the Strut Tower (should be sitting on top of washers just installed)
6. Place 1 – top plate with the bearing housing assembly attached over the Strut Shaft and 3 base plate bolt shafts. Top plate should be sitting on top of spacers just installed)
7. Place 1 – 14mm washer and locking nut on each base plate bolt shafts coming up through the Strut Tower/spacer/top plate and hand tighten
8. With the nuts installed, release the base plate which should now hold in place
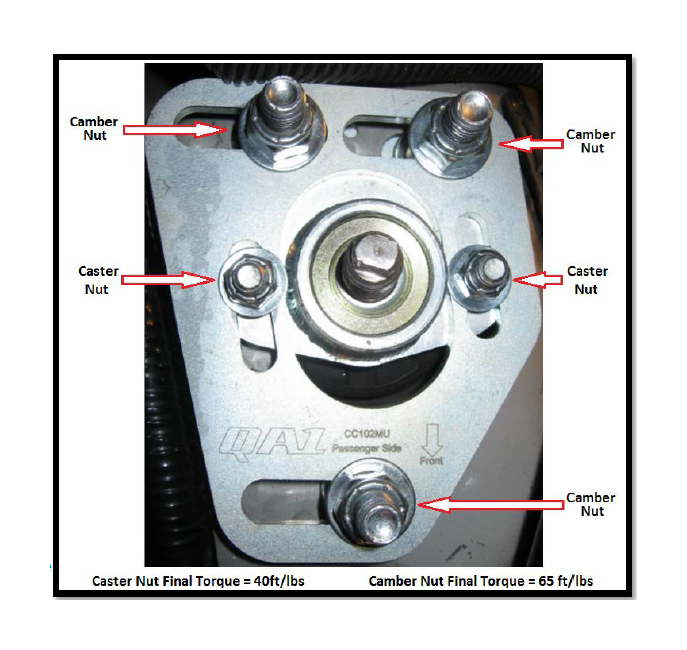
9. With all the parts installed perform a rough alignment of the plate parts
10. Roughly adjust the camber so that the camber plate is moved away from the engine as far as it will go.
11. Once camber is set, tighten the 3 camber nuts to 65ft/lbs
12. Bias the caster plate towards the back of the car, keeping the caster nuts perpendicular to the brake disc
13. Once caster is set, tighten the two caster nuts to 40ft/lbs
Important Note: Before proceeding, check the Strut Shaft clearance by slowly putting the car hood down to see if the Strut Shaft hits the underside of the hood. If the Strut Shaft hits the hood, check Appendix A at the end of this document
14. With the Caster/Camber Plate set in place, put on and tighten the Strut Shaft nut with the impact driver
15. Back underneath the car, slowly drop the jack to release the A Arm
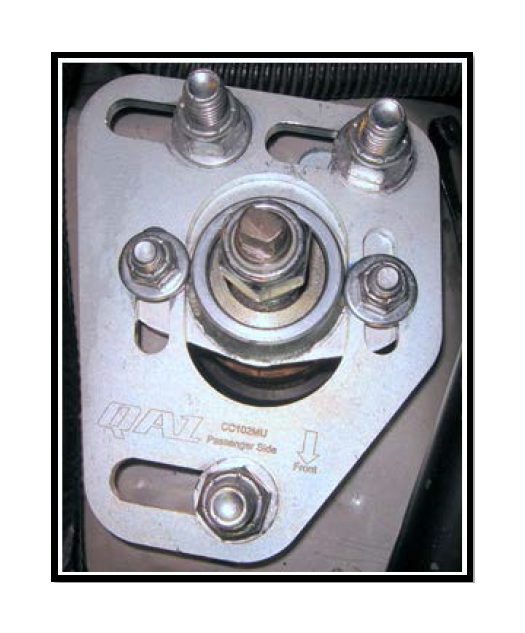
16. The finished Caster/Camber Plate should look like the picture to the right with all 6 nuts tightened.
17. This completes the installation of one Caster/Camber Plate, if only one has been installed, return to Section C of this procedure and repeat the installation process for the other Caster/Camber Plate.
F: Post Caster/Camber Plate Installation
1. With both Caster/Camber Plates installed, reinstall both front wheels on the car and tighten the wheel bolts
2. With the jack, slowly raise one corner of the car enough to remove one jack stand, then removed it and place it aside.
3. Slowly lower one corner of the car back to the ground
4. With the jack, slowly raise the other corner of the car enough to remove the second jack stand
5. Slowly lower the other corner of the car back to the ground
6. With the car back down, verify the torque on the wheel bolts (85-105ft/lbs)
7. Verify the torque on the Caster/Camber Plate bolts
8. Take your car to have an alignment performed