FREE 1 to 3-Day Delivery on Orders $149+ Details
How to Install Raxiom Switchback Turn Signal Conversion Kit w/ Resistors in your 1987-1993 Mustang
Installation Time
2 hours
Tools Required
- 7/16” Combination Wrench (stubby preferred)
- 7/16” Socket
- Socket Ratchet
- 4” and 8” Socket Extensions
- Standard Pliers
- Electric Drill
- 3/16” Drill Bit
- 5/16” Drill Bit
- Soldering Iron
- Solder
- Heat Gun or equivalent
- 2 – 6” 16-18AWG wire
- 2 – 4” lengths of 1/8”Shrink Tubing
- 4 - 6x32x1” Screw/Flat Washer/Nylon Locking Nut

Shop Parts in this Guide

Overview:
Below are the steps involved in the installation of the Raxiom Switchback Turn Signal LED lights in the 1987 – 1993 Ford Mustang. Some of the steps below are noted as being optional, but performing these optional steps will make the installation simpler.
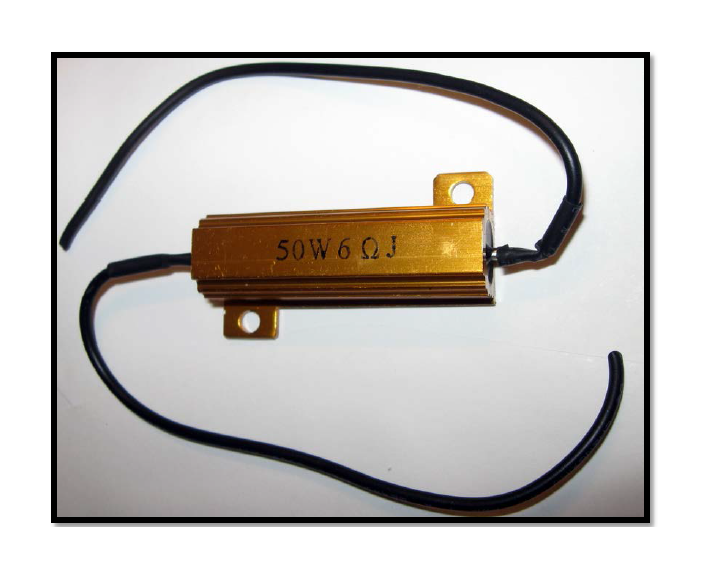
Pre Fab the Resistors (Optional)
Add Wire Length
Lengthening the wires on the resistors will ease the installation process.
- Strip the insulation off the resistor wire ends
- Strip one end of insulation off the extension wires
- Twist one wire extension to one resistor wire end
- Twist the other wire extension to the other resistor wire end
- Solder the wires together
- Slip one piece of shrink tubing over each soldered connection
- Heat and shrink tubing over the soldered connections
Enlarge the size of the resistor mounting holes
Enlarging the mounting holes in the resistor will ease installation of the resistors in the locations noted in the procedure below.
- Using a 3/16” drill bit, drill out both holes in each resistor.
Passenger Side Light
Mount the Resistor
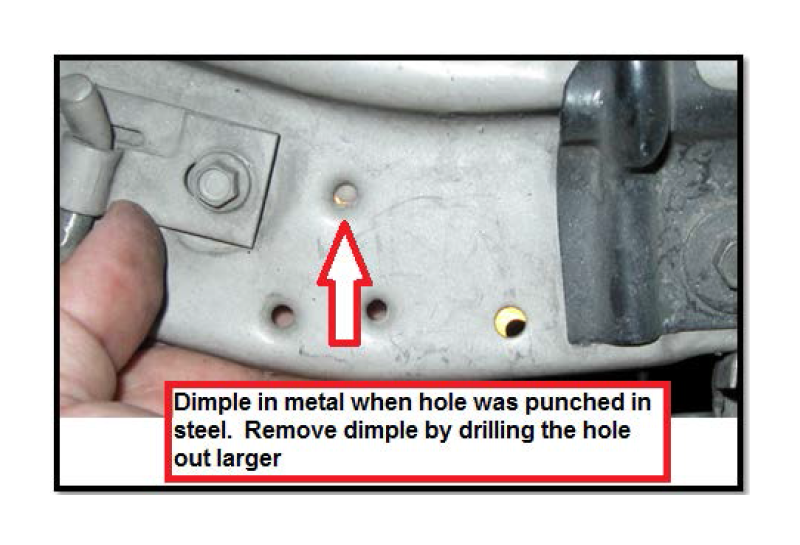
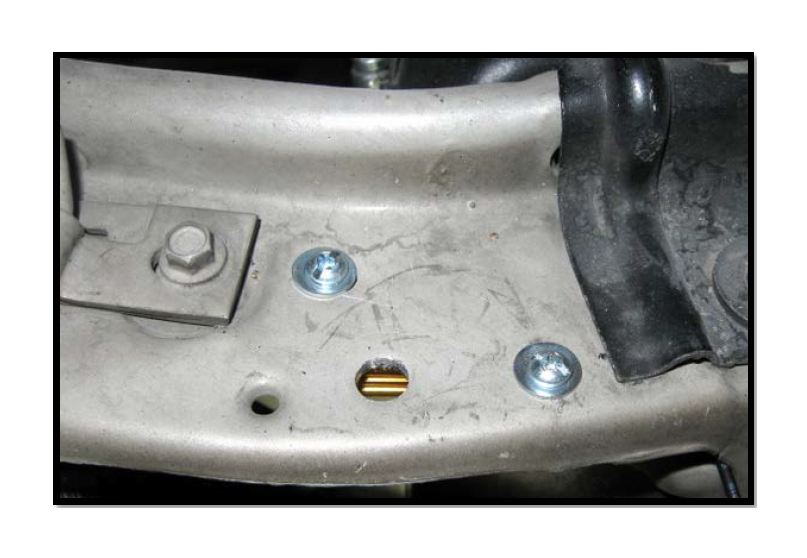
- Align the resistor to the punched holes in the metal which are closest to fitting the resistor in
- With the holes found, drill them out with a 5/16” bit which will remove the dimples created by the hole punching process
- With dimples removed the resistor can be mounted flush against steel and hidden under the under the steel rail. Being flush mount and hidden will help cool the resistor and accidental burns which will become very hot when used
- Once drilled, check that the holes line up with the resistor holes
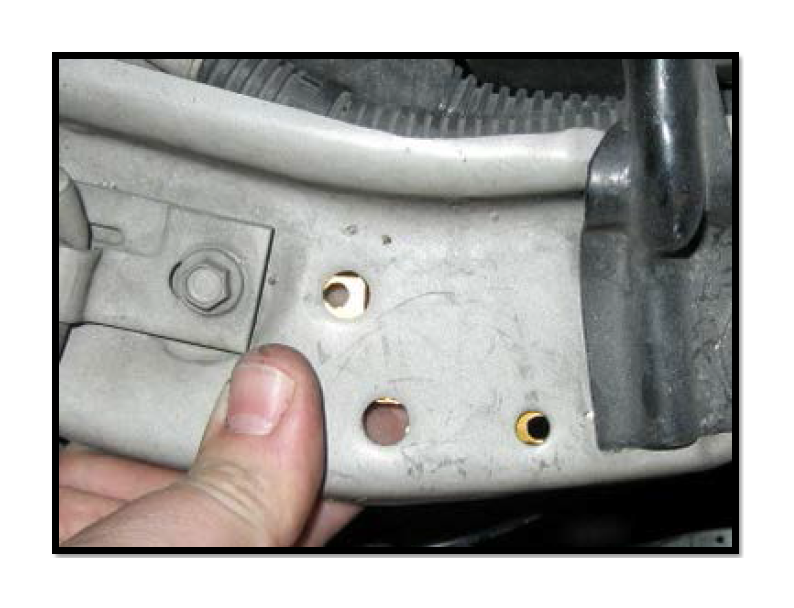
- With a flat washer on the head of the screw, install them using a Nylon locking nut on the bottom side.
Remove the Bulb
- Removing the bulb is tough because of the tight location. Removing it is not required, but will ease removal of the lens assembly which makes the overall installation easier
- Looking at the front of the car, the bulb socket is on the backside of the lens assembly and can be removed by turning the socket about 1/6th of a turn.
Remove the Lens
- There are two nuts on the back side of the lens
- One in top center
- TIP: Easiest removed with a ratcheting stubby 7/16” wrench
- One in bottom center
- TIP: Easiest removed by a 7/16” socket on a ratchet with 8” to 12” extension fed in through the engine bay just below the alternator and run forward to the side of the radiator
- With the nuts removed, pull the lens out
- If you didn’t do it before, twist and remove the bulb
Expose the Wiring
- Pull bulb out of socket
- Remove any electrical tape on the end of the wire tubing
- With the tape removed, split open the wire tubing and pull out the three wires so that about 3-4” of the wires are exposed (Black, Brown, White Blue Stripe)
- TIP: To prevent more wiring from coming out of the wire tubing, place a zip tie about 1” behind the exposed wire. More wire out of the tubing can be difficult to reinstall if it goes too far back behind the lens frame.
Connect the Resistor to the Turn Signal Wire
- Looking at the quick connector there will be two holes, one hole is blocked, the other feeds through
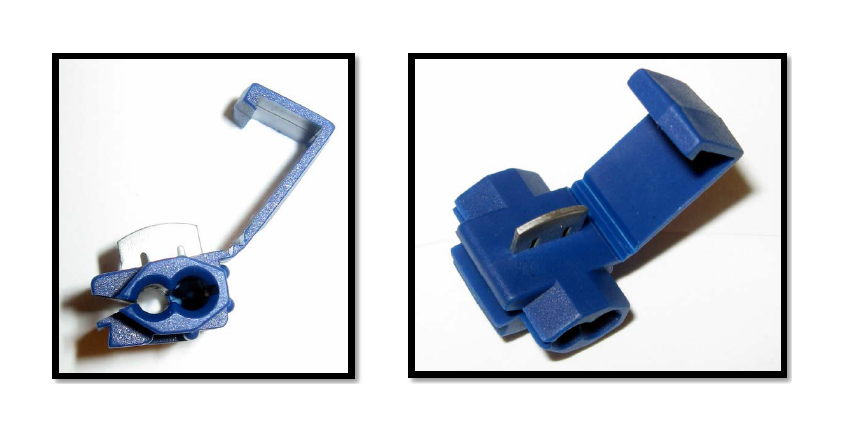
- In the hole that goes through the quick connector, insert the White Blue Stripe wire
- Slide the quick connector to with 2” of the socket
- In the hole that is blocked feed the resistor wire into the end opposite the blockage
- Holding the resistor wire in place, flip the top over the metal tab sticking out and press together
- After pressing it together as best you can, use a pair of pliers and compress the connector completely
Connect the Resistor to the Ground Wire
- With the other quick connector connect the black wire to the other end of the resistor
- Take the black wire from the socket and insert it into the hole that feeds through the connector
- Slide the quick connector to within 2” of the socket
- In the hole that is blocked feed the other resistor wire into the end opposite the blockage
- Holding the resistor wire in place, flip the top over the metal tab sticking out and press together
- After pressing it together as best you can, use a pair of pliers and compress the connector completely
With the Connectors Installed
- Trim back some of the plastic tubing so that it butts up against the quick connectors
- Remove the zip tie installed earlier and with a new zip tie put it on the end of the wire tubing and use it to hold the resistor wires and end of the tubing together.
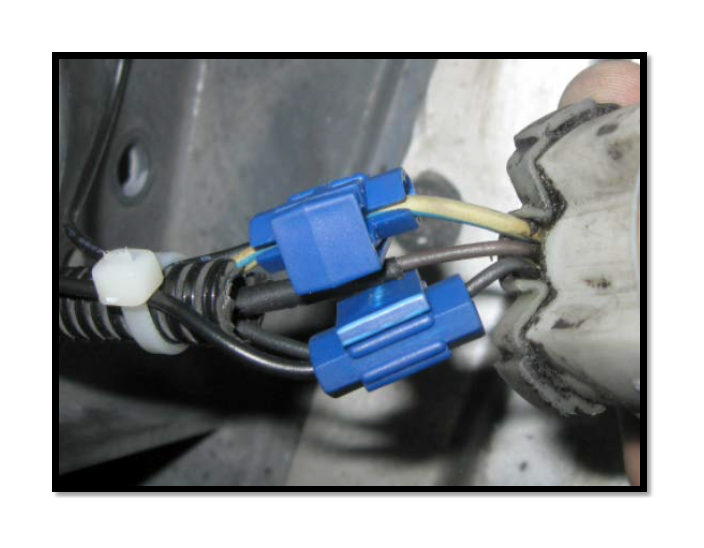
- For added protection, new electrical tape can be wrapped around the connections between the tubing and the socket
Install the Raxiom LED bulb
- The LED bulb will press in and you should hear it click in place
- Before installing the bulb into the lens, verify the LED bulb is working properly by turn the car key on and
- Check turn signal
- Check running light
- Check turn signal with running light on
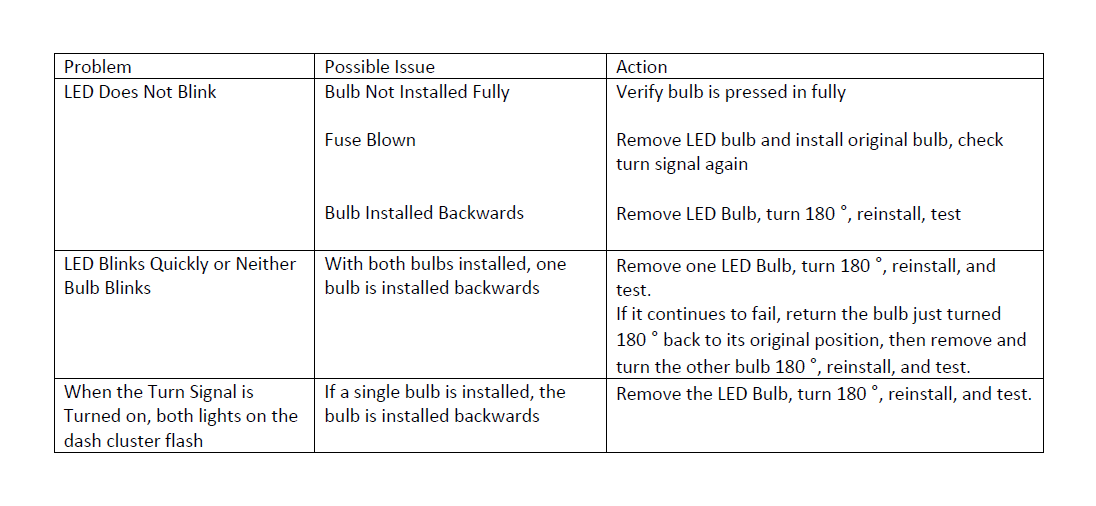
- If the bulb malfunctions see the troubleshooting section
Reinstall the Bulb and Lens
- Check that the bulb is installed fully and will not fall out easily
- Reinstall the socket and bulb into the lens
- Place the lens back into the frame
- Reinstall the two nuts that hold the lens in place
- Again, verify the turn signal, running light and turn signal with the running light
Driver Side Light
Mount the Resistor
- Like the passenger side, find the punched holes in the rail used to hold the radiator brackets and align the resistor to the holes closest to fitting the resistor
- With the holes found, drill them out with a 5/16” bit which will remove the dimples created by the hole punching process
- With dimples removed the resistor can be mounted flush against steel and hidden under the under the steel rail. Being flush mount and hidden will help cool the resistor and accidental burns which will become very hot when used
Remove the Bulb
- TIP: Removing the bulb on the driver side is quite difficult with the lens installed, so instead remove the lens with the bulb installed
Remove the Lens
- There are two nuts on the back side of the lens
- One in top center
- TIP: Easiest removed with a ratcheting stubby 7/16” wrench
- One in bottom center
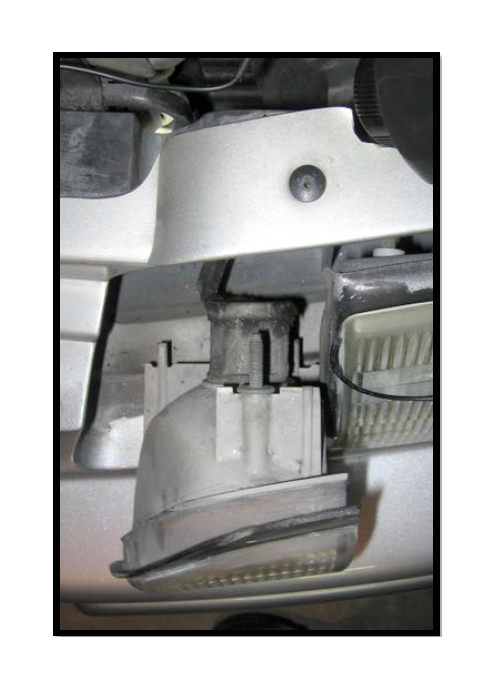
- TIP: Easiest removed by reaching up from under the nose of the car. Shown below are pictures of an LX Mustang nose and a picture showing the bottom nut on the lens assembly
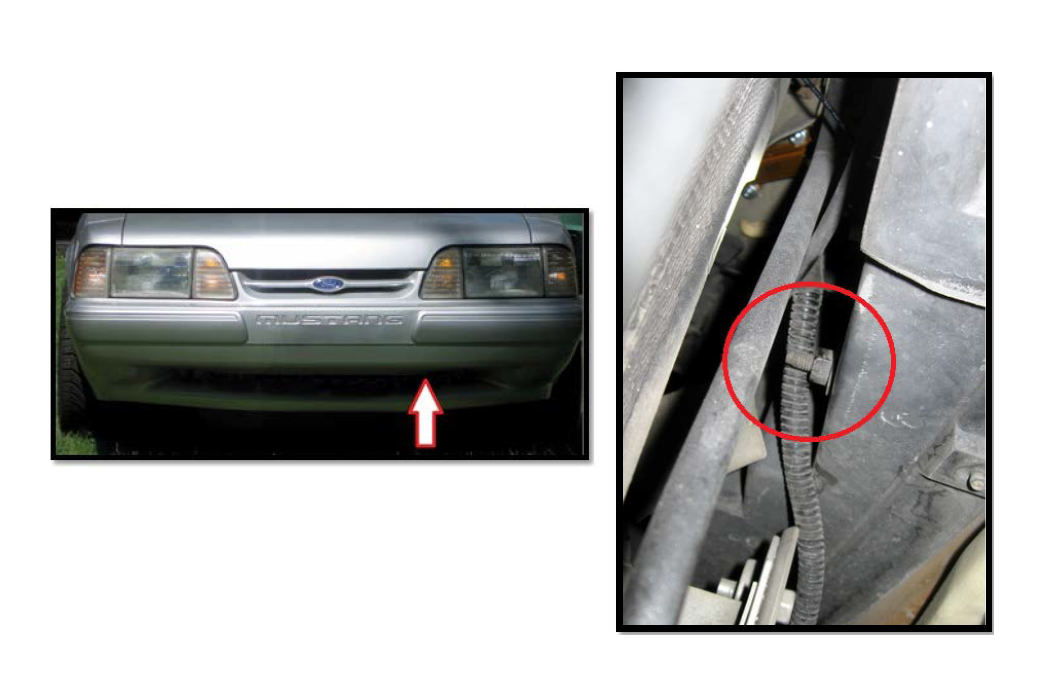
- With the nuts removed, pull the lens and remove the socket/bulb
Expose the Wiring
- Pull bulb out of socket
- Remove any electrical tape on the end of the wire tubing
- With the tape removed, split open the wire tubing and pull out the three wires so that about 3-4” of the wires are exposed (Black, Brown, Green Yellow Stripe)
- TIP: To prevent more wiring from coming out of the wire tubing, place a zip tie about 1” behind the exposed wire. More wire out of the tubing can be difficult to reinstall if it goes too far back behind the lens frame.
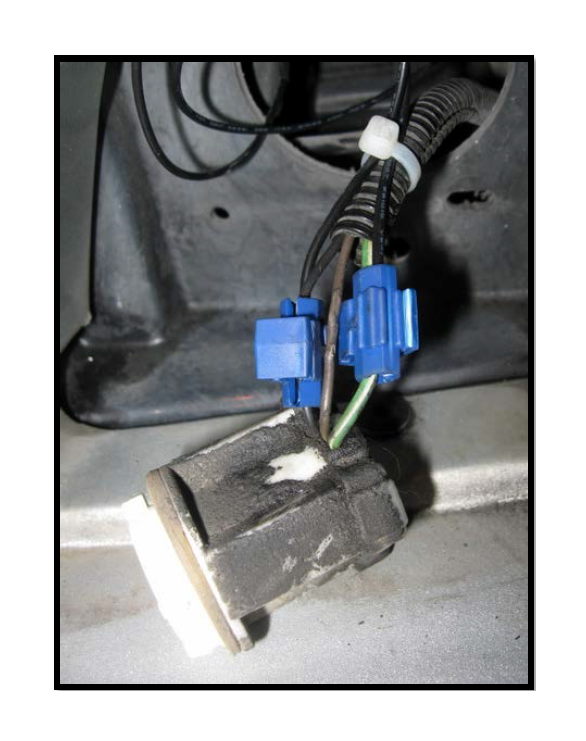
Connect the Resistor to the Turn Signal Wire
- Looking at the quick connector there will be two holes, one of the holes is blocked by plastic, the other feeds straight through
- In the hole that goes through the quick connector, feed in the Green Yellow Stripe wire
- Slide the quick connector to with 2” of the socket
- In the hole that is blocked feed the resistor wire into the end opposite the blockage
- Holding the wires in place, flip the top over the metal piece sticking out and press together
- After pressing it together as best you can, use a pair of pliers and compress the connector completely
Connect the Resistor to the Ground Wire
- With the other quick connector connect the black wire to the other end of the resistor
- Take the black wire from the socket and put it into the hole that feeds through the connector
- Slide the quick connector to within 2” of the socket
- In the hole that is blocked feed the other resistor wire into the end opposite the blockage
- Holding the resistor wire in place, flip the top over the metal tab sticking out and press together
- After pressing it together as best you can, use a pair of pliers and compress the connector completely With the clips installed
- Trim back some of the plastic tubing so that it butts up against the quick connectors
- Remove the zip tie installed earlier and with a new zip tie put it on the end of the wire tubing and use it to hold the resistor wires and end of the tubing together.
- For added protection, wrap electrical tape between the tubing and the lamp socket
Install the Raxiom LED bulb
- The LED bulb will press in and you should hear it click in place
- Before installing the bulb into the lens, verify the LED bulb is working properly by turn the car key on and
- Check turn signal
- Check running light
- Check turn signal with running light on
- If the bulb malfunctions see the troubleshooting section
Reinstall the Bulb and Lens
- Check that the bulb is installed fully and will not fall out easily
- Reinstall the socket and bulb into the lens
- Place the lens back into the frame
- Reinstall the two nuts that hold the lens in place
- Again, verify the turn signal, running light and turn signal with the running light