 FREE 1 to 3-Day Delivery on Orders $119+ Details
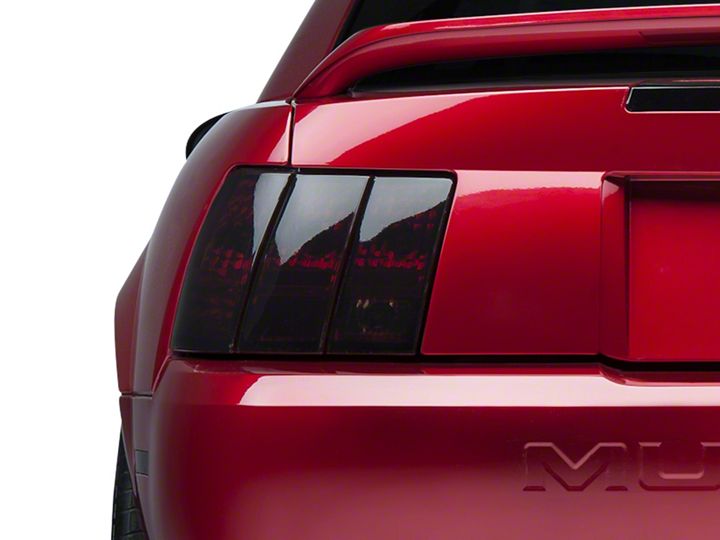
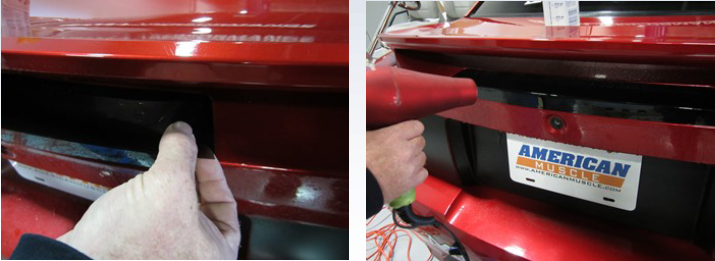
How to Install American Muscle Graphics Smoked Tail Light Tint on your Mustang
Installation Time
30 minutes
Tools Required
- Spray Bottle with Filtered Water
- Blow Dryer
- X-acto or Breakaway Knife
- Squeegee (wrap with a cloth to prevent scuffs)
- Soft, Lint-Free Towels
Shop Parts in this Guide
STEP 1
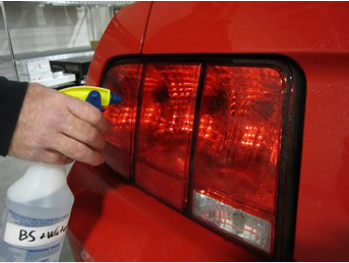
Clean the surface and all edges of the lens thoroughly before applying film. PLEASE USE FILTERED, NON-CHLORINATED WATER ONLY. DO NOT USE ANY ALCOHOL SOLUTION OR CHEMICAL CLEANERS TO CLEAN THE LENS! After this is done, clean it again with filtered water. Keep the area and film free from dirt, debris, or any contaminants. Our adhesive loves to stick to everything. Wash your hands thoroughly before handling the film then always keep your fingers saturated/wet during t he install to prevent permanent fingerprints in the adhesive.
STEP 2
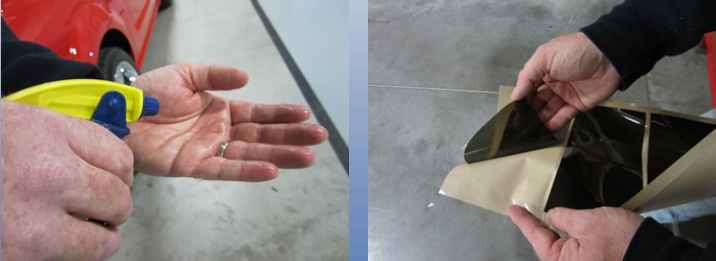
IMPORTANT: ONLY SPRAY A VERY LIGHT MIST OF FILTERED, NON-CHLORINATED WA-TER ONTO THE LENS (1-2 SPRAYS MAX). JUST ENOUGH FOR TINY DROPLETS, BUT NOT DRIPPING! Do not over-saturate, as doing so will prevent the adhesive from gripping! The film installs much differently than window tint or graphics. The film should not slide or float into place. If it does then you have too much solution! In this case, pull the film off and let air dry before reinstalling.
STEP 3
Before you begin the actual installation, take the time to think about how you will apply and maneuver the film across any compound curved areas. The objective is to keep the film from bunching up or wrinkling in any one area. You want to evenly and smoothl y distribute the film, so as to prevent any wrinkles (fingers).
After misting the lens, remove the backing liner then align the film (using the handling tabs & wet fingers) to a lens edge and/or flat surface. NOTE: It is best to start at the flattest areas with the longest straight lines then work to the more difficult or curved sections. Align the film as accurately as possible during this step as it will effect the alignment of the rest of the installation. After getting the alignment right, just lightly tack the film down. If the alignment is off, just pull it back up and re-tack until alignment is near perfect.
NOTE: Warming the film with the blow dryer is crucial to tackling those difficult areas.
STEP 4
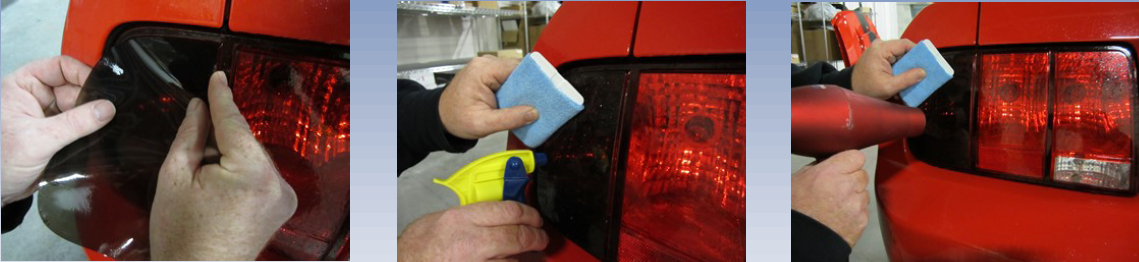
After the film is tacked on, liberally saturate the outside of the film (the non-adhesive side) to create a lubrication layer for the squeegee to easily glide over
Note from 99-04 put the bottom piece on then the piece that sits on top the brake light. Making sure the first is dry and cooled before doing the second. Then heat the top and with your hands wet roll the top over the bottom.
STEP 5
IMPORTANT: USE OF A BLOW DRYER TO SOFTEN & WARM THE FILM MAY BE NECESSARY FOR DIFFICULT IN-STALLATIONS!
After the film is aligned and tacked down. Its time to squeegee! Always use smooth, sweeping windscreen-wiper like motions. This is especially important in the curved areas! To force the water out from underneath the film, squeegee towards the outside edges of the lens. Do this across the remainder of the light. NOTE: The film will move and shift according to your squeegee direction and pulling pressure or angle. So be aware of this and correct and/or re-apply the film as necessary if misalignment occurs. The film’s adhesive is very forgiving, which will allow you to pull the film up numerous times in order to get the best fitment possible! If any large air bubbles are present or the film is becoming misaligned, you may peel up the film to that area and apply again. However, this is only possible during the initial installation procedure!
If your film has a protective cover it can be removed for final installation once almost all tunneling and fingers are worked out. It is easier to heat without the protective film. BE CAREFULE use a squeegee cover like a micro fiber cloth to protect from scratching and keep it wet. Otherwise remove the film after installation is complete. The backing of films with protective covers are clear, other wise the tint with no protective film has a brown paper backing.
NOTE: If you get winkles (“fingers”) in any area. Wet your fingers, then pull the film up around that problem area. Then re-apply by distributing the film evenly over a larger area. It may be necessary to soften the film using the blow dryer .
STEP 6
IMPORTANT: PRESS DOWN ALL EDGES OF THE FILM AGAIN, 24 HOURS AFTER INITIAL INSTALLATION! DO NOT CAR WASH YOUR HEADLIGHTS FOR AT LEAST 48 HOURS!
If all moisture has not been evacuated/squeegeed out from under film then some fogginess of the film will occur. This is completely normal. The film is breathable and porous - cloudiness/fog will evaporate within few weeks, depending on film thickness and sun-light/heat exposure. So be patient! Any surface texture, scratches, or ripples will also disappear during this curing process. If you have a large air or water bubble, you may poke it with a sewing needle. The film is self-annealing, so that hole will eventually heal back up.
STEP 7
The film can be washed with soap and water just as you would use on your car’s finish. Light scrubbing is okay, as well as a mild solvent if needed. It is important to use either Sentinel Vinyl Conditioner or a synthetic carnauba based wax on the film once every 2 months. These products have a U.V. Inhibitor in them that will maintain the films softness and color
