 FREE 1 to 3-Day Delivery on Orders $149+ Details
How to Install Smooth Aluminum Rear Window Louvers for a 1994-2004 Mustang
Installation Time
1 hours
Tools Required
- Wax crayon, soft lead pencil or marker Silicone (black or clear)
- Paper towels or a clean, lint free rag Isopropyl Alcohol

Shop Parts in this Guide
Installation
READ INSTRUCTIONS COMPLETELY BEFORE STARTING.
Check hardware kit before starting to insure all pieces are included. Make sure you have the right part number. The louver number is stamped on the back of the slats or will be on the paperwork (i.e. packing slip, instruction sheets, or on the shipping label). If you need to order additional parts, you can order directly from Willpak by calling 1-888-945-5725 or 905-827-0224.
In order to reduce shipping costs to you, some of the louvers have been designed to separate into two halves. If you have a two piece louver, follow the “Two Piece Assembly Steps” to assemble your louver into one piece. If your louver was shipped in one piece move on to the preparation and installation steps.
PREPARATION STEPS
NOTE: You will need the following items on hand to make a good installation:
1. Paper towels or a clean, lint free rag to clean the window.
2. Liquid soap and warm water to wash the window.
3. A bottle of Isopropyl Alcohol to clean the window. Nothing else will clean the window without affecting the adhesive strength of the attaching hardware.
4. A soft lead pencil, wax crayon or marker to mark the hardware positions.
5. Automotive silicone (black or clear)
Clean the glass with liquid soap and warm water first and after drying wipe with a 50/50 Isopropyl Alcohol / Water solution using paper toweling or clean rag, giving special care to ensure clean edges and corners. The glass must be above 60oF (warm tithe touch) for the special adhesive to bond securely. If necessary, warm the glass with a hair dryer.
To achieve proper fit of all components, they must first be temporarily secured or “tacked” to the glass as
outlined in the following installation steps.
After complete installation of the louver, avoid pressure spray car washes or extreme cold weather for another
24 Hrs to allow the adhesive to bond further and properly.
NOTE: FAILURE OF PROPER TAPE BONDING MAY BE ATTRIBUTED TO ONE of FOUR ITEMS:
• Poor surface preparation and/or application.
• Poor adhesive contact: exposed adhesive side of tape being touched or contaminated, insufficient pressure
being applied.
• Adhesive being undercut due to prolonged exposure to high humidity, and not using silicone as recommended.
• Vehicle being driven too soon, tape not fully cured.
TWO PIECE ASSEMBLY STEPS
1. Lay the louver upside down on a flat non-abrasive surface ( i.e. a carpeted floor, the louver packing
material or on a piece of cardboard will do).
2. Start on one side of the louver and slip exposed slat of one half into the channel side piece of the other half and push the halves together.
3. Repeat the process with the opposite side of the louver making sure the center strip tongue and groove assembly slips together.Note: due to the geometry of some louvers, the lower piece may need to be bowed in order to slide the two halves together.
4. When the entire louver is in one piece, place foam covered center splint over center seam to hold the two halves together.
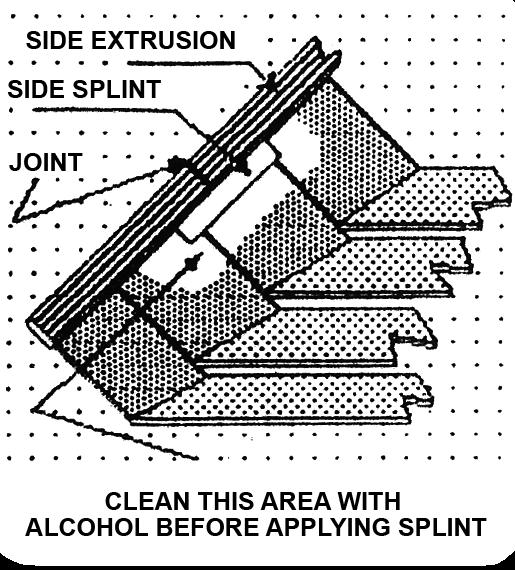
5. After assembling the louver proceed to add the side splints. The purpose of the side splints is to provide additional support for your two-piece louver. Peel the backing from the 3/8” wide adhesive on the side splints provided in the hardware kit. Be sure the louver side extrusion joint is tightly pressed together and the louver surface is clean (see the preparation steps on cleanliness etc.). The side splint may now be placed on the underside of the louver as shown. Press the plate firmly in place and repeat the process on the other side. Now thoroughly read the installation instructions before you proceed.
INSTALLATION
1. Attach hinge plates and or tie down plates to the louver, snuggly using the supplied nuts. Hinges if applicable to your application will be mounted at the top of the louver.
2. Lay the louver with hardware attached onto the glass and check the fit. Ensure louver is placed high enough towards the top of window to allow trunk opening clearance. Mark the hardware mounting locations, precisely with a wax crayon, soft lead pencil or marker and remove the assembly.
3. Remove the backing tape from the hardware and apply to the glass being very precise with the initial contact between the tape and the glass, attaching and removing the tape will adversely affect the bond strength of the tape to the glass.
REMOVE LOUVER FROM GLASS LEAVING HARDWARE ATTACHED.
4. Apply heavy and even pressure to the mounting hardware to ensure good contact across the entire surface area. The tape is pressure sensitive and will only have one use, so ensure correct positioning and good/ even contact.
5. Apply a thin bead of clear or black silicone to all edges of the hardware mounting plates and “squeegee” in
with a finger to ensure moisture cannot “undercut” the tape.
6. A full 24 Hrs is required to achieve a fully cured bond to the glass,do not install louver during this period. The added stress of the louver on the vehicle could cause tape to fail and a total loss of adhesion will occur.
TAPE BOND WILL TAKE 24 Hrs To CURE.
DO NOT INSTALL LOUVER OR DRIVE VEHICLE DURING THIS PERIOD.
7. After the recommended cure time has passed, inspect the bond strength of the tape to the glass prior to re-installing the louver. If any problems are visible call the hotline before proceeding.
8. Make the final installation of the louver; with the louver properly aligned, tighten all fasteners completely.
Avoid pressure spray car washes and extreme cold or hot weather for the next 24 Hrs to allow the adhesive to cure further.

