Talk to a Mustang Sales Tech
1-877-887-1105
M-F 8:30A-11P, Sat-Sun 8:30A-9P
$20K Sweeps! 10 Chances to Win! Enter Daily >

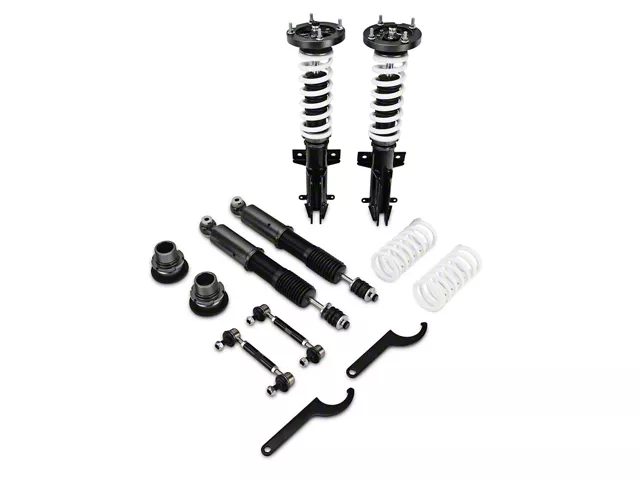
SR Performance V2 Coil-Over Kit (05-14 Mustang)

Item 389002
Verify parts fit and get product recommendations.
Mustang Sales Techs: Connect Now M-F 8:30A-11P, Sat-Sun 8:30A-9P
$0.00
On Sale

$759.99 (kit)

FREE Shipping Market Price $935.99 You Save 19% ($176.00) Up to 10% off for Military & First Responders! See Details

Will this fit your Vehicle?

Select a different vehicle Help?
Update or Change Vehicle
Ship to: Ashburn - 20149
Sorry, please enter a valid US or CA postal code
We're sorry, zip can't be updated at this time.
    Create a list
    Add to New List

    Saved - View your saved items

    We're sorry. We couldn't save this product at this time.

    or use

      Video Review & Installation

      Justin: The SR Performance V2 Coilover that we have here for the 2005 to 2014 Mustang are by far and away the most popular coilover option currently in the category four south of 1000 bucks. Now the V2s will pack that monotube design with 16-way damping adjustability and will lower your car anywhere from one to three inches which will essentially allow prospective buyers out there to fine-tune their ideal ride height or just simply slam the car to the ground if that's what you desire. Now price point's gonna live in that mid-$800 range and the install according to the site will get a soft three out of three wrenches here and take roughly four hours to complete or so from start to finish. But as always, guys, if you hang with me for a little bit, we'll walk you through the job later in the video.All right, guys, so full disclosure, I've actually had the SR V2 coilovers installed on my S197 in the past prior to moving to a more drag-focus setup and while they were on the car, I absolutely loved them. Now they did replace a Koni orange SR spring combination at the time. And besides the obvious height and damping adjustability of the coilovers themselves, the ride quality and handling performance were just vastly improved over my previous setup. But enough about me, what do you say we talk about the V2s here on the table?First up, let's talk about that height adjustability because I think it's one of the biggest draws of going with a coilover setup like this as opposed to the more traditional static spring setup. Now the V2s here from SR, guys again will offer a drop range from one to three inches depending on how you want to set your ride up. So again, essentially will allow you to slam the car to the ground to the point of being almost undriveable or maybe just go a little bit lower than stock and really anywhere in between. Now your only other option to get this kind of adjustability is of course going with an Air Ride setup which as you guys know is not only far more expensive but will also be a little bit more difficult to install as well.Now in addition to the height adjustability here guys, the V2s will also give you that 16-way dampening adjustment, meaning you can either soften or stiffen your ride depending on your personal preference and maybe the driving style that you're going to be attacking. For instance, if you're heading to the drag strip, you might want to soften up those fronts a little bit, add a little bit more stiffness to the rear to help promote that weight transfer or if you're heading to an autocross day, road track, something like that, you can always mess with those things pretty quickly and pretty easily. To do so, you're just simply gonna want to turn your knobs here on the top of the fronts, the rears, a key is included to insert into the top of the shock and make your adjustments that way. Now it's a very nice thing that SR has incorporated this kind of adjustability on such an entry-level or budget-friendly coilover and it's something you guys get to play with to ultimately kind of nail down your ideal ride quality. Me personally, I like things to be a little bit more on the firm side, the car just feels a little bit more responsive, a little bit more nimble if you will, but ultimately that is up to you guys at home.Another nice feature to point out with the V2s is the monotube design that you're getting here again for south of 1000 bucks, which I feel is very solid.Now if you're not familiar, a monotube shock or strut is typically used on higher-end dampers and coilover kits as the design just offers more consistent performance and for that reason, it's extremely popular with all out performance applications. But along with those monotube dampers, you're also getting four springs here. Of course, your front spring rate, by the way, 447 pounds, rear spring rates is gonna be 331 pounds. Now for the record, these are some of the higher spring rates in the category for a coilover such as this. The V2s from SR also do include the aluminum top hats here or caster-camber plates built in, nice feature to point out. And finally they even toss in some burly adjustable end links for you guys right there for the front sway bar, really nice feature and necessary feature if you ever wanted to go ahead and corner balance the car.But now we want to talk about the installation process. And the benefit of going with a coilover like this guys is that you're simply going to be yanking out your front strut assembly in one piece and replacing it with the entire coilover up front. So meaning there's no need to mess with any spring compressors or anything like that. But to give you a better idea of what the job is gonna be like here's that detailed walkthrough we promised you along with a quick tool breakdown.Man: The tools I used for this install are half-inch impact gun, a three-eighths impact gun, a quarter-inch impact gun, a 21-millimeter socket, a 19-millimeter socket, 18-millimeter socket, 15-millimeter socket, 13-millimeter socket, 12-millimeter socket, 15-millimeter swiveling impact socket and a 10-millimeter socket, an 8-millimeter wrench, a 12-millimeter wrench, a 19-millimeter ratcheting wrench, and an 18-millimeter ratcheting wrench.So the first step you're gonna want to take after you remove your wheel is to pull your caliper and rotor assemblies off the car and get them out of the way so that you can get to work. All right, you're gonna need a 15-millimeter socket, I'm using a half-inch air gun and a swivel socket but this can be done with a ratchet and socket set. With the caliper unbolted, you can use just a regular bungee cord and hook it into your caliper and tie it off to the subframe so that it stays out of your way and doesn't fall loose.Next, I'm gonna use a 10-millimeter socket to unbolt the brake line retaining clip, and then use a clip panel tool to remove the Christmas tree clip that hold the ABS and brake lines to the strut assembly. Using a clip tool, I'm gonna remove the clip. Next I'm gonna use an 18-millimeter socket to remove the upper part of the sway bar end link from the strut assembly. And now using the same 18-millimeter socket, I'm gonna remove the two lower strut bolts that hold the strut to the hub assembly.The final step to removing your strut assembly is going to be to remove the four nuts up at the top inside the engine bay, and once you remove those, your strut assembly should come right out. Now I need to remove the sway bar end link, in order to do that, I'm gonna use an 18-millimeter ratcheting wrench and an 8-mill box end wrench to hold the ball joint from spinning while I remove the nut. And now we can install the new coilover suspension kit just like the reverse removal for the stock.Next we can install the adjustable sway bar end link provided in the kit. With the coilover and sway bar link installed, you can start to reassemble your spindle. Gonna use a 19-millimeter ratcheting wrench to tighten up my sway bar end links. Next we're gonna throw our rotor and caliper back on before we reconnect our brake line bracket. Now I'm gonna use a 12-millimeter socket to tighten down the top strut nuts. And now you can just repeat this process for the other side of the vehicle.So because this is a solid rear axle vehicle, we're gonna actually accomplish removing both springs at the same time by lowering down the rear differential. We're gonna do this unbolting the sway bar from the body and we're also going to unbolt the lower shocks. Once we do that, we can lower our differential down, pull both springs out at the same time and put in our new ones. So I'm gonna use a 15-millimeter socket and impact gun to remove the sway bar end link from the body. With the links unbolted you can swing the sway bar down out of your way.Before I can unbolt the shocks, I have to support my rear axle so that my springs don't unload while I try to unbolt everything. Once again, using a 15-millimeter socket, I'm gonna unbolt the lower shock bolt. Now using the screw handle on the pole jack, I can slowly lower down the rear differential which will unload the springs and allow me to remove them from the car. Make sure to retain the isolators on the stock diff, you're gonna need them for your new springs.With all the lower suspension hardware removed in the rear, you can move into the trunk and pull this access panel back to get to the top of the shock bolt. Gonna use a 15-millimeter socket on an impact gun and unscrew the nut. And now we can start by installing our new rear shock. Now I'm gonna use a 19-millimeter socket on an impact gun to tighten up the top nut. Now I can install my new spring adjuster. And now I'm gonna install my new springs. And that's gonna wrap up this review and install for the SR Performance V2 Coilovers for your '05 to '14 Mustang. Thanks for watching. And for all things Mustang, keep it right here at AmericanMuscle.com.

      Product Information

      Features, Description, Reviews, Q&A, Specs & Installation

      Features & Specs

      • SR Performance V2 Coil Over Kit
      • Improves Handling Performance
      • Perfect for Track or Autocross
      • Monotube Coil Over Design
      • 16 Way Adjustable Damping
      • Estimated Drop: 1"-3" Front and Rear
      • 447lbs Front Spring Rate; 331 lbs Rear Spring Rate
      • Bolt-In Installation - No Cutting or Welding Needed
      • Fits All 2005-2014 Mustangs

      Description

      Performance Handling. Upgrade the suspension of your S197 Mustang with a SR Performance V2 Coil Over Kit for a dramatic improvement in over all handling performance. This SR Performance V2 Coil Over Kit is designed to lower your Mustang's center of gravity and reduce excessive body roll which results in flatter cornering and better directional control - perfect for windy back roads.

      Adjustable Ride Height. Not only will SR Performance Coil Overs improve the handling of your 2005-2014 Mustang, but they will also improve its overall appearance. This SR Performance V2 Coil Over Kit is ride height adjustable allowing you to lower your Mustang anywhere from 1" to 3" (front and rear) to eliminate that nasty tire to fender gap for a more aggressive street stance.

      16 Way Adjustable Damping. SR Performance V2 Coil Over Kits use 16-way adjustable monotube struts that have been specially tuned to match the included spring rates. The 16 clicks of damping adjustment allow the driver to dial in their preferred handling feel or desired ride quality from soft to firm to match their driving needs.

      Bolt-on Design. SR Performance designed their Mustang V2 Coil-Over Kit to be an easy, bolt-on conversion with absolutely no cutting, welding or modifications required for a simple straight forward installation.

      Application. This SR Performance V2 Coil Over Kit is designed for use on all 2005 to 2014 Mustangs, including the V6, GT, Bullitt, BOSS and Shelby GT500 models.

      SR Performance

      Fitment:

      Details

      SR Performance 389002

      CA Residents: WARNING: Cancer and Reproductive Harm - www.P65Warnings.ca.gov

      Installation & What's in the Box

      Installation Info

      What's in the Box

      • (2) Front Coil Overs
      • (2) Rear Shocks
      • (2) Rear Springs
      • (2) Spanner Wrenches
      • (2) Sway Bar Links

      4.2

      Customer Reviews (130)

        Questions & Answers

        10 More Questions

        Will It Fit My Mustang

        • Boss 302 - 12, 13
        • Bullitt - 08, 09
        • GT - 05, 06, 07, 08, 09, 10, 11, 12, 13, 14
        • GT500 - 07, 08, 09, 10, 11, 12, 13, 14
        • V6 - 05, 06, 07, 08, 09, 10, 11, 12, 13, 14

            Related Mustang Categories