 FREE 1 to 3-Day Delivery on Orders $119+ Details
Best Sellers


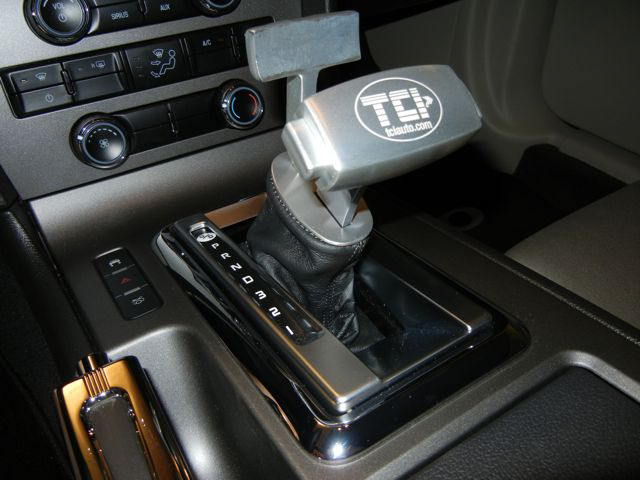
How to Install a TCI StreetFighter Ratchet Shifter on your 2010-2012 Mustang GT and V6
Installation Time
2 hours
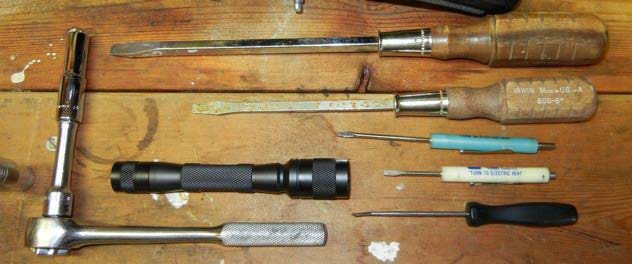
Tools Required
- Large Flat Blade Screwdriver (12”+ long suggested for best leverage)
- Medium Flat Blade Screwdriver
- 2 Small Flat Blade Screwdrivers (blades no more than 1/8” wide)
- Optional, small pick tool as a substitute for one of the small screwdrivers
- Small Flashlight
- 10mm Deep Socket
- Torque Wrench (not pictured) capable of setting to 80 inch-pounds
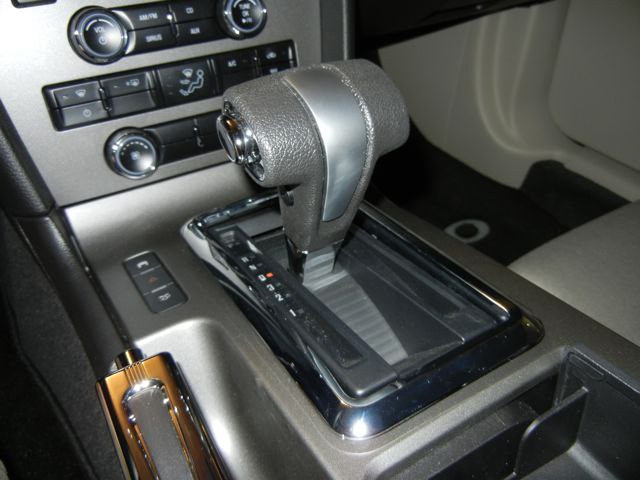
BEFORE
Installation Instructions:
1. Raise front of vehicle and secure in a safe manner. Ramps that raise the front wheels 7” will work, though that is about the minimum. 7” ramps provide enough clearance at the transmission location, but there is not much extra space for an average size person.
2. Set the parking brake and place wheel chocks on the rear tires.
3. Place the gear selector in D (Drive), turn off the ignition and disconnect the battery.

4. Remove the chrome bezel from around the shifter. Pull up evenly on both sides and ends as gently as possible. The bezel is attached to the shifter (not the console) using notched tabs. Once you get the bezel started up it will help to use the optional small pick tool or a small screwdriver to press inward on the tabs.
5. Remove the top of the console trim. Open both the rear console lid and the cup holder cover and pull up gently, but firmly at the back of the cup holders. Just use your hands. It takes a good grip and a firm pull. Once those two springs clips pop loose, there are two more pairs of spring clips along the sides. Work your way from back to front, gently pulling up till each pair of clips pops loose. Finally, at the front, there is a pair of tabs that engage slots in the front of the console. Just raise the console top and pull back slightly and it is easily removed.
6. As you are removing the console top, there is one wire plug you need to remove, located at the front left. It is the traction control / warning flasher / trunk release switch.
7. Next, you are going to work underneath the car. Take the large, medium, 2 small screwdrivers, optional pick tool and small flashlight with you.
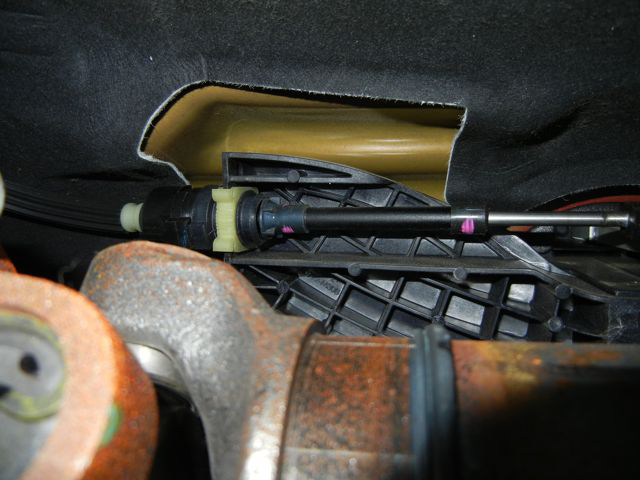
8. Use the medium flat blade screwdriver to depress the locking tab located inside the large yellow plastic locking mechanism. The tip of the red arrow shows the location of the locking tab. While depressing the locking tab, simultaneously push up on the yellow locking mechanism itself. It will move upward and you will be able to see the small ‘teeth’ at the bottom disengage.
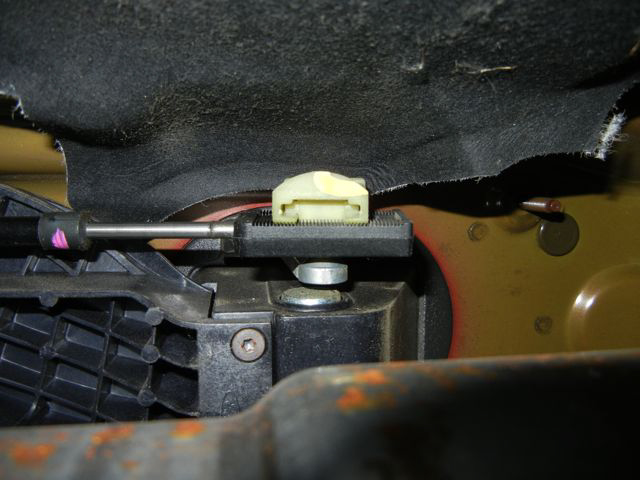
9. Using the large screwdriver, pry between the shifter’s metal arm and the yellow plastic. On picture 4, the tip of the blue arrow shows where to pry. Do not pry on the black plastic shift cable end. Be sure to place the tip of the screwdriver between the metal shift arm and the yellow plastic piece. Use a combination of twisting the screwdriver and prying to pop it loose. It can be a bit stubborn to pop off. That is why you need a large screwdriver. Once it pops off be careful not to move the cable at all. The idea is to leave the cable and shifter both set to D (Drive) position until the installation is complete.
10. Take one small flat blade screwdriver and insert it between the yellow locking tab and the hole it engages. The red arrow on shows where to insert the small screwdriver. Just slide the screwdriver tip between the two, letting the screwdriver tip protrude into the hole. This gives the locking tab a ‘ramp’ to ride up and out. The screwdriver should stay there by itself while you depress the other lock. The blue arrow indicates the position of the second lock. Use the second small screwdriver (or the optional pick tool) to press the locking tab out of its hole; and at the same time pull down on the shift cable. One or the other, or both of the locks should pop loose at this point. If both come loose at the same time, you are done. If only one comes loose, then use one of the small screwdrivers to gently pry the remaining locking tab loose, keeping downward pressure on the shift cable. Once the cable is loose just move it gently out of the way of the shifter arm so it does not get pulled on when you remove the shifter from inside the car.
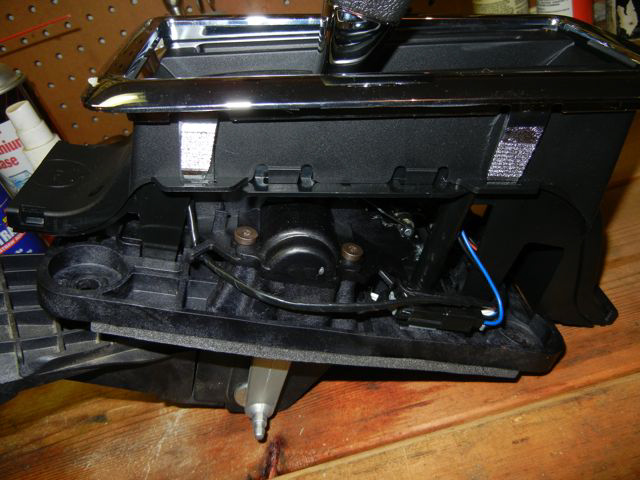
11. Back inside the car remove the (2) 10mm bolts and (2) nuts that are holding the shifter and remove the shifter from the car. The bottom left nut has a wire cable minder pushed onto it. Just pull it up and off. If you have trouble pulling it up, squeeze it with a pair of pliers to spread it a little and it will come off easily. The red arrows show 1 bolt at the top and one nut at the bottom. The other two on the right side are the same.
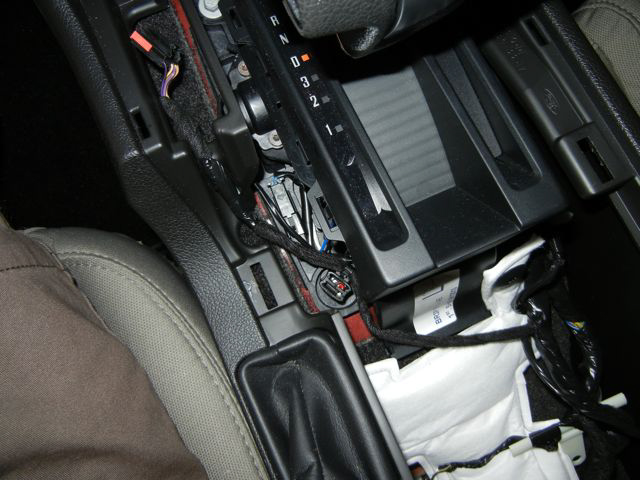
As you are lifting the shifter up, remove the wire plug located at the bottom right.
12. Install the TCI shifter using the same bolts and nuts. Tighten the bolts and nuts in a criss-cross pattern. Go slow and do not tighten any single bolt or nut significantly more than any other. Try to keep them even as you are tightening them. Use a torque wrench set to 80 inch-pounds and work up to that torque carefully.
13. Plug in the wire plug at the bottom right side.
14. Reconnect the battery. Turn ignition to ON position (do not start car) and verify the D indicator is lit on the new shifter. If not, shift through the gears leaving it in the D (Drive) position. Turn off the ignition.
15. Back underneath the car; reattach the cable to the cable support arm on the new shifter. Make sure the two locking tabs are engaged in the holes so they will not come loose.
16. Align the shifter cable end onto the stud of the metal shift arm and press it on. It will pop on with moderate pressure. Be sure not to move the cable in or out while you are doing this. You want the cable to be in the D (Drive) position, the same as the TCI shifter. Finally, press down on the yellow locking tab to lock the cable end.
17. Back inside the car; place the TCI shifter in PARK; turn ignition ON and verify the PARK indicator light is lit on the shifter.
18. At this point you can lower the car and take it for a test drive before replacing the console trim and shifter bevel.
19. Reinstall the console top trim and chrome shifter bevel in reverse order of removal in steps 4 and 5.
20. Installation is complete!
Installation Instructions written by AmericanMuscle customer Mike Mcallister 7/18/12
