 FREE 1 to 3-Day Delivery on Orders $119+ Details
How to Install Tuff Country 2 in. Leveling Kit on your F-150
Installation Time
4 hours
Tools Required
- Torque Wrench
- Standard Socket Set
- Standard Wrench Set
- Metric Socket Set
- Metric Wrench Set
- Tape Measure
- Hydraulic Floor Jacks
Please follow instructions carefully:
Before installation begins, measure from the center of the hub, to the bottom of the fender well, and record measurements below.
Pre-installation measurements:
Driver side front:_________________________________
Passenger side front:_____________________________
At the end of the installation take the same measurements and compare to the pre-installation measurements.
Post-installation measurements:
Driver side front:_________________________________
Passenger side front:_____________________________
If the vehicle that you are working on is equipped with EPAS, the EPAS plugs will need to be disconnected prior to beginning the installation of this kit. Failure to disconnect these plugs could result in damage to the EPAS module resulting in an error message being displayed, which will require replacement of the EPAS module. EPAS stands for (Electronic Power Assist Steering)
1. To begin installation, block the rear tires of the vehicle so that the vehicle is stable and can’t roll backwards. Safely lift the front of the vehicle and support the vehicle with a pair of jack stands. Place a jack stand on both the driver and the passenger side. Next, remove the front wheels and tires from both sides.
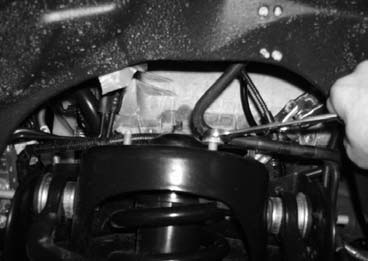
2. Working on the driver side, remove the (3) upper strut mount nuts. Save the stock hardware. Repeat procedure on the passenger side.
3. Working on the driver side, Loosen, but do not remove the upper ball joint nut. Repeat procedure on the passenger side.
4. Working on the driver side, loosen but do not remove the nut from the outer tie rod. Repeat procedure on the passenger side.
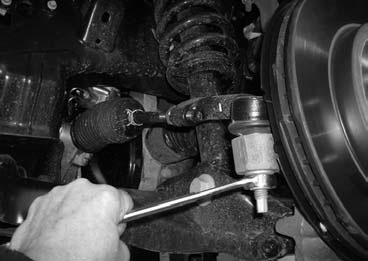
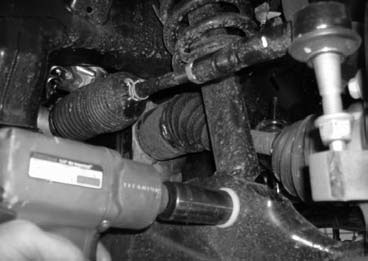
5. Now return to the upper ball joint and outer tie rod and carefully break the taper and remove them both from the steering knuckle. Repeat on passenger side. Special Note: Take special care not to damage the ball joint and tie rod end rubber boots.

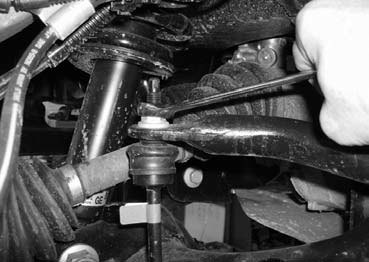
6. Working on the driver side, disconnect the sway bar end link from where it is connected to the sway bar, do not disconnect the end link from the lower control arm. Repeat on passenger side.
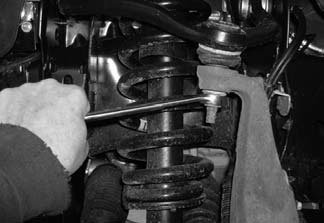
7. Working on the driver side, remove the nut and bolt holding the strut assembly to the lower control arm. Repeat on passenger side.
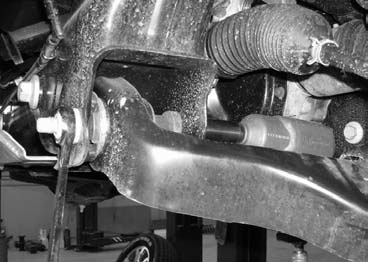
8. Working on the driver side, loosen but do not remove the (2) bolts holding the lower control arm to the vehicle. Repeat on passenger side. Special note: This is done so that the lower control arm can swing down and allow you to remove the strut assembly from the vehicle. Also, carefully use a pry bar to help remove the struts from the vehicle.
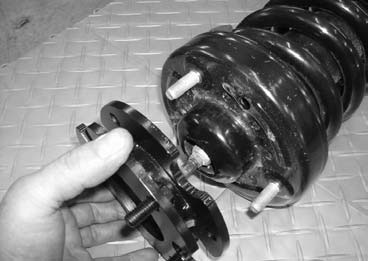
9. With both strut assemblies out of the vehicle it is time to install the new leveling spacers. Install these directly on top of the stock strut cap and secure them using the stock nuts. Torque to 35 ft lbs.
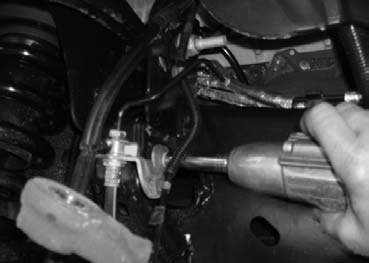
10. Working on the driver side, remove the brake line and ABS line from the mounting location. Save the hardware. Repeat procedure on the passenger side.
11. Working on the driver side, install the strut assembly back into the stock location, it may be necessary to pry down on the lower control arm in order for the lower eyelet of the shock to go into its pocket. Secure the strut using the stock bolt and hardware on the lower part, and using the new 3/8” nylon lock nuts and 5/16” flat washers on the upper mount. Torque the upper 3/8” hardware to 32 ft lbs and the lower stock bolt to 100 ft lbs. Repeat on passenger side.
12. Re-connect the upper ball joint into the steering knuckle and secure using the stock nut. It may be necessary to pry down on the upper control arm to get the nut started. Torque to 85 ft lbs and repeat on passenger side.
13. Now attach the brake line bracket into the stock location using the stock bolt, torque to 8 ft lbs.
14. Working on the driver side re-install the tie rod ends back into the steering knuckle using the stock nut and torque to 70 ft lbs. Repeat on passenger side.
15. Working on the driver side, attach the sway bar back to the sway bar end link using the stock hardware. Repeat on passenger side and torque to 50 ft lbs. If the vehicle that you are working on is equipped with EPAS, and you disconnected the module, re-connect the module at this point! EPAS stands for (Electronic Power Assist Steering)
16. Install the tires and wheels and carefully lower the vehicle to the ground.
17. With the weight of the vehicle on the ground, move back and torque the driver and passenger side lower control arm hardware to 110 ft lbs.
Congratulations, installation complete!
Special note: After the completion of the installation, Tuff Country EZ-Ride Suspension recommends taking the vehicle to an alignment shop and having a proper front end alignment performed.
Tuff Country EZ-Ride Suspension recommends that a complete re-torque is done on all bolts associated with this suspension system. It is the customers responsibility to make sure that a re-torque is performed on all hardware associated with this suspension system after the first 100 miles of installation. It is also the customers responsibility to do a complete re-torque after every 3000 miles or after every off road use. Neglect of following these steps could cause brackets to come loose and cause serious damage to the suspension system and to the vehicle.
Tuff Country EZ-Ride Suspension packages (2) sets of instruction sheets with this box kit. (1) is for the installer and (1) is for the customer. The (1) for the customer has some post installation procedure literature and it is the installers responsibility to make sure that the customer receives a copy of the installation manual along with the literature.
If you have any questions or concerns, please feel free to contact Tuff Country or your local Tuff Country dealer.
