 FREE 1 to 3-Day Delivery on Orders $119+ Details
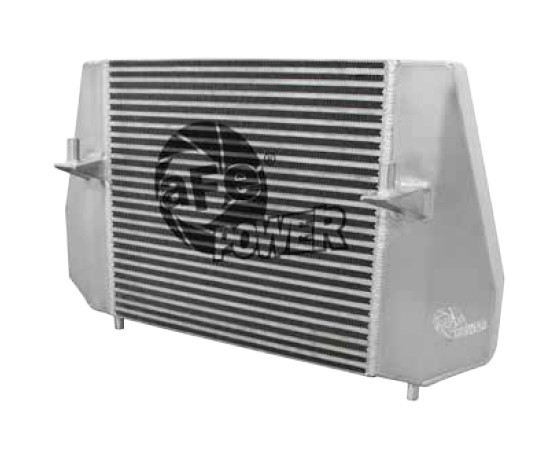
How to Install AFE Blade Runner Intercooler on your F-150
Parts Included:
• Intercooler
• Plug, Hex (X1)
• Washer, M6 (X1)
• Vent, Breather 1/8” (X1)
• Screw, M6 x 1 x 16 (x1)
CAUTION: Allow time for your vehicle to cool down prior to installation. When working on or under your vehicle proceed with caution. Engine bays reach high temperatures and may cause serious burns. Wear protective safety equipment; eye goggles and gloves to ensure a safe installation. aFe recommends professional installation on our products.
1. Park vehicle on level ground and engage parking brake.
2. Disconnect battery.
3. Remove the two (2) 13mm bolts holding the plastic shield underneath the vehicle.
4. Remove the plastic clips holding the rubber cover behind the plastic shield just removed.
5. Loosen clamps holding the passenger side intercooler couplings onto the intercooler then disconnect couplings from intercooler, using an 8mm socket.
6. Remove c-clip holding driver side tube onto intercooler then disconnect the tube from intercooler.
7. Disconnect the plastic tube from recirculation canister and unplug the electrical connector on the pressure relief valve.
8. While supporting the intercooler support bracket, remove the two (2) 13mm bolts to drop the intercooler and support bracket out from the bottom of the vehicle.
9. Once the intercooler is out of the vehicle, remove the recirculation canister and pressure relief valve assembly by removing the bottom screw, then twisting the entire assembly counter-clockwise.
10. Reinstall the recirculation canister and pressure relief valve assembly onto the aFe intercooler and secure with the supplied M6 washer and M6x16mm bolt, using a 10mm socket.
11. Install the supplied plug onto the bottom driver side support peg. It is recommended to drain the fluid build-up after every oil change.
Note: There is a breather fitting equipped with this intercooler because testing has shown the stock intercooler to have condensation build up in the bottom of the intercooler on some vehicles. The breather fitting will prevent this issue from happening with no side effects. You can install the breather fitting instead of the plug and never have to drain the intercooler.
12. Install all four rubber grommets and bottom support bracket onto the aFe intercooler then install into vehicle.
13. Use a small amount of WD-40 on outside of grommets for ease of installation.
Note: It may be necessary to reposition top support bracket for installation.
14. Install the two (2) 13mm lower bracket bolts, removed from step 8.
15. Reinstall the passenger side stock couplings, and clamps, onto the aFe intercooler and tighten clamps, using an 8mm socket.
16. Reinstall the driver side tube with c-clip onto the aFe intercooler.
17. Reconnect the plastic tube and electrical connector onto the recirculation canister and clip into place on intercooler.
18. Reinstall all parts removed in steps 3 & 4, using an 13mm socket.
19. Reconnect battery.
20. Installation is now complete.
Enjoy and thank you for choosing aFe Power!
