FREE 1 to 3-Day Delivery on Orders $119+ Details
How to Install Barricade Xtreme Heavy Duty Brush Guard - Polished SS on your F-150
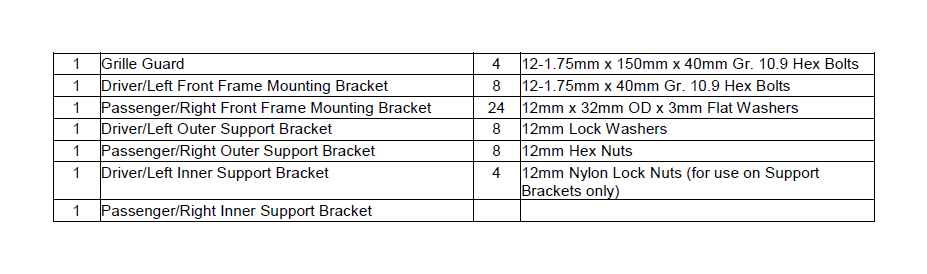
PARTS LIST:

PROCEDURE:
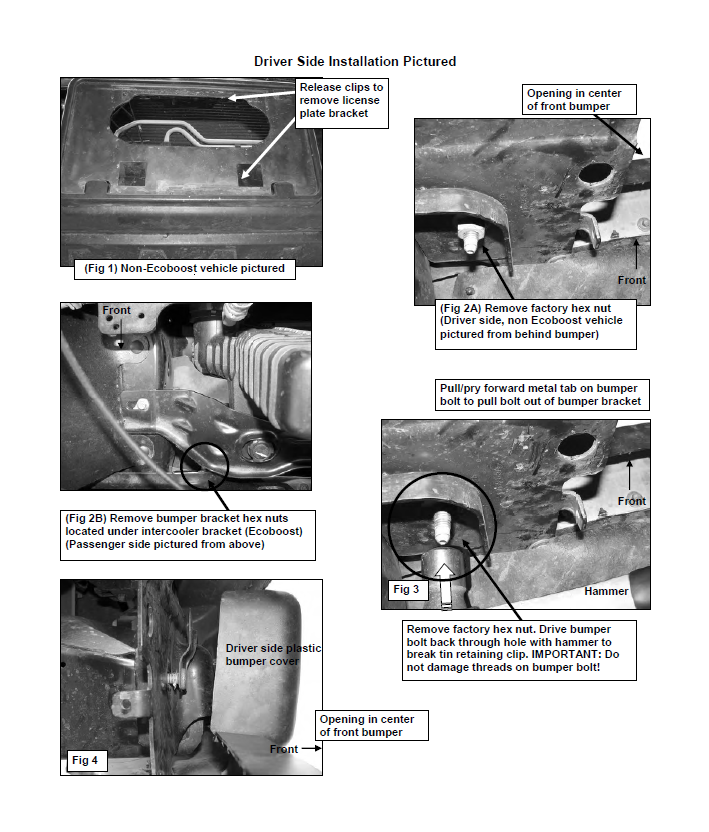
REMOVE CONTENTS FROM BOX. VERIFY ALL PARTS ARE PRESENT. READ INSTRUCTIONS CAREFULLY BEFORE STARTING INSTALLATION. GRILLE GUARD IS VERY HEAVY AND ASSISTANCE IS HIGHLY RECOMMENDED TO AVOID POSSIBLE INJURY OR DAMAGE TO THE VEHICLE. CUTTING MAY BE REQUIRED.
2011-12 w/Ecoboost: It will be necessary to relocate the front license plate. If local/state law requires a front license plate, an aftermarket bracket kit must be purchased separately. Follow manufacturer's directions for installation. IMPORTANT: Do not block the air inlet in the front bumper on Ecoboost equipped vehicles!
1. Remove the front license plate and plastic bracket, (Figure 1). Open the hood. Starting on the driver side, remove the factory hex nut located on the back of the bumper bracket, (Figure 2A). Drive the bumper bolt into the hole in the bracket to release the bolt from the metal retaining clip, (Figure 3). IMPORTANT: Do not damage threads on the factory bumper bolt! Discard the metal clip. The factory bumper bolt is attached to a metal tab on the front bumper. Gently pry the metal tab away, (forward) from the bracket to pull the bolt out of the bracket, (Figures 4 & 5). NOTE: The metal tab and bumper bolt can be moved by hand once released from the retaining clip. Access the bumper bolt through the opening behind the plastic bumper cover, (Figure 5).
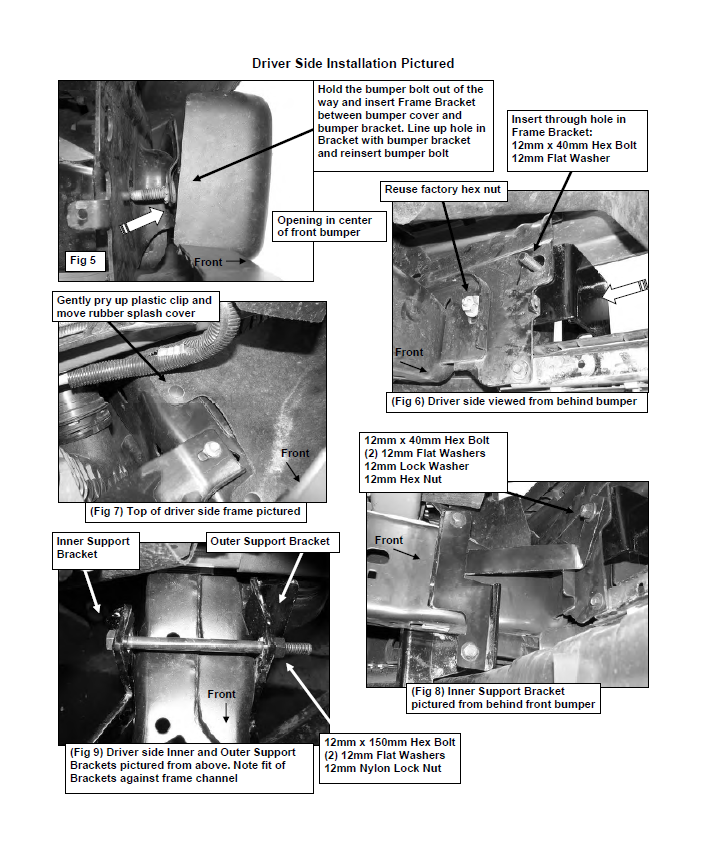
2. Pull the bumper bolt clear of the bracket and insert the driver side Frame Mounting Bracket into position between the plastic bumper cover and the bumper bracket, (Figure 6). Line up the (2) mounting holes in the Frame Bracket with the holes in the bumper bracket. Insert the bumper bolt back through the Frame Mounting Bracket and bumper bracket and reinstall the factory hex nut. Do not tighten hardware at this time.
3. Repeat Steps 1 & 2 for passenger side Mounting Bracket installation.
a. Ecoboost equipped vehicles: Reinstall the crossmember mounting bracket for the intercooler if removed in Step 2, (Figure 2B).
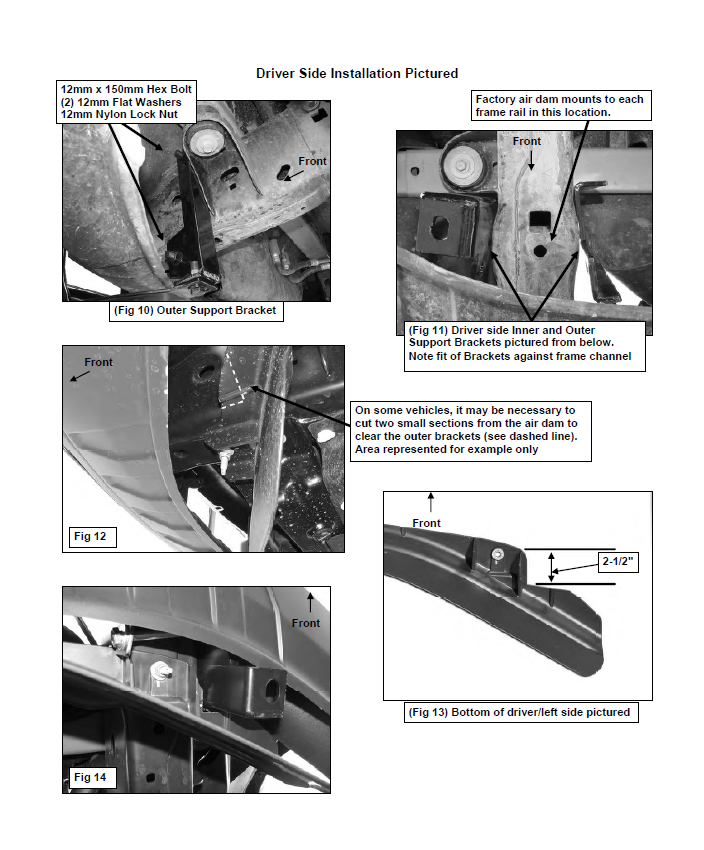
4. Open the hood and locate the top of the frame on the driver side. Use a flat blade screwdriver to gently pry up on the plastic clip on the top of the frame to move the rubber splash guard out of the way, (Figure 7). Select the driver side Inner Support Bracket, (Figure 8). IMPORTANT: Temporarily remove the plastic air dam-if equipped. Hold the Inner Bracket in position against the side of the frame. Insert (1) 12mm x 150mm Hex Bolt with (1) 12mm Flat Washer into and through the hole in the top of the Bracket. NOTE: Hex Bolt will rest on the top of the frame channel, (Figures 8, 9 & 15).
5. Next, select the driver side Outer Support Bracket. Hang the Bracket from the (1) 12mm x 150mm Hex Bolt, (Figures 9 & 10). Secure the Outer Bracket to the Inner Bracket with (1) 12mm Flat Washer and (1) 12mm Nylon Lock Nut. Repeat this step to secure the bottom of the Inner and Outer Support Brackets. IMPORTANT: Leave hardware completely loose, do not tighten hardware on the 12mmx 150mm Hex Bolts until installation is complete. NOTE: The sides of the frame are not flat at the mounting point so both brackets will be at slight angles to each other and not parallel, (Figure 11).
6. Repeat Steps 4 – 5 for passenger side Support Bracket installation.
7. Once the driver and passenger side Support Bracket assemblies have been partially installed, push the Support Brackets as far forward on the frame as possible. NOTE: Hardware must be loose-remove the lower 12mm x 150mm Hex Bolt if necessary. Reinstall the air dam. Pull the Bracket assemblies back into position with the Outer Support Bracket against the body mount, (Figures 11 & 15). The Outer Support Bracket must be tight against the factory frame mount when properly installed, (Figures 10, 11 & 15). The Support Brackets are designed to fit over and around the factory air dam but depending on model and year, the air dam may require some trimming to clear the Outer Brackets, (Figures 12 - 14).
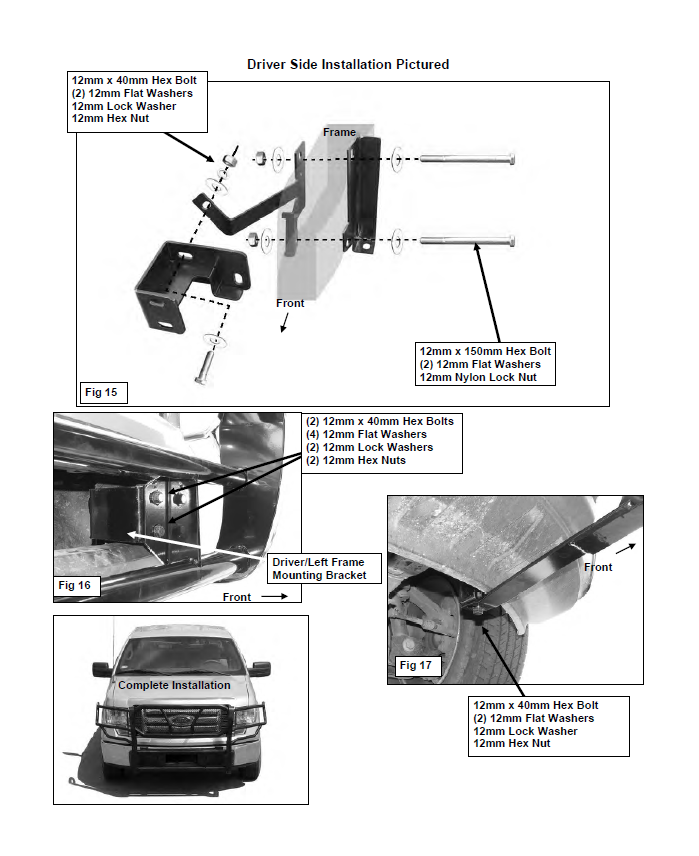
8. Line up the slot in the long, angled tab on the Inner Support Bracket with the hole in the back of the factory bumper bracket next to the opening in the bumper, (Figures 8 & 15). This hole will also line up with the remaining hole in the Frame Mounting Bracket installed in Step 2. Insert (1) 12mm x 40mm Hex Bolt with (1) 12mm Flat Washer into the Frame Mounting Bracket and through the bumper bracket, (Figure 8). NOTE: Move the rubber splash guard behind and below the bumper. Secure the Inner Support Bracket to the Hex Bolt with (1) 12mm Flat Washer, (1) 12mm Lock Washer and (1) 12mm Hex Nut, (Figures 8 & 15). Snug but do not fully tighten hardware at this time.
9. Repeat Step 8 for passenger side Inner Support Bracket installation.
10. With assistance, hold the Grille Guard up to the vehicle. Stands are highly recommended. Line up the (4) mounting holes in the Frame Mounting Brackets with the holes in the mounting plates on the Grille Guard. Bolt the Grille Guard to the Frame Brackets with (4) 12mm x 40mm Hex Bolts, (8) 12mm Flat Washers, (4) 12mm Lock Washers and (4) 12mm Hex Nuts, (Figure 16). Snug but do not tighten hardware at this time.
11. Next, move to the driver side lower mount welded to the Grille Guard. Line up the slot in the bottom of the Outer Support Bracket with the lower mount on the Grille Guard. Bolt the two Brackets together with (1) 12mm x 40mm Hex Bolt, (2) 12mm Flat Washers, (1) 12mm Lock Washer and (1) 12mm Hex Nut, (Figure 17). Snug but do not tighten hardware at this time.
12. Repeat Step 11 to attach the passenger side lower Grille Guard mount.
13. Align, center and adjust the Grille Guard properly and tighten the Grille Guard and Frame Bracket hardware first. Once properly tightened, move to the Support Brackets. Hold the (2) Support Brackets tight against the frame and slowly tighten the hardware. Make sure that the (2) long Hex Bolts are tightened evenly to clamp the (2) Brackets against the frame, (Figures 9, 11 & 15). Once the Support Bracket hardware is tight, check and tighten all remaining hardware. Replace license plate if required.
14. Do periodic inspections to the installation to make sure that all hardware is secure and tight.
To protect your investment, wax this product after installing. Regular waxing is recommended to add a protective layer over the finish. Do not use any type of polish or wax that may contain abrasives that could damage the finish.
For gloss black finishes: Mild soap may be used to clean the Grille Guard.