FREE 1 to 3-Day Delivery on Orders $119+ Details
How to Install Black Horse Off Road Armour Rear HD Bumper (15-18 All, Excluding Raptor) on your Ford F-150

Shop Parts in this Guide
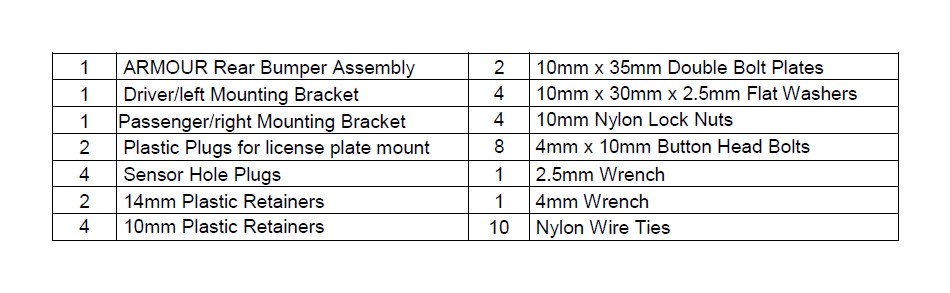
PARTS LIST:
PROCEDURE:
REMOVE CONTENTS FROM BOX. VERIFY ALL PARTS ARE PRESENT. READ INSTRUCTIONS CAREFULLY BEFORE STARTING INSTALLATION. BUMPER IS HEAVY, ASSISTANCE IS RECOMMENDED TO AVOID POSSIBLE INJURY OR DAMAGE TO THE VEHICLE. IMPORTANT: OEM BUMPER REINFORCEMENT USED WITH “STANDARD” TOW PACKAGE WITHOUT RECEIVER HITCH CANNOT BE REINSTALLED. OE INTEGRATED “HD” HITCH, “MAX DUTY” HITCH AND MOST AFTERMARKET RECEIVER HITCHES REQUIRED FOR TOWING.
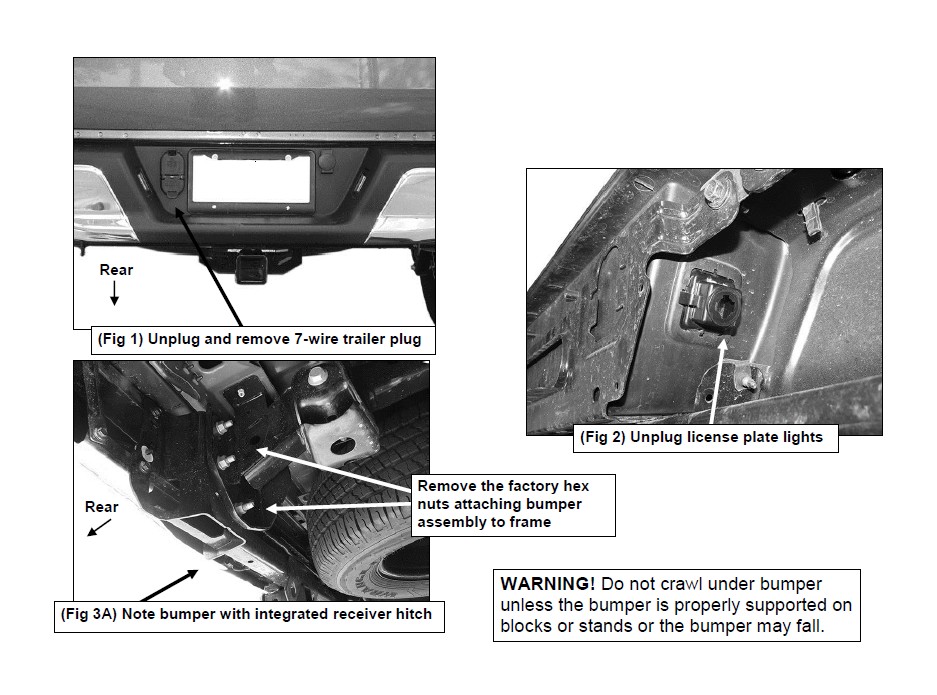
1. Remove the license plate from the bumper, (Figure 1). Next, unplug the license plate lights, trailer plug and sensors, (if equipped). Release the wiring harness from the clips attached to the back of the bumper. Move all wiring harnesses away from bumper. NOTE: Bumper is designed to be compatible with larger 7-wire universal trailer harness plug only.
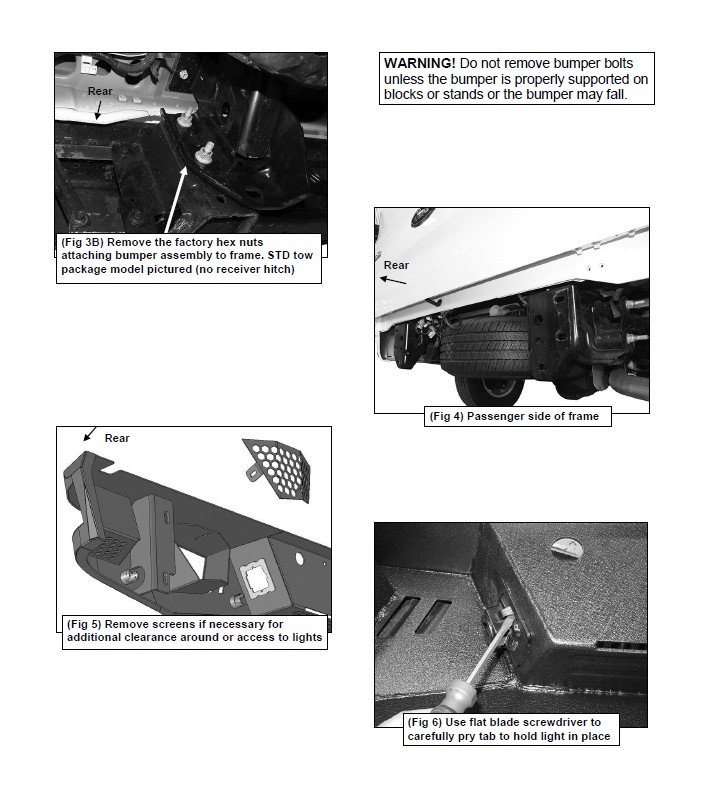
2. Place blocks or jack stands under the bumper to support it during mounting bolt removal. Once the bumper has been safely supported, remove the factory hardware attaching the bumper to the end of the frame and remove the bumper assembly, (Figures 3A, 3B & 4). WARNING! Assistance is required to hold the bumper in place during hardware removal to prevent bumper from falling.
3. Remove sensors, (if equipped), from bumper. Next, release the clips holding the license plate lights in place and remove the lights, (Figure 2). Release the clips securing the trailer plug and remove the plug.
4. Optional LED light installation at ends of bumper (sold separately).
a. Insert light into opening and up to mounting slots. Check for clearance between front and back of light. If necessary, remove the screens from the back of the openings, (Figure 5). IMPORTANT: Screens must be removed before Bumper is installed.
b. Follow the light manufacturer’s instructions to attach each light to slot in the opening.
c. Repeat the above steps for remaining light installation.
d. Follow light manufacturer’s instructions for adjustment and to properly wire the light to the vehicle electrical system after Bumper installation.
5. Reinstall the license plate lights and trailer plug, (Figure 6). NOTE: Use a flat blade screwdriver to carefully pry the metal clips on the plug out to grab the edge of the opening.
6. NOTE: Depending on tow package, it may be necessary or easier to install sensors, (if equipped), before installing the Bumper.
Models without bumper sensors:
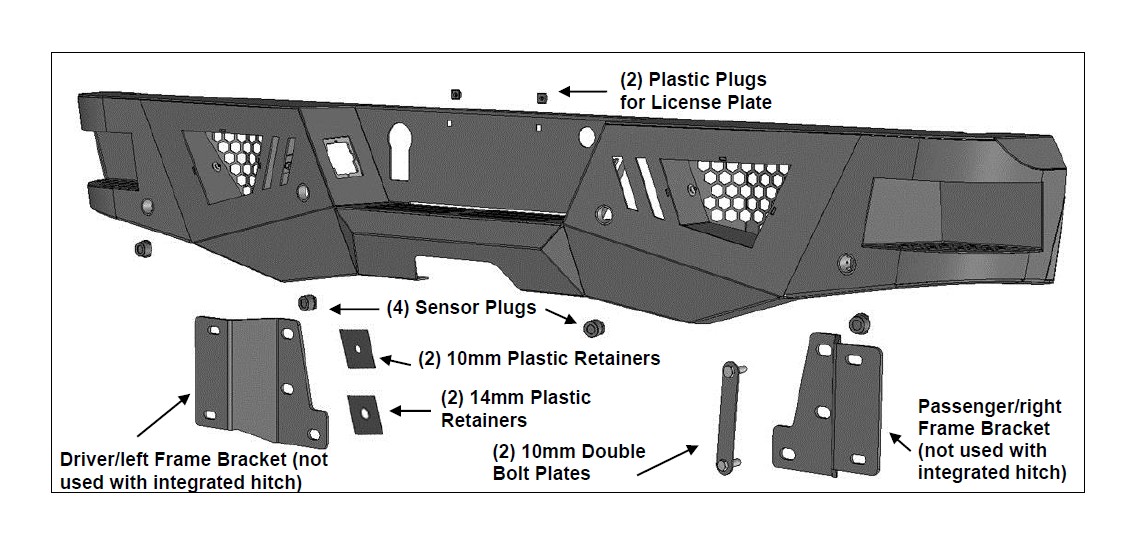
a. Select the included (4) Rubber Plugs.
b. From behind bumper, push plugs into sensor mounting holes, (Figure 7).
Models with bumper mounted sensors:
a. Push the sensor into the mounting socket in the back of the bumper.
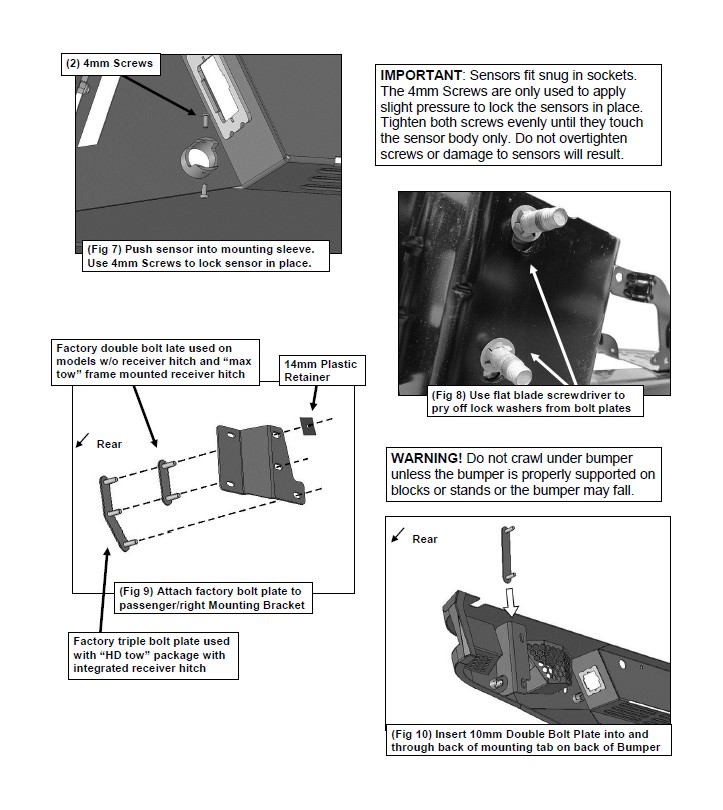
b. Secure each sensor to the socket with (2) 4mm x 10mm Button Head Screws, (Figure 7). IMPORTANT: Sensors fit snug in sockets. The 4mm Screws are used to apply slight pressure to lock the sensors in place. Tighten both screws evenly until they touch the sensor body only. Do not overtighten screws or damage to sensors will result.
7. Use a small flat blade screwdriver to pry the star washers off of the bolt plates used to attach the factory bumper to the frame, (Figure 8). NOTE: “HD” tow package models use a triple bolt plate, “Standard” and “Max Duty” equipped models use a double bolt plate.
8. Determine towing package supplied with vehicle:
Models with “standard tow package” without HD receiver below bumper and models with “Max Duty” frame mounted receiver hitch below bumper.
a. Insert the factory bolt plate into the passenger/right Mounting Bracket. Thread (1) 14mm Plastic Retainer onto the bolt plate to hold it in position, (Figure 9).
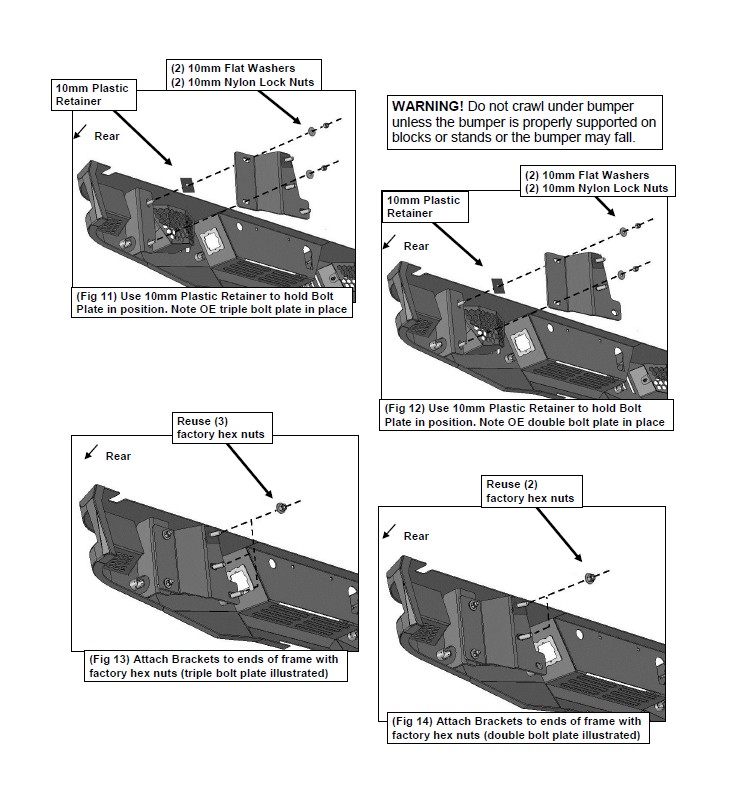
b. Select (1) 10mm Double Bolt Plate and (1) 10mm Plastic Retainer. Insert the Double Bolt Plate into and through the back of the mounting tab on the ARMOUR Bumper, (Figure 10). Thread the Retainer down onto the Bolt Plate to help hold it in position.
c. Attach the passenger/right Mounting Bracket assembly to the 10mm Double Bolt Plate with (2) 10mm Flat Washers and (2) 10mm Nylon Lock Nuts, (Figures 11 & 12). Snug but do not fully tighten hardware at this time.
d. Repeat the previous Steps to install the driver side bolt plate and Bracket assembly.
e. With assistance, hold the ARMOUR Bumper assembly up to the ends of the frame. Temporarily support the weight of the Bumper. WARNING: To avoid possible injury or damage to the vehicle, do not proceed until the bumper is fully and safely supported. Reuse the factory hex nuts to attach the ARMOUR Bumper Brackets with bolt plates to the frame, (Figures 13 & 14). Snug but do not fully tighten hardware at this time.
f. Skip to Step 9.
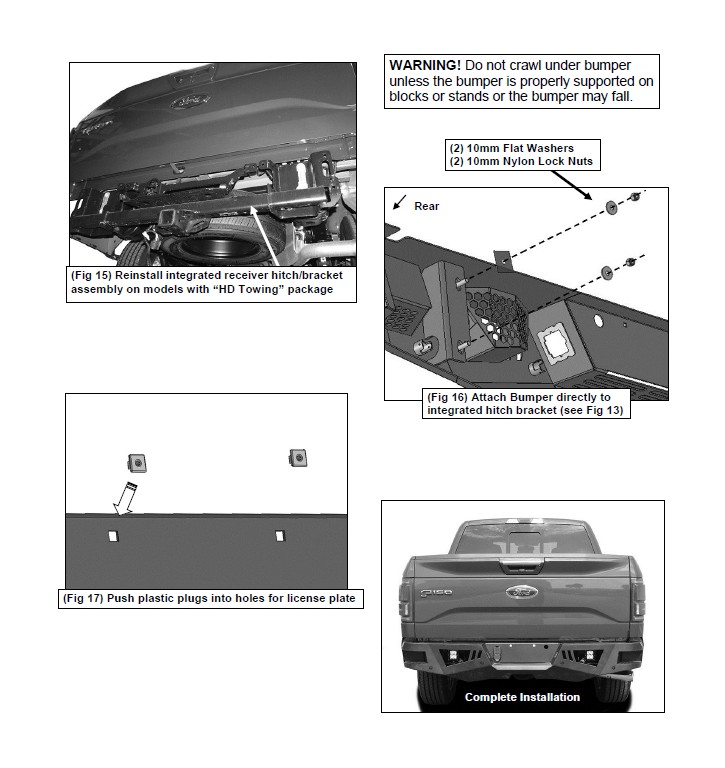
Models with “HD” tow package with integrated receiver hitch into bumper and brackets.
a. Remove integrated receiver hitch and bracket assembly from back of bumper.
b. Use factory hardware to reinstall receiver/bumper bracket assembly to mounts on ends of frame, (Figure 15). Snug but do not fully tighten hardware at this time.
c. Select (1) 10mm Double Bolt Plate and (1) 10mm Plastic Retainer. Insert the Double Bolt Plate into and through the back of the mounting tab on the bumper, (Figure 16). Thread the Retainer down onto the Bolt Plate to help hold it in position. Repeat to attach the driver side 10mm Double Bolt Plate.
d. With assistance, attach the Bumper assembly to the receiver/bumper bracket assembly with (4) 10mm Flat Washers and (4) 10mm Nylon Lock Nuts, (Figure 16). Temporarily support the weight of the Bumper. WARNING: To avoid possible injury or damage to the vehicle, do not proceed until the bumper is fully and safely supported. Snug but do not fully tighten hardware at this time. Skip to Step 9.
9. Level and adjust the bumper and fully tighten all hardware including the Mounting Bracket to Bumper hardware.
10. Attach the wiring harness to the sensors, lights and trailer plug. Use the included Wire Ties to secure the wiring harness to the bumper and frame as necessary.
11. Do periodic inspections to the installation to make sure that all hardware is secure and tight.
12. Use the included (2) push-in plugs to attach the license plate to the Bumper, (Figure 17).
13. Do periodic inspections to the installation to make sure that all hardware is secure and tight.
To protect your investment, wax this product after installing. Regular waxing is recommended to add a protective layer over the finish. Do not use any type of polish or wax that may contain abrasives that could damage the finish. Mild soap may be used to clean the Bumper assembly.