 FREE 1 to 3-Day Delivery on Orders $119+ Details
How to Install ICI Magnum RT Series Front Winch Bumper (10-14 Raptor) on your Ford F-150

Hardware Kit Includes:
(1) 4— 1/2-13 x 172 Hex Head Bolt
(2) 8 —1/2" Flat Washer grade 8
(3) 4— "A" lock washer grade 8
(4) 4— W'-13 Hex Head Nuts
(5) 4— 3/8-16 x.1.0" Hex head bolt
(6) 4-3/8 USS Flat washer
(7) 4-3/8 lock washer zinc
(8) 4 — 8mm Spring nuts- 1.25
(9) 4— 8mm x 25mm x 1.25 Hex Head Bolts
(10) 4— 8mm flat washers
Components List:
1 —Magnum Series Bumper
2 —Support L-Brackets (BP5036)
3— BP5001 Winch plate
Removal
STEP 1. Open Hood of truck, locate & remove (2) inner 10mm bolts hex bolts attaching hood latch mechanism to front bumper from the inside. One located on either side of the latch mechanism.
STEP 2. Remove plastic trim push-tabs from the back side of the bumper holding the splash guard in place. Leave splash guard attached to the core support area. (If so equipped)
STEP 3. Remove the (4) 2 1mm head retaining nuts attaching the bumper assembly at the frame. Remove by lifting up from the bottom and outward.
STEP 4. Remove factory tow hooks and save for re-installation along with all the tow hook mounting hardware.
Installation:
STEP 1. Remove all components from there packaging and inspect hardware to ensure you have the correct amount. Lay bumper on a blanket or cardboard to prevent damaging the powder coat finish.
STEP 2. If you have purchased lights to install into the FBM5OFDN bumper we recommend doing so before installation onto the vehicle. Utilize hardware provided by the light manufacturer. Leave slightly loose for adjustment after completing the bumper installation.
STEP 3. Once lights have been installed; lift and support the FBM5OFDN bumper up onto frame of the vehide, Bolt in place using the 2 of the 4 supplied 1/2x 11/2" Hex bolts (1), washers (2), lock washers (3) and nuts (4) using the outer two mounting holes and into the corresponding factory bolt holes, leave loose. (See Fig. A).
STEP 4. Align the bumper and once satisfied, snug the two outer 1/2" bolts to the frame.
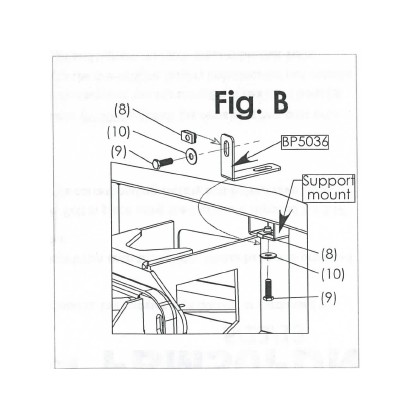
STEP 5. Next install two of the supplied 8mm spring speed clips (8) onto the short side of both Support L-Brackets (BP5036). Attach the remaining two dips onto the welded support mount on bumper. (See Fig. B). The Support L-Brackets (BP5036) attach to the welded support mounts using 8mm hex head bolts (9) and flat washers (10) located inside/top of the bumper (See Fig. B). Now attach L-Brackets (BP5036) into the pre-existing factory holes located just outside of the hood latch mechanism, using the remaini ng 8mm hex head bolts (9) and flat washers (10) . Adjust and tighten the latch support bracket bolts. Torque to 15ft/lbs.
STEP 6. Next you will install the supplied winch mount plate (BP5001) by aligning the two upward mounting points with inside mounting holes of the frame and front bumper. Attach using the remaining 'A" x 11/2" Hex head bolts (1), lock (2) and flat washers (3). Align and attach rear mounting holes using the factory (12mm) bolts and spring nuts that were removed from factory skid plate. Once aligned tighten all four mounting points. 1/2" bolts to 85ft./lbs. Torque all hardware at this time.
STEP 7. Re-using factory tow hooks and tow hook hardware, line up with bottom holes in bumper/frame brackets and install (4) bolts and welded nut tabs, adjust and tighten.
STEP 8. Install winch with the hood open and lower in from top downward onto the winch plate, attach using hardware supplied with your winch. Follow winch manufacturers installation, wiring and safety instructions. Attached fairlead to the front of the bumper using hardwa re supplied with the winch. Feed winch cable through the fairlead and attach hook.
STEP 9. Next install the supplied Skid Plate (BP5037). Place the front of the Skid Plate (BP5037) on top of the lower lip of the bumper (Note: 3/8 welded nuts face upward) then raise and align the two bottom slotted holes with bottom holes used by the old factory skid plate. Attach two of the fa ctory 12mm bolts to hold the skid plate in place, HAND TIGHTEN ONLY. Now using the supplied 3/8" hex bolts (5), lock washers (7) and flat washers (6), attach the front of the Skid Plate (BP5037) to the bumper, take care not to force or cross thread the bolts. (Note: make sure nut threads are free paint or other debris before threading) Once all four 3/8" bolts are started you may tighten all six attaching bolts. 3/8" bolts torque to 30ft/lbs.
STEP 10. Recheck that all hardware is properly torqued. Spool winch cable in attaching hook end to either one of thefactory tow hooks. DO NOT POWER WINCH HOOK INTO FAIRLEAD This can cause damage to the winch and bumper
You are now finished, Thank you for purchasing and enjoy your new ICI Magnum Bumper.
