 FREE 1 to 3-Day Delivery on Orders $119+ Details
How to Install Perforated Real Flag Rear Window Decal on your F-150
Installation Time
30 minutes
Tools Required
- Plastic Squeegee
- Pair of scissors
- Snap Knife or X-acto style knife
- Painters tape
- Needle or pin
- Window perf tool-(optional)

Shop Parts in this Guide
Prep:
Clean window well with soap and water. Do Not use window cleaner. Make sure all dirt debris and any foreign matter is removed from the window. Then clean the window with alcohol and allow to dry completely.
Step 1:
After cleaning the window thoroughly , place graphic against the window without removing the backing. You can tape the graphic in place on the vehicle. This will help you see the spacing needed for the location on the graphic.
Step 2:
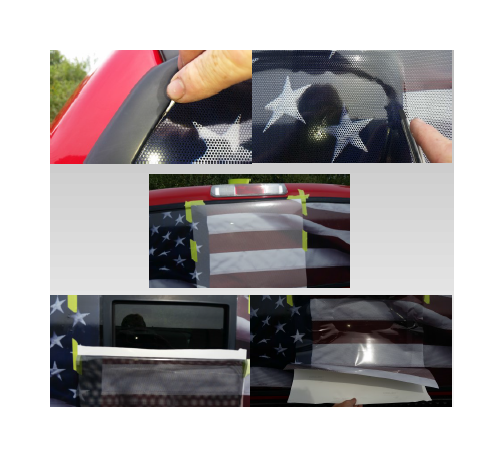
Remove backing from the graphic. With help from an assistant place the graphic on the window in the center. Lightly apply from the center out to the edges. If bubbles appear stop, remove vinyl to the just past the bubble and re apply. Keep only light pressure on the graphic but be sure it is flat on the window as you go. Once it is on the window bubble free, using the felt edge of the squeegee, squeegee the graphic down to the window. Small bubbles can we removed by taking a pin and puncturing the vinyl to let out the air. Hard pressure is not needed just be sure the all adhesive is in contact with the window. The edges will be trimmed next so it doesn't need to be flat near any areas that are raised above the glass, such as molding or trim.
Step 3:
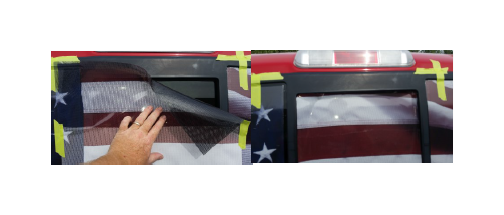
For sliding sections, Apply as above in step 2 but only concentrate you efforts to the outer two window panels. These two should be installed properly, the center section will be removed and replaced later. Having the outer two in one sheet will ensure alignment of the center section.
Step 4:
Trimming the edges is the next step. Cut the graphic flush with the edge of the glass up against any moldings. Do this on both outer panels. This is not critical to be absolutely perfect you will be trimming it to final size later. The center section becomes waste during the large panel installation.
Step 5:
For the center panel, take the extra piece and lay it over the installed graph-ic. Line the print up to the installed sections. Tape the center section tem-porarily in place. Next use tape and make some location marks with the tape. Placing tape next to the edge of the graphic on the top corners and next to it on the upper side corners will allow you to place the graphic in the proper location. Leave the graphic taped in place. Fold down without creasing the graphic to the middle and remove half the backing by cutting it away. Be careful not to cut the graphic. Fold the backing back a bit so you have something to grasp from the other side. Once you have removed the backing, place the graphic were it was using your location marks to ensure proper alignment. Pull the remaining backing off downward from the back of the graphic. Install the center section in the same manner as you did the first section. Trim the edge like you did in step 4.
Step 6:
Once all sections have been installed and are laying flat we can move on to the edge final trimming. You must trim the edge of the graphic away from the edge of the glass to leave room for a protective laminate that will edge seal the graphic. This prevents dirt and debris from getting under the graph-ic. There are several techniques for doing this step.
Technique 1: Using a specific tool designed for this trimming can prove to the most accurate. Although most accurate it is a separate item to be purchased. This tool is available as PERFect Cutting Tool. Although these can be pricey they do work well. The idea is to get the graphic cut about an 1/8-1/4” away from the edge of the glass to allow for edge sealing with the over laminate.
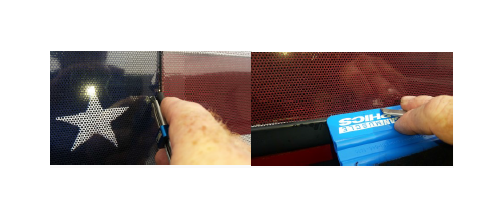
Technique 2: Use a snap knife and cut the edge away from the glass free hand. Although fast and economical if not accurately done could cause for an imperfect install. Again the idea is to get the graphic cut about an 1/8-1/4” away from the edge of the glass to allow for edge sealing with the over laminate.
Technique 3: The third technique is a little slower but can be done with the tools on hand or readily available. Use a straight edge such as a 12” ruler or in small locations use the hard edge of the 4” squeegee. Laying it on the graphic about 1/8-1/4” away from the edge of the glass and trim off the excess vinyl.
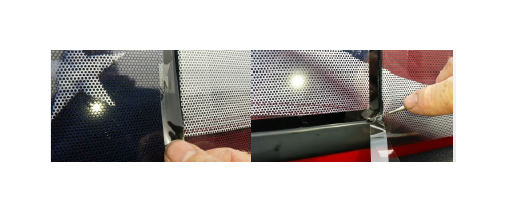
The final result regardless of the tools or technique used is a cut graphic following the edge of the glass about 1/8-1/4” away from the edge of the glass. This will allow for edge sealing.
Step 7:
Install the edge sealing laminate by laying the edge against the edge of the window either against the molding or flush with any cut glass. This will over lap the graphic enough to seal the edge. Start at the bottom edges, then do the side edges, and then the top edges. This will help dirt from getting under the graphic.
