 FREE 1 to 3-Day Delivery on Orders $119+ Details
Putco Crossrails - Stainless Steel (15-16 All)
Installation Time
1 hours
Tools Required
- 1/4" Hex Wrench
- Torque Wrench
- Safety Glasses
- Pocket Cap Removal Tool
- [For 5.5' Kit, Also Required:]
- 3/8" Router Bit or Equivalent
- Router or RotoZip Type Tool with 1/4" Shank and Base
- Drill
- 1/2" Drill Bit
- Hearing Protection
Shop Parts in this Guide
Please read all instructions before installation and to check to see that all parts are included.
Locker Rail Installation
(Note: for 6.5’ bed, start with Step 7. Steps 1 through 6 are for 5.5’ beds only.)
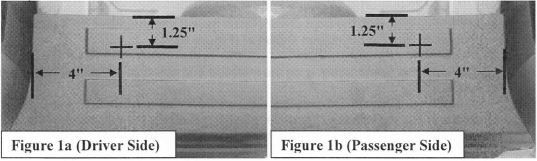
STEP 1. Measure, mark, and drill a 1/2” hole in the center of the two hidden FRONT stake pocket hole locations on the driver side and passenger side plastic rail caps. Location marked in (Figure 1a and 1b).
STEP 2. Set and tighten the router bit 3/8” from the router base to the end of the router bit cutter.
STEP 3. Turn on router and insert the router bit into the previously drilled 1/2” hole on the passenger side.
STEP 4. Slowly and gently guide the router until the bearings of the router bit touch an edge of the hidden pocket hole.
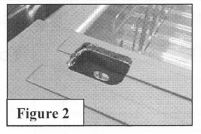
STEP 5. Guide the router slowly and gently in a counter-clockwise motion until the pocket is exposed (Figure 2). Repeat step 5 if slag is present.
STEP 6. Repeat Steps 3, 4, and 5 for the driver side.
STEP 7. Remove the pocket hole covers located on the rear of the driver and passenger rail caps. For 6.5’ beds, remove front driver and passenger covers as well.
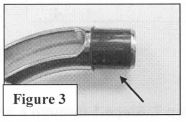
STEP 8. Assemble black plastic bushings on all the locker end castings as shown (Figure 3). (This step does not apply for nylon end casting kits.)
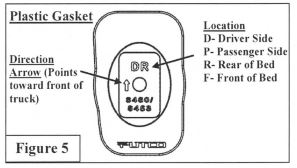
STEP 9. Assemble the mounting hardware on all the locker end castings in order as shown (Figure 4). Note: Each plastic gasket goes to a specific stake pocket hole that is marked on the plastic gasket. Refer to (Figure 5).
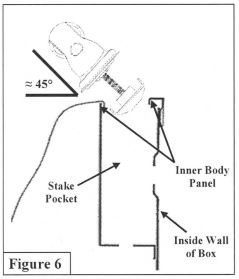
STEP 10. Insert locker end casting with the front driver plastic gasket into the driver front pocket hole at about a 45° angle in orientation shown in (Figure 6).
STEP 11. Slide rail tube over the plastic bushing on the installed end cap until it touches the plastic bushing flange.
STEP 12. Slide a locker end casting with the rear driver plastic gasket into the other end of the tube.
STEP 13. Insert the locker end casting into the rear driver pocket hole in the same manner as step 10.
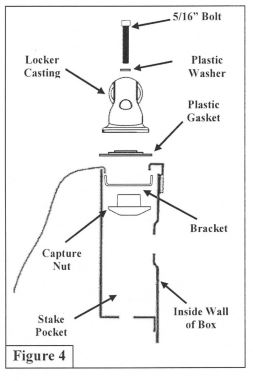
STEP 14. Once both locker and castings are in the holes, verify that the front bracket is in the orientation shown in (Figure 4).
IMPORTANT: Both bracket flanges must rest on inner body panel for secure installation. Refer to (Figure 6) for locations.
STEP 15. Pull straight up on the front locker end casting so that the bracket and nut maintain contact and correct positioning with the bed as shown in Figure 4.
STEP 16. Rotate the plastic gasket until it’s correctly oriented. Arrow on plastic gasket faces toward the front of truck. See (Figure 5).
STEP 17. Tighten the 5/16” bolt until the locker and casting is snug against the rail cap.
STEP 18. For the rear pocket repeat steps 14 through 17. Confirm the tubes are fully seated in the locker castings before securing.
STEP 19. After locker end castings are snug to rail cap torque both front and rear 5/16” bolt to 132in-lbs (11 ft-lbs).
STEP 20. Repeat steps 11 through 20 for the passenger side.
