Installation Time
(approx) 2 Hours
Difficulty Level:
Mechanical expertise or professional installation required.
Installation Guides
FREE 1 to 3-Day Delivery on Orders $119+ Details
$49.95 (kit)
FREE Shipping on orders over $119 Market Price $57.99 You Save 14% ($8.04) Up to 10% off for Military & First Responders! See DetailsAdd Local Shop Installation
Saved - View your saved items
We're sorry. We couldn't save this product at this time.
Hey, guys. It's Sara with americantrucks.com, and today we have a review and install of the Rough Country 2.5-Inch Leveling Strut Extensions, fitting your '04 to '08 F-150 2-wheel drive and 4-wheel drive models. This kit will work well for the F-150 owner who wants a budget-friendly leveling solution to give you some more room for wheels and tires in the front and level out your factory rake. These spacers will provide you 2.5 inches of front lift. Now, the spacers themselves come in at about 2 inches. That extra half inch is made up for in the change and suspension geometry you get from installing these spacers. For this video, we are using a 31-inch stock tire. Depending on the model of your truck, stock tire sizes may vary, so keep that in mind. So with the manufacturer notes that with this kit, you can fit up to a 33-inch tire. Now, tread pattern does matter. If you're choosing to run a more aggressive tread pattern like the mud-terrain you see here, you may experience some mild rubbing on the factory plastics. However, if you're picking a more mild tread like an all-terrain, it should clear just fine. So the recommended size is a 33, as I said before. Because we have 35s, we threw them on so you can see how they look and fit. Although they do fit sitting on our flat shop floor, they will rub during normal driving, going over bumps, or turning. The spacers feature a composite construction with a black finish and all hardware is included. Now, because of the construction, these spacers are more budget-friendly than other options out there, and they still perform in the same way.So as far as price goes, this kit comes in at around $50, making it the most budget-friendly way to get a more level appearance to your truck and make some more room for wheels and tires. I'm giving this install a three out of three wrenches on the difficulty meter. It does feature a direct bolt-up install that can be done within two hours. So with that said, let's check out our install.For this install, you will need an impact gun or a ratchet and hand tools will work just fine. You may also want a swivel extension. You will need 13-millimeter, 15-millimeter, 18-millimeter, 21-millimeter, 24-millimeter, and 30-millimeter sockets, 27-millimeter, 14-millimeter, and 15-millimeter wrenches, a hammer and a rubber mallet, a vacuum tool. You may also want a pry bar and a hanger tool or a bungee cord will work just fine. All right. So the first step in our install, we're gonna unplug our ABS sensor. We're also gonna disconnect the vacuum line from the back of the knuckle. Remove the sensor from behind your wheel well liner. The plug should be right here. What you're gonna do is press down on the connector and remove it. Grab a pop clip removal tool and remove the pop clip that holds this line. Disconnect the vacuum line from your brake line and then pull it off of the spot on the back of your knuckle.Next up we're gonna remove the nut on the outer tie rod. Grab a 21-millimeter socket and get it off. Next up we're gonna remove the nut that's holding on the knuckle to the upper control arm. Grab a 21-millimeter socket and you will want a swivel here. Go ahead and get it removed. We are gonna thread this back on though until we release this ball joint. All right. So it's not likely that this ball joint will release on its own. If that is the case, you're gonna wanna grab a hammer and hit the top of the knuckle here to shock it loose. All right. So we do have to disconnect the sway bar. And I think the easiest way to do this is to remove the nut on the underside of the end link. Now, you only have to remove one side of the end link to be able to remove this. You should take off both sides of your sway bar just to make your job a little easier. Go ahead and grab your 18-millimeter socket and remove it.Next up we're gonna remove the two 18-millimeter bolts holding on our brake caliper. This will relieve the brake line and also make it so we can remove the knuckle. Go ahead and grab an 18-millimeter socket and remove both of these bolts. Now you can pull your caliper off of your truck and hang it off to the side. If you don't have a caliper hanger tool, you can use a bungee cord or anything that secures the caliper and doesn't have any tension for the brake line. Next up we're gonna remove the nut that holds on the knuckle to the lower control arm. We're gonna grab a 24-millimeter socket and remove this nut. We are gonna thread it back on because we still have to release this ball joint. We're gonna repeat the process we used up top and we're gonna hit this part of the knuckle to release the ball joint. Next up we're gonna remove the rotor itself. Now, we recently had the breaks apart on this truck, so the rotor should come straight off. If yours does not, you can tap around it and on the backside, but with a rubber mallet. Next up we're gonna remove the dust cover that blocks the axle nut so that we can remove the nut itself. So you're gonna wanna hit this with a little PB B'laster, depending on how rusty it is, and then get behind it and pry it off with a flathead.Next up we're gonna remove the axle nut with a 13-millimeter socket. Now, if the ball joining your outer tie rod does not release from the knuckle, go ahead and grab your hammer and release it the same way you released the other two ball joints. Next up we need to pull vacuum to be able to release the four-wheel drive so we don't damage it. Grab a line and slide it over the larger port that your vacuum line used to be attached to. Now we're gonna use our vacuum tool to pull 24 pounds of vacuum. This releases the four-wheel drive actuator, because it's engaged unless it sees the 24 pounds, and allows us to slide the axle out of the back of your knuckle without damaging your four-wheel drive. Set your vacuum tool down, make sure it's still pulling pressure and you don't bump it to release the pressure. We're gonna now start to disconnect the knuckle. Go ahead and pull down on your upper control arm and remove this nut. Slowly release your upper control arm. If it doesn't come all the way out, carefully pry it the rest of the way. Now we can carefully remove the nut on the bottom of your knuckle and remove the knuckle off the truck.Now, we do have to maneuver around our axle a bit here. I'm lifting it up so you guys can see the bolt that we're going for. There's a 30-millimeter nut on this side and a 27-millimeter bolt on the other side. This holds on the bottom of our strut. I'm gonna set the axle down here for a second, grab my 27-millimeter wrench for the other side, and my 30-millimeter socket for this side, and remove the nut. Now, depending on how much tension, this should wiggle its way out. Next up we're gonna remove the three 15-millimeter nuts on the top of our strut. What you're gonna do is grab a 15-millimeter ratcheting wrench just because we don't have a ton of space up there. You can use a small socket if you'd like and remove these. We're gonna leave one or two at the front just loosely installed to keep the strut from falling all the way out. With all of the nuts loose or removed, can lift up a little bit on your strut to get the last one off. And remove it off the truck.All right. So before we can install the spacer on our truck, we do have to install these bolts in the underside so they can act like studs. What we're gonna do is line them up to the hex-shaped holes and press them into place. If they don't wanna seat all the way in, we will lightly tap them into place. With a spacer placed on top of the vise, or you can put it in the vise if you don't think it's going to move, grab your hammer and we're gonna lightly tap these into place. We're just rotating the spacer as we go. I'm trying to keep it as flat as I can on the top surface while allowing the studs to poke through. Slide your spacer over the top of the studs. It only goes on in one configuration, so make sure all three of the studs are lined up. Grab your nuts and thread them onto the top of the strut. We're using the factory nuts over the factory studs here. Then what we're gonna do is grab a 15-millimeter socket and tighten them down.Now you can grab your strut and slide it underneath your control arm and into place. Now, it's gonna be 180 degrees out of where it was because of the spacer. So line up the studs through the top of your strut tower. Once you have them in place, grab one of the nuts that were included with the kit and thread them over the top of the stud to keep it in place. With the top in place, you can now press down on your control arm to line up the bottom of your strut in the opening here. With the bottom of your strut lined up, you can thread the rest of your nuts over the top of the studs up top. There are two in the front and there's one at the back, similar to how the factory ones came out. So you may have a little bit of a hard time seeing the back one, but know it's the same thing, just one in the far back. And what we're gonna do here is grab a 14-millimeter ratcheting wrench. It is a little bit smaller than factory. We're gonna tighten each of these down. So prying back on your strut and going up and down with your lower control arm, should it be able to get this bolt in and through. If it goes almost all the way but not all the way, you can grab a rubber mallet and tap it the rest of the way. Grab the nut and thread it on the other side. Grab your 27-millimeter wrench and 30-millimeter socket and tighten it down.Now you can line up the knuckle. Make sure that the axle is sliding in place. Make sure that you're still pulling the 24 pounds of vacuum on the back of your knuckle so that we're not damaging 4-wheel drive. And what we're gonna do is line up your axle so that we can reinstall the axle nut. We're now gonna tighten down the nut holding the knuckle to the lower control arm. Grab your 24-millimeter socket and tighten it down. With vacuum still pulled on the back of your knuckle, press your axle through the knuckle till you can see threads on your axle. Grab the axle nut and thread it over the end. Grab your 13-millimeter socket and tighten it down. All right. So we're supporting the bottom of the knuckle to get it a little bit higher. And we're gonna take a pry bar. We're gonna pry it down to line up our upper control arm through the top of the knuckle. Grab your nut and thread on a few threads on the bottom here.All right. So we have a pry bar pressing down on the top of the ball joint to prevent it from spinning. We have a 21-millimeter socket and a swivel extension to get on here. We're gonna tighten it down. Now you can re-install your outer tie rod through the side of your knuckle. Now we're gonna use a pry bar on the bottom of this as well just to put pressure on the bottom of your outer tie rod to hold the ball joint still. Grab your 21-millimeter socket and tighten it down. Now you can thread on the nut on the bottom of your sway bar end link. Grab an 18-millimeter socket and tighten it down. Replace your rotor. And I'm just gonna throw a lug nut on there just to hold it in place while I finish tightening everything down. Grab your caliper off the hanger, line it up over the top of the rotor, and line up the two bolt holes on the back of the knuckle. Grab your factory hardware and re-install it. Just moving the entire knuckle to give myself a little more room. Then I'm gonna grab the 18-millimeter socket and tighten these down. Make sure you're plugging the vacuum line back to the back of your knuckle. Replace the pop clip the holds on your ABS line and plug it back in. And finally, replace the dust cap that goes over top of your axle nut. If you need, you can tap it into place with a rubber mallet.All right. So now that your kit is installed, make sure you torque everything to spec, and you may want to get a professional alignment afterwards. But that is gonna do it for the review and install of this spacer kit. And remember, for all things F-150, keep it at americantrucks.com.
Subscribe to our YouTube Channel
Features, Description, Reviews, Q&A, Specs & Installation
Brand | Rough Country |
Leveling Kit Location | Front |
Leveling Kit Lift Height | 2.50 Inch |
Leveling Kit Includes Shocks | Shocks Not Included |
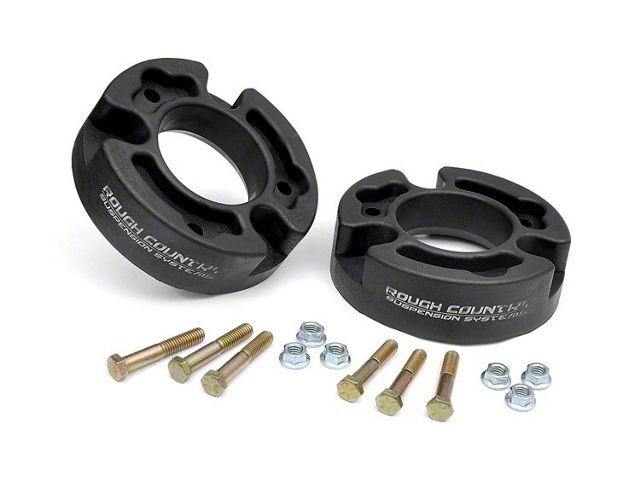
Get a Level Stance. If you are after a lean and mean look for your F-150, then the Rough Country 2.5 in. Leveling Strut Extensions is perfect for you. This kit is best for those who need a more demanding stance for their truck out on the open terrain. Once installed, you will find that these strut extensions provide a factory ride quality, so you do not have to worry about losing it. In addition, you will have more ground clearance and room for tires up to 34 inches in size. Off-road performance will be upgraded and you can enjoy the ride offered by your weekend off roader or your daily driver.
Front Strut Spacers Included. The Rough Country 2.5 in. Leveling Strut Extensions kit comes with front strut spacers that will not require you to remove the entire strut to install. The spacers are made from premium materials to ensure durability over time.
Experience Needed. Installation of the Rough Country 2.5 in. Leveling Strut Extensions is considered to be easy, but mechanical experience is required. The kit has all of the hardware needed to install and you should expect the process to take about two full hours to complete.
Warranty. Rough Country backs this Leveling Kit with their Lifetime Replacement Warranty, giving you full protection for the many miles to come. Some exclusions apply, please see manufacturer's warranty for complete details.
Application. Rough Country's 2.5 in. Leveling Strut Extensions are designed to fit 2004 to 2008 F-150s equipped with two-wheel drive (2WD) or four-wheel drive (4WD).
Shop All Truck Parts And Accessories
Shop All Truck Leveling Kits
Shop All Truck Lift Kits
Fitment:
DetailsRough Country 570
CA Residents: WARNING: Cancer and Reproductive Harm - www.P65Warnings.ca.gov
Installation Info
Installation Time
(approx) 2 Hours
Difficulty Level:
Mechanical expertise or professional installation required.
Installation Guides
What's in the Box
10 More Questions
Does NOT fit Heritage Models