FREE 1 to 3-Day Delivery on Orders $119+ Details
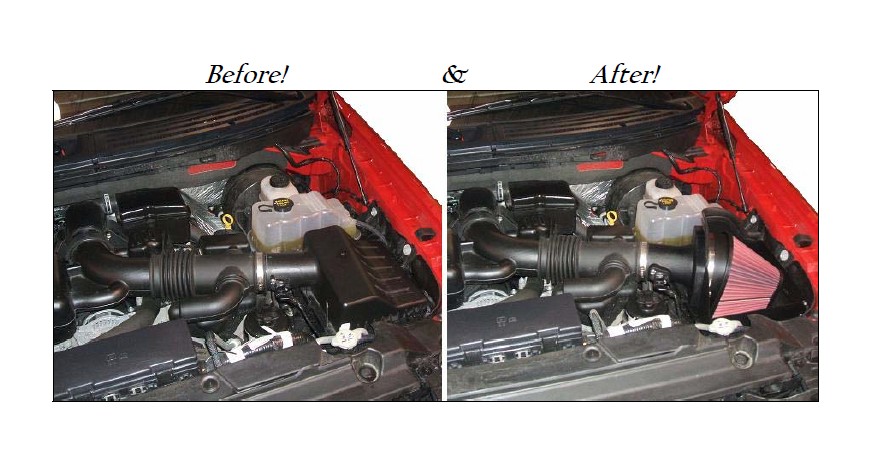
How to Install Roush Cold Air Intake on your F-150
Installation Time
1 hours
Tools Required
- 3/32” & 5/32” Allen Wrenches
- 1/4”, 5/16” Sockets -1/4” Drive
- Ratchet and Short Extension - 1/4” Drive
- Phillips Screw Driver
- Straight Slot Screw Driver
- T-20 Torx Bit (Provided)
Installation Instructions
Before installing your ROUSH Performance Product(s), read through the entire installation procedure and check to make sure all items are present. Contact ROUSH Customer Service at 1-800-59-ROUSH, 9:00 AM to 5:00 PM EST weekdays, for missing parts, any questions regarding fit or instructions that are unclear to you.
The air filter element is protected from direct exposure to water and debris. Care should be taken to avoid deep water. WATER INGESTION IS THE DRIVERS RESPONSIBILITY. The Premium Air Filter Element in this kit is reusable and should be cleaned periodically using a generic Air Filter Cleaner and Recharging Kit available at most performance auto parts stores.
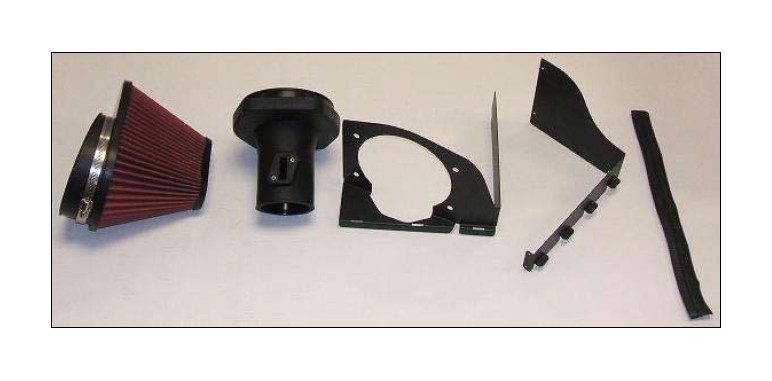
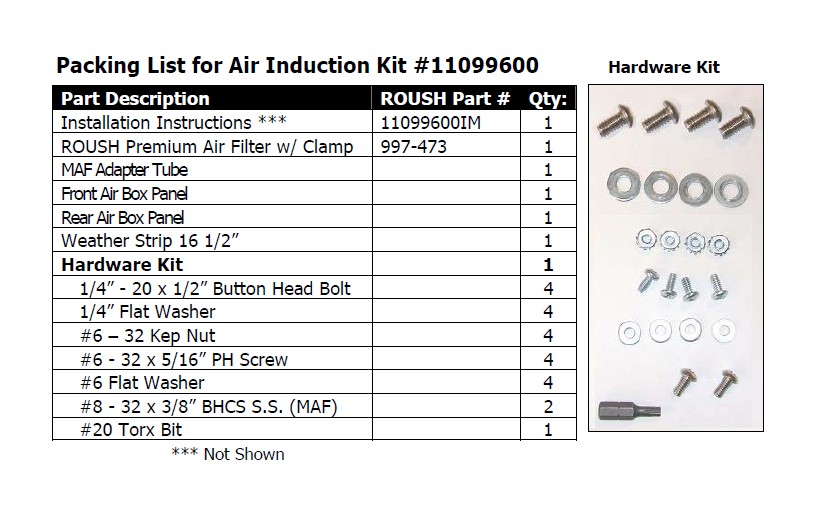
Packing List for Air Induction Kit #11099600
IMPORTANT SAFETY NOTICE
Appropriate disassembly, assembly methods and procedures are essential to ensure the personal safety of the individual performing the kit installation. Improper installation due to the failure to correctly follow these instructions could cause personal injury or death. Read each step of the installation manual carefully before starting the actual installation.
1. Always wear safety glasses for eye protection.
2. Place ignition switch in the OFF position.
3. Always apply the parking brake when working on a vehicle.
4. Block the front and rear tire surface to prevent unexpected vehicle movement.
5. If working without a lift, always consult vehicle manual for correct lifting specifications.
6. Operate the engine only in well-ventilated areas to avoid exposure to carbon monoxide.
7. Do not smoke or use flammable items near or around the fuel system.
8. Use chemicals and cleaners in well-ventilated areas.
9. Batteries produce explosive gases, which can cause personal injury. Therefore, do not allow flames, sparks or flammable substances to come near the battery.
10.Keeps hands and any other objects away from the radiator fan blades.
11.Keep yourself and your clothing away from moving parts when the engine is running.
12.Do not wear loose clothing or jewelry that can get caught in rotating parts or scratch surface finishes.
13. Allow the engine, cooling system, brakes and exhaust to cool before working on a vehicle.
WORK SAFELY!
Perform this installation on a good clean level surface for maximum safety and with the engine turned off.
Removing the stock system
1. Open the hood and disconnect the battery negative cable.
2. Cover the fenders to avoid scratching the body paint.
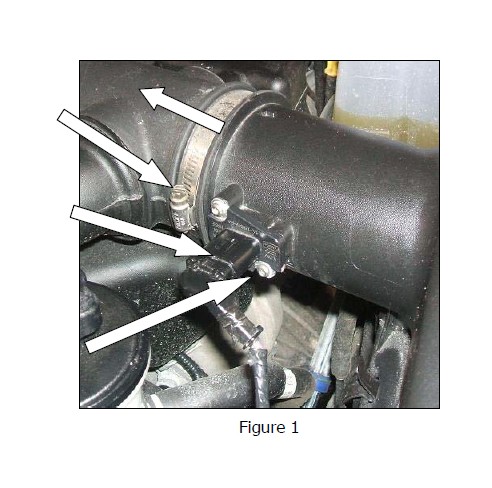
3. Loosen the inlet tube hose clamp. Slide the flexible air inlet tube off of the air cleaner lid.
4. Disconnect the Mass Air Flow Sensor connector. Pull the red tab out on the bottom and then squeeze the release tab of the MAF connector and disconnect.
5. Using the supplied #20 Torx Bit, remove two (2) screws and the MAF sensor from the air cleaner lid. Do not reuse these screws. Refer to Figure 1 for steps 3, 4 & 5.
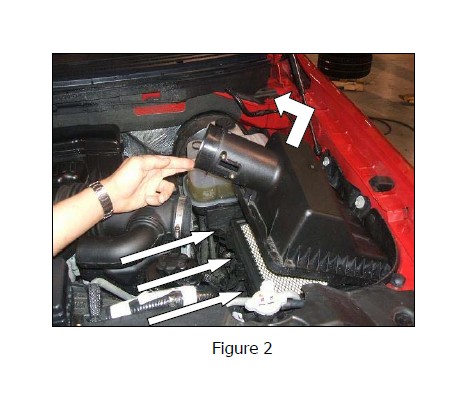
6. Unlatch the three (3) air cleaner lid latches. Raise the air cleaner lid as shown and remove it from the air cleaner base. Refer to Figure 2.
7. Remove the factory air filter element from the air cleaner base.
Assemble the Cold Air Dam
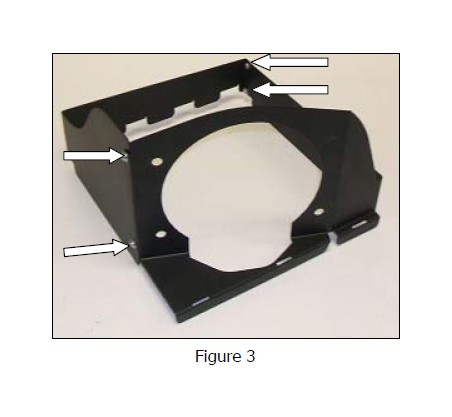
8. Assemble the two (2) Air Box Panels with four (4) 6-32 Screws, four (4) #6 Flat Washers, and four (4) 6-32 Kep Nuts. Refer to Figures 3. Assemble with the mounting flanges and screw heads to the outside of the assembly.
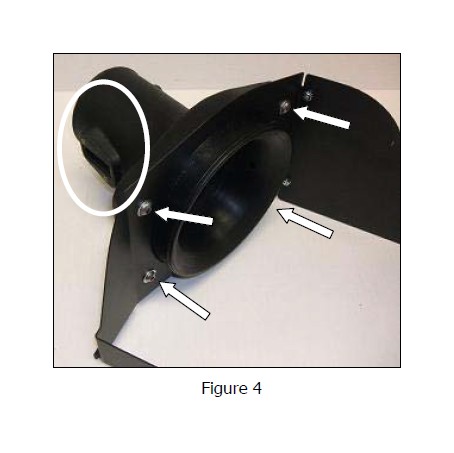
9. Install the MAF Adapter Tube to the Air Box Assembly with four (4) 1/4”-20 Button Head Bolts and four (4) 1/4” Flat Washers. Install the Tube with the MAF Sensor slot as shown. Refer to Figure 4.
Install the Cold Air Dam
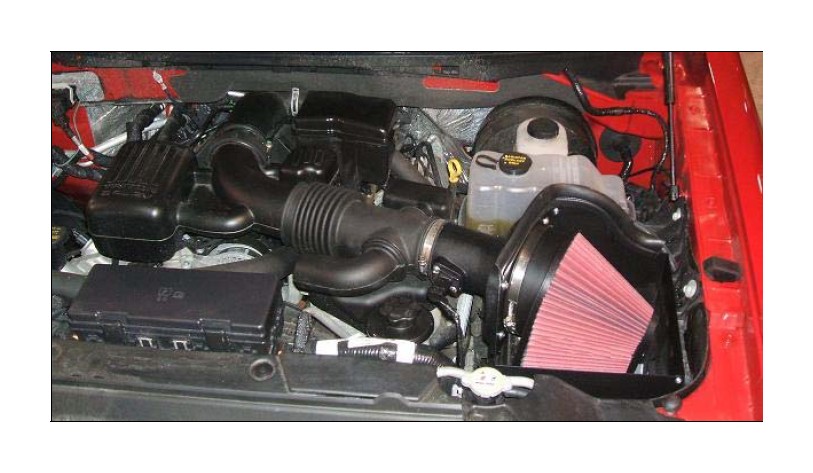
10. Install the Air Box Assembly onto the top of the factory airbox base by sliding the four (4) tabs on the Air Box Assembly into the slots on the factory air box base. Latch the three (3) latches on the air box base to secure the Air Box Assembly. Slide the factory air inlet tube onto the MAF Tube and tighten the hose clamp. Refer to Figure 5.

11. Reinstall the MAF Sensor into the slot on the MAF Tube using two (2) 8-32 Screws supplied in the kit. Do Not reuse the factory screws.
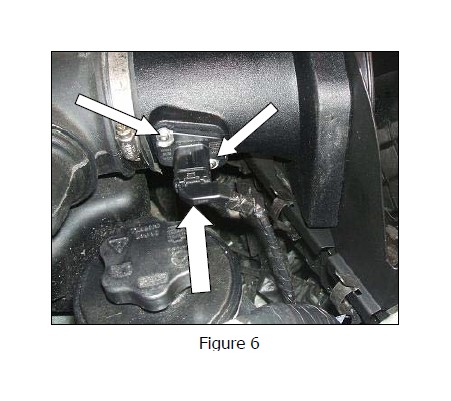
12. Reconnect the Mass Air Flow Sensor connector. Ensure it snaps into place. Press in the red tab to lock the connector release tab. Refer to Figure 6 for Steps 11 & 12.
13. Install the Premium Air Filter Element onto the MAF Adapter Tube and tighten the Hose Clamp.
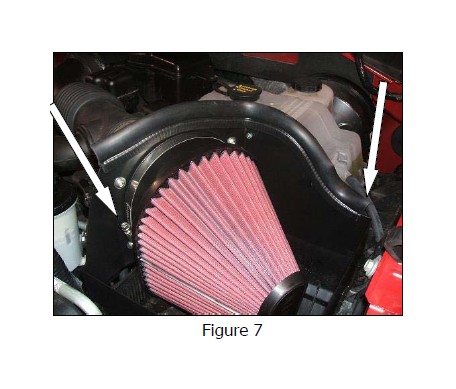
14. Install the Weather Strip. Start at one end and press the Weather Strip onto the top edge of the Air Box Assembly. Refer to Figure 7 for Steps 13 & 14.
15. Double check your work! Make sure there are no foreign materials in the intake path. Make sure all clamps, hoses and connectors are installed correctly and all fasteners are tight. Periodically check the intake system to ensure the fastener and clamps remain tight and the weather strip is in place.
16. Reconnect the battery negative cable, remove the fender coverings and close the hood.
Congratulations!!! You have completed the installation of the ROUSH Performance Products, Air Induction Kit. It is recommended that you save all parts removed from your vehicle during the installation of this kit.