 FREE 1 to 3-Day Delivery on Orders $119+ Details
How to Install TracRac Base Rail on your F-150
Tools Required
- 6 ft. Straight Edge
- Tape Measure
- Open End Box Wrench
- 3/16" Allen Wrench
- 1/4" Allen Wrench
- Torque Wrench
IMPORTANT: All TracRac products require specific torque during assembly and install to safely and consistently secure racks and components. Following tfiese torque
specifications is required to maintain functionality and safety, and failure to properly secure will void warranty.
Make sure to use a torque wrencfi or gun providing allowing specific torque settings. Ensure cordless torque guns are fully cfiarged.
1
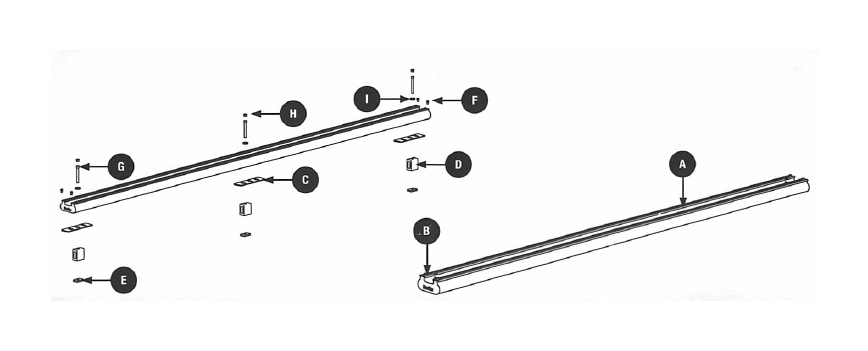
The TracRacG 2 SlidingR ack offersd rill-free, base rail assembly on trucks with stake pockets, using bed liners with pocket tabs.
1. Confirma ll parts are included,a nd reconfirmb ase rail pad number correspondsto your pickup truck makes model and year.
2. LocaW correct hole pattern in base mils for your truck by referring to enclosed base rail layout drawing. Holes shoulda lign with stake pocket. Use plastic access plugs to cover holesW at do not correspondto your truck.
NOTE: Some truck beds taper towards !awrier of bed and outside plane of base mils which is normal
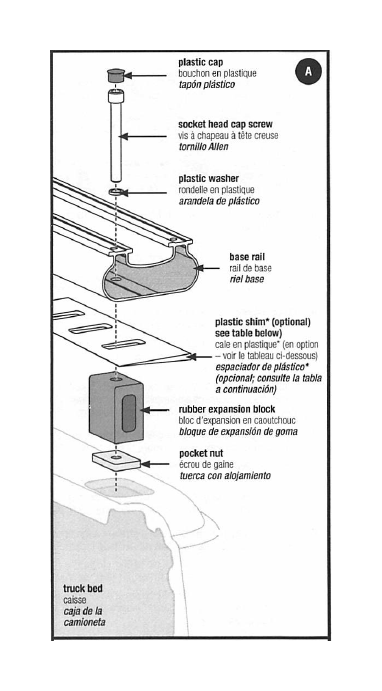
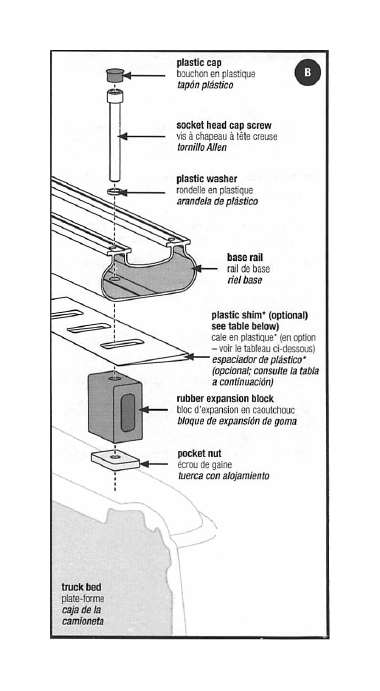
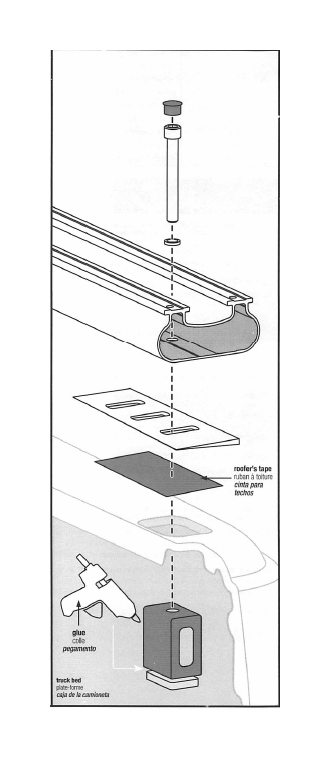
3. Assemble component to base rail by inserting plastic washer onto 318-16 x 3" socket head cap screw (SHCS). Insert socket head cap screw Wrough base mil hole, Wrough shim (if necessary) and rubber expansion blocks (Image A). Ensure shim is positioned with Wickest side facing outside truck Labels at end of each base rail identify correct orientation of base rails on truck.
4. Hand tighten pocket nut just enough to hold rubber expansion block in place against shim (without compressing We rubber block). Repeat on other ends of base rail.
TIP: Tape or glue pocket nuts to rubber expansion blocks before inserting into stake pockets. This will prevent nuts from dropping into stake pockets should base rails need to be removed.
5. For trucks with bedliners and removable pocket tabs, carefully remove pocket tabs per manufacturer instructions.
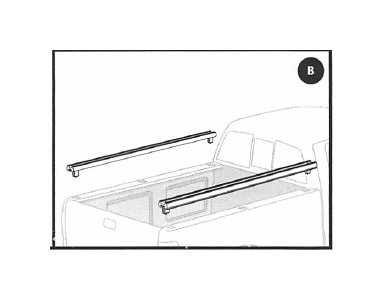
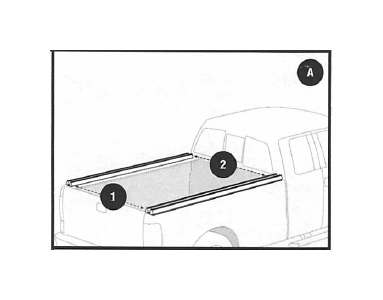
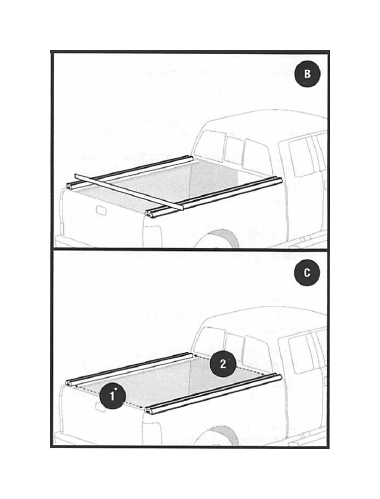
6. Place assembled rail on lop of bedrail ensuring rubber blocks are inserted into stake pockets. Leave base rails loose on top of bedrail and repeat for second base rail (image B).
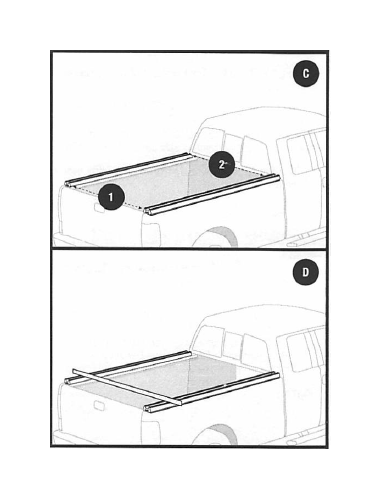
7. To make parallel, and starting with the cab (front) end of truck, measure inside width at front and rear of bed, and confirm difference is no more than /-1/16" (Image C). Adjust as necessary.
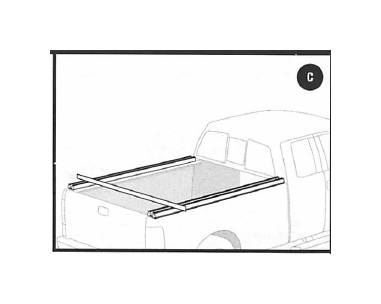
8. To make plane (fiat on top), use a straight edge or crossbar to ensure all four tracks touch the straight edge within /-1/16" (Image D). Move the shims inside and out as necessary, or use the supplied rubber tape strips until plane.
9. Partially tighten left/right assemblies at cab (front} end of truck. Use a 5/16" socket wrench on the ball point Allen driver supplied. Press down to keep rail in position while tightening.
10. At the tailgate (rear) end of truck, repeat steps 7-9.
WARNING: If proper torque is not achieved rack can loosen and cause failure. Ensure bolts are tightened using a calibrated torque wrench. Re-torque non-adhesive fasteners to proper specification after 500 miles and every 10k miles thereafter.
11. Reconfirm measurements to verify base rail locations. Fully tighten to 9 ft lbs torque while keeping straight edge / crossbar on tracks to ensure base rails remain parallel and in plane.
12. For 8' beds, lighten middle assembly to 9 ft lbs, and reconfirm torque at 9 ft lbs for all assemblies. Pour les caisses de 8 pi (2,4 m), serrez (assemblage central a 9 pi-Ib et confirmez a nouveau le couple a 9 p-lb pour taus les assemblages.
13. Thread and tighten (4) 1/4-20 x 3/8" safety bolts onto the "T" at the cab (front) end of the base rails.
CAUTION: All safety bolts must he installed and ail knobs tightened prior to operating the vehicle.
NOTE: Base rails must be parallel and in plane, and must be adjusted separately front to back.

The TracRac G2 Sliding Rack base rail is a drill-through assembly for trucks without stake pockets and with or without bedliners.
1. Confirm all parts are included, and reconfirm base rail part number corresponds to your pickup truck make, model and year.
2. Locate correct hole pattern in base rails for your truck by referring to enclosed base rail layout drawing. Use plastic access plugs to cover holes that do not correspond to your truck.
3. For bedliner applications, and before drilling hales, ensure the bedliner is properly installed and in correct position per manufacturer instructions.
4. Secure base rails to truck using c-clamps or other temporary method, and making sure base rails are in correct position for drilling. Labels at end of each base rail identify correct orientation of base rails on truck. Rails must remain parallel within 1/16".
NOTE: Some truck beds taper towards interior of bed and outside plane of base rails which is normal.
5. Using holes specified for your truck, mark each center and set base rails aside.
6. Drill 13/32" diameter holes at each marked point and fasten.
7. Insert plastic washer onto 3/8-16 x 3" SHCS, and insert SHCS through base rail hole, through shim (if necessary), Through truck bed. Ensure shim is positioned with thickest side facing outside truck.
TIP: Tape or glue pocket nuts to rubber expansion blocks. This will prevent nuts from dropping into bedrail should base rails need to be removed.
8. Hand tighten pocket nut to loosely hold rail in place against shim. Repeat an other ends of base rail. Repeat for second base rail.
NOTE: Base rails must be parallel and in plane, and must be adjusted separately front to back.
9. To make plane (flat on top), use a straight edge or crossbar to ensure all tour tracks touch the straight edge within /-1/16". Move the shims inside and out as necessary, or use the supplied rubber tape strips until plane (Image C).
10. Partially tighten left/right assemblies at cab (front) end of truck. Use a 5/16" socket wrench on the ball point Allen driver supplied. Press down to keep rail in position while tightening.
11. At the tailgate (rear) end of truck, repeat steps 7-9.

WARNING: If proper torque is not achieved rack can loosen and cause failure. Ensure bolls are tightened using a calibrated torque wrench. Re-torque non-adhesive fasteners to proper specification after 500 miles and every 10k mites thereafter.
12. Reconfirm measurements to verify base rail locations. Fully tighten to 9 ft lbs torque while keeping straight edge I crossbar on tracks to ensure base rails remain parallel and in plane.
13. For 8' beds, tighten middle assembly to 9 ft Ibs, and reconfirm torque at 9 ft lbs for all assemblies.
14. Thread and tighten (4)114-20 x 3/8" safety bolts onto the "T" at the cab (front) end of the base rails.
CAUTION: All safety bolts must be installed and ail knobs tightened prior to operating the vehicle.
The TracRac G2 Sliding Rack base rail is a drill-through assembly for trucks using bedliners without pocket tabs.
1. Before drilling holes, confirm bedliner is properly installed and in correct position per the manufacturer's instructions.
2. Confirm all parts are included, and reconfirm base rail part number corresponds to your pickup truck make, model and year.
3. Locate correct hole pattern in base rails for your truck by referring to enclosed base rail layout drawing. Use plastic access plugs to cover holes that do not correspond to your truck.
4. Place base rails on truck bed rails. if bedliner flange is flat and in plane, shims are not required. Otherwise position shims on top et bedliner with thickest side facing outside truck.
5. Locate center front left / right stake pockets and drill a 3/8" hole through bedliner. Temporarily place 3/18-16 x 3" socket head cap screw (SHCS) through corresponding base rail holes and newly drilled bedliner holes.
6. Measure width between base rails at the same location front and rear to ensure they are equal within 1/16" and C-clamp in place. Using base rail's rear hole as a template, drill a 3/8" diameter hole in the center of each stake pocket.
NOTE: Some truck beds taper towards interior of bed and outside plane of base rails which is normal.
7. Unbolt bedliner and lift to gain access to stake pockets (a small wooden block in between bedliner -flange and truck bed rail will provide hands-free stake pocket access).
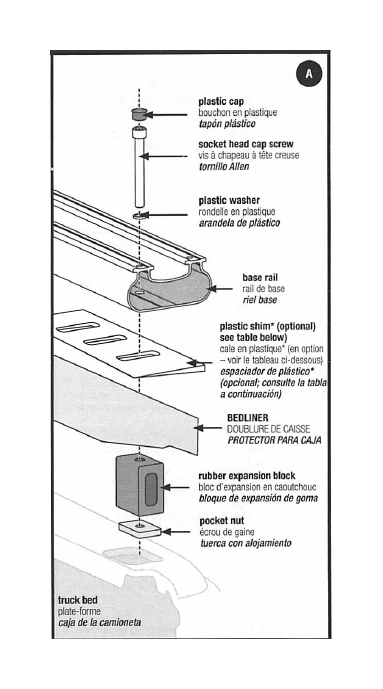
8. Insert plastic washer onto each 3/8-16 x 3" SHCS, and insert SHCS through base rail hole, through shim (ii necessary), bedliner, rubber expansion and into nut (Image A).Ensure shim is positioned with thickest side facing outside truck.
TIP: Tape or glue pocket nuts to rubber expansion blocks. This will prevent nuts from dropping into bedrail should base rails need to be removed.
9. Hand tighten pocket nut just enough to hold rubber expansion block in place against shim (without compressing the rubber block). Remove wooden blocks and insert entire assembly into stake pockets. Repeat on other ends of base rail. Leave base rails loose on top of bedrail and repeat for second base rail.
NOTE: Base rails must be parallel and in plane, and must be adjusted separately front to back.
10. To make parallel, and starting with the cab (front) end of truck, measure inside width at front and rear of bed, and confirm difference is no more than 44-1/16". Adjust as necessary.
11. To make plane (flat on top), use a straight edge or crossbar to ensure all four tracks touch the straight edge within /-1/16". Move the shims inside and out as necessary, or use the supplied rubber tape strips until plane.
12. Partially tighten left/right assemblies at cab (front) end of truck. Use a 5/16" socket wrench on the ball point Allen driver supplied. Press down to keep rail in position while tightening.
13. At the tailgate (rear) end of truck, repeat steps 7-9.
WARNING: If proper torque is not achieved rack can loosen and cause failure. Ensure bolts are tightened using a calibrated torque wrench. Re-torque non-adhesive fasteners to proper specification after 500 miles and every 10k miles thereafter.
14. Reconfirm measurements to verify base rail locations. Fully tighten to 9 tt lbs torque while keeping straight edge I crossbar on tracks to ensure base rails remain parallel and in plane.
15. For 8' beds, tighten middle assembly to 9 ft lbs, and reconfirm torque at 9 ft lbs for all assemblies.
16. Thread and lighten (4) 1/4-20 x 3/8" safety bolts onto the "T" at the cab (front) end of the base rails.
CAUTION: All safety bolts must be installed and all knobs tightened prior to operating the vehicle.
The TracRac G2 Sliding Rack base rails require periodic maintenance to maintain functionality and safety.
1. Periodically refighten all fasteners and check the torque on the rubber expansion blocks (every 3-4 months on average). Over time with repeated use the TracRac base rails may loosen slightly.
2. Salt, soap, scum and other debris may inhibit the slide of the racks and accessories. Periodically clean to ensure proper functionality.
a) Base rails are parallel. Re-measure, adjust and re-tighten.
bi Crossbars are parallel and tight. If crossbars feel loose, fasteners / socket head cap screws may not have been properly tightened. Do not re-tighten; call customer service for new fasteners with fresh adhesive and replace ensuring they are tightened to proper torque settings.
TIP: Spray rails occasionally with Armor-All or Son-Of-A-Gun will enhance sliding.
TRACRAC GUIDELINES
When using TracRac Load carriers and accessories, the user must understand the precautions. The points listed below will assist you in using the rack system and will encourage safety.
• For quality fits and safety, use only the recommended rack or accessory as stated in TracRac current Fit Guide. Do not assume a rack will fit, always check the current Fit Guide when obtaining a new vehicle.
• Unless stated otherwise in these instructions, do not carry more than the maximum load capacity. TracRac can not warranty loads that exceed this limit Total load = cargo weight plus weight of accessories used to carry cargo.
• Make sure all knobs, bolts, screws, straps, and locks are firmly attached, tightened and locked before every trip. Knobs, bolts, screws, straps and locks must be periodically inspected for signs of wear, corrosion, and fatigue. Check your load at stops during the trip to ensure continued fastening security.
• Check local and state laws governing projection of objects beyond the perimeter of a vehicle. Be aware of the width and height of your cargo since law clearance branches, bridges, and parking garages can affect the load. All cargo will affect the vehicle's driving behavior. Never drive with any lock, knob or rack in an open or unlocked position. All long loads such as, but not limited to, ladders and lumber must be secured to the rack.
• Remove your TracRac rack and accessories before entering automatic car washes.
• All locks must be turned and moved periodically to ensure smooth operation. Use graphite or dry lubricant to help this. TracRac locks are designed to deter vandalism and theft but should not be considered theft proof. Remove valuable gear if your vehicle is unattended for an extended period. Place at least one key in the glove compartment.
• For safety to your vehicle and rack system, obey all posted speed limits and traffic cautions. Adapt your speed to the conditions of the road and the load being carried.
• Do not use TracRac toad carriers and accessories for purposes other than those for which they were designed. Do not exceed their carrying capacity. Failure to follow these guidelines or the product's instructions will void the warranty.
• Consult with your TracRac dealer if you have any questions regarding the operations and limits of TracRac products. Review all instructions and warranty information carefully.
• Not for use on trailers or towed vehicles.
• Not for offroad use.
