 FREE 1 to 3-Day Delivery on Orders $149+ Details
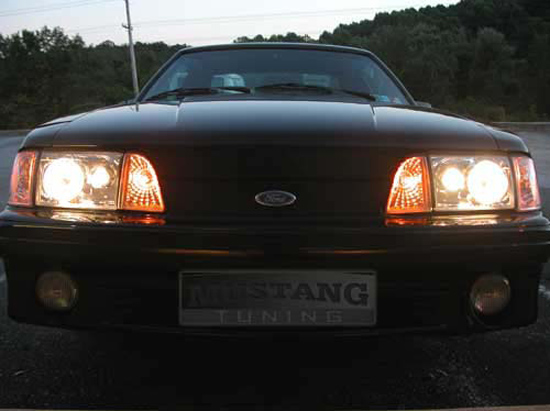
Fox Body Mustang Projector Headlights Installation Guide ('87-'93)
Tools Required
- Wire Cutter and Crimper
- Ratchet Set with 1/4" and 3/8 Drive
- Crescent Wrench Set
- Small Jewelry Flat Head Screwdriver
- Multimeter (Can be picked up at Wal-Mart for $10)
- 12 Gauge Wire (2 Colors)
- Electrical Tape
- Wire Crimps and Quick Connects
Installation
1. Remove retaining bolts from original center light, headlight, and corner light housings. Set bolts aside to use on the new light housings.
2. Remove light assemblies from car, carefully removing and saving the original wiring harness and bulbs from the side marker and turn signal assemblies. NOTE: The original turn signal / marker lights are required, but the original 9004 headlight bulb will not work with the new projector lights.
3. Install original bulb and wiring harness into side corner light assembly and install in car.
4. Use multimeter to test original wiring harness to locate high beam wires. Splice a few inches of wire into the ground wire and the positive high beam wire, and attach quick disconnects to the end of each wire. NOTE: On my car, Black = Ground, Red =Low Beam Positive, Green = High Beam Positive. Careful, this may be different on your car, incorrect wiring can blow out your bulb or fuse!
5. Test fit main headlight projector assembly. Adjust headlight-aiming bracket so headlight assembly is flush. The aiming screws for the bracket can move the headlight forward or backward several inches. Note: The 9007 bulb retaining ring hit the headlight-mounting bracket on my car. If this is the case on your car, trim off an inch or two with a box cutter, hacksaw, or a Dremel and it will solve this problem.
6. Attach wire leads from the H3 projector bulb to the quick disconnects on the wires you spliced into the original high beam wires. Attach the 9004 to 9007 wiring harness adapter to the original wiring harness and the headlight bulb.
7. Install main headlight and center light assembly.
8. Test your lights. For low beam, only the 9007 bulb should be lit. For high beam, the 9007 and the H3 projector bulb will be lit. Note: On my headlights, the high beam positive and the low beam positive wires were backwards on my wiring harness adapter. This resulted in the 9007 bulb to be in high beam mode when I turned on my headlights, and then go into low beam mode with the H3 projectors on when I switched to high beams. If this happens to you, simply unplug the adapter right at the 9007 bulb and use a small jewelry screwdriver to remove the right and left pins from the connector and switch them around.
9. Please aim your headlights properly.
10. While the new headlights are so much brighter then stock headlights, you still may wish to upgrade to better bulbs then the APC bulbs that come with the headlights. I would recommend PIAA bulbs, because they use a relative rating system (i.e. uses55W, but puts out 110W of light) while other companies actually use high wattage bulbs to produce brighter bulbs. This will keep you from burning up your wiring harnesses, melting or damaging parts of your new headlight
assemblies, or blowing fuses.
Installation instructions provided by Nick Macura

