 FREE 1 to 3-Day Delivery on Orders $149+ Details
Professional Products Satin Upper Intake Plenum Installation Guide ('96-'04 4.6L 2V)
Tools Required
- Socket Set (preferably metric, but English will work too)
- Teflon Tape or pipe thread dope
Installation
Removal:
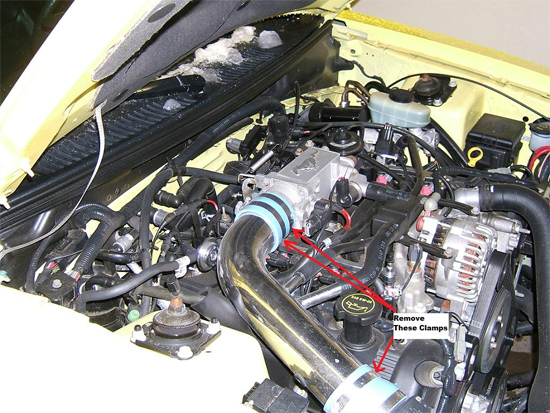
1. The first step in installing the plenum is the removal of the air intake tube from the throttle body.
2. Remove the hose clamp around the intake tube to the mass air flow sensor.
3. Remove the hose clamp around the throttle body.
4. Remove the other two hoses that are connected to the side of the air intake tube.
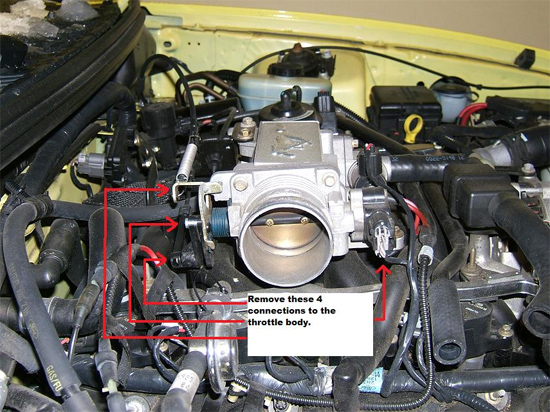
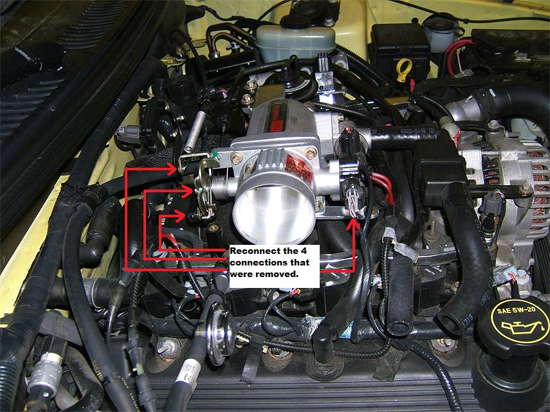
5. Once the air intake tube is removed, you’ll want to disconnect the 4 connections that are attached to the throttle body. The four connectors to remove are as follows:
6. Cruise Control Cable – black plastic connection (bottom, left of picture)
7. Throttle Body Spring – metal spring (top, left of picture)
8. Throttle Body Cable – metal cable (middle, left of picture)
9. Throttle Position Sensor – electrical plug connection (right of picture)
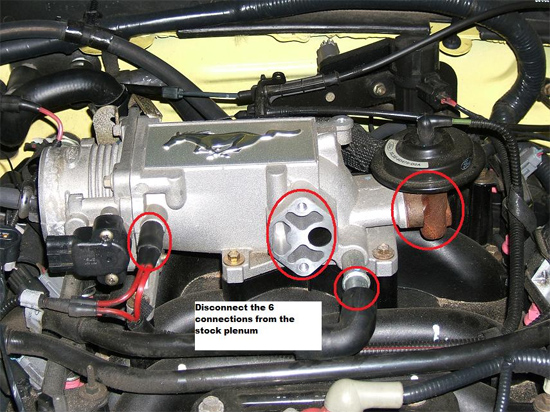
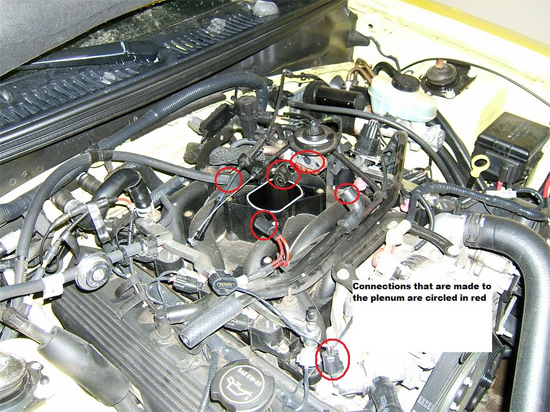
10. Disconnect the 6 connections from the stock plenum. Four of the six connections are pictured below. The other two are on the other side, towards the fire wall.
11. Remove the 5 bolts holding the plenum to the intake manifold.
12. I put all of the bolts from the old plenum on to the new one as I was removing them, so I wouldn’t have to remember where each one went.
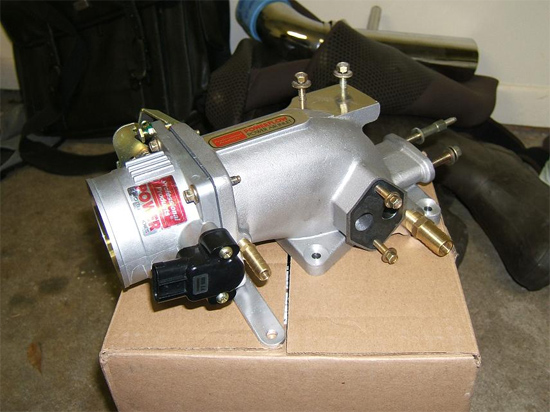
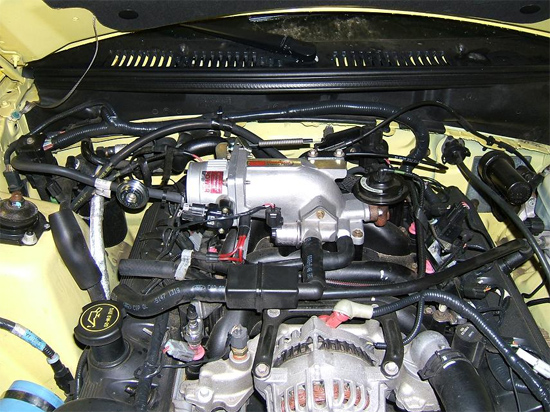
13. Put the Teflon tape or pipe dope on the supplied barbed fittings and connect them to the new plenum.
14. At this point, you can also reconnect the throttle body to the new plenum.
15. Once the throttle body is reinstalled to the plenum, you can attach the plenum back onto the intake manifold.
16. Professional Products supplied a brace that can be seen in the picture above (on the bottom of the plenum). It attaches to the plenum with the supplied screw, threading up into the bottom front lip of the new plenum.
17. Attach the plenum to the intake manifold with the 5 bolts that you removed from the original.
18. Reconnect the 6 connections that you originally removed from the plenum (seen below).
19. I used the stock gaskets since Professional Products didn’t supply any. Ideally you should replace the gaskets to ensure an air tight seal.
20. Pictured below is the Professional Products plenum with all of the connections made.
21. Once the plenum is reconnected, you can reconnect the throttle body.
22. The cruise control cable connects pretty easy. You just snap the plastic end of the connection to the tab provided on the new throttle body.
23. The throttle body spring was the easiest of the three connections on that side of the throttle body. You simply connect the spring onto the throttle body, then reconnect to the other end.
24. The throttle body cable doesn’t fit easily into the opening provided. I don’t know if the hole that was machined wasn’t to the best tolerance or what, but you might have to force the metal head of the cable into the hole in the throttle body.
25. The throttle position sensor wiring harness just plugs back into the throttle position sensor.
26. That does it for the throttle body installation. Now all you have to do is reconnect the air intake tube to the throttle body and to the mass air flow sensor and you’re ready to go.
27. I reconnected the tube to the new throttle body before connecting to the mass air flow sensor. Simply slide the tube back onto the throttle body and tighten the hose clamp back down until snug.

28. Reconnect the intake tube to the mass air flow sensor, then reconnect the hoses that are attached to the side of the intake tube.
29. Finally, make sure all of your connections are tight and everything is reconnected to the throttle body and you're done.
30. Go enjoy the extra 10 horsepower you just bolted on!
Installation instructions provided by AmericanMuscle customer Nick McKendry 11.25.08

