FREE 1 to 3-Day Delivery on Orders $149+ Details
How to install a BBK Off-Road X-Pipe on your 2005-2010 GT Mustang
Installation Time
2 hours
Tools Required
- Jack
- stands
- 3/8" ratchet
- long extension(s)
- 15mm deep socket
- small flat screwdriver
- 22mm open end wrench.

Shop Parts in this Guide
Installation
!CAUTION!
ALWAYS USE EXTREME CAUTION WHEN WORKING UNDERNEATH A VEHICLE. USE STURDY JACK STANDS PLACED ON A HARD LEVEL SURFACE. ALWAYS WEAR PROTECTIVE EYE WEAR.
Step 1 Disconnect negative (–) battery terminal.
Step 2 Lift the vehicle as high as possible with jack and support with stands.
Step 3 Unplug the passenger side front, and the rear oxygen sensors. Do not remove the sensors from the pipe yet. This will be done after the pipe is removed from the car. The driver side sensor is located in the exhaust manifold. It does not need to be removed for this job.
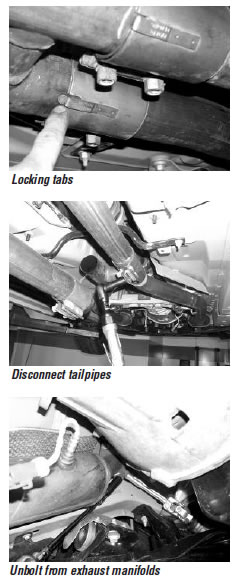
Step 4 Separate the cat-back system by loosening the (2) 15mm nuts on each band clamp and prying the locking tabs up with a small screwdriver while sliding the clamp towards the rear of the car.
Step 5 Unbolt stock H-pipe from the exhaust manifolds using the 15mm and long extension(s).
Step 6 Remove the H-pipe from the car by sliding it backwards until the hangers slide out of the rubber isolators in the transmission cross member.
Step 7 Transfer the 3 oxygen sensors to the BBK X-pipe using a 22mm open ended wrench. Be sure to install them in the correct locations, they are color coded to avoid any confusion.
Step 8 Install the BBK X-pipe using the stock hardware.
A. Guide the hangars into the rubber isolators in the cross member.
B. Tighten the nuts that attach the X-pipe to the exhaust manifolds evenly from side to side. Verify that the pipe seats properly on the collector all the way around with no gaps.
C. Pull the tailpipes forward by hand until they butt up against the X-pipe, then slide the band clamps forward and tighten them evenly. Inspect the tailpipes where they protrude past the rear bumper cover. If they are uneven, you can adjust this by loosening the band clamps then slipping the pipes further in or out of the band clamps until the desired results are achieved then tightening the band clamps.
Step 9 Re-connect the oxygen sensors.
Step 10 Reconnect negative (–) battery terminal.