 FREE 1 to 3-Day Delivery on Orders $149+ Details
Mustang Grille w/ GT-Style Angel Eye Fog Lights - ('05-'09 V6) - Installation Instructions
Installation
Installing the Grille
1. Remove the ORIGINAL GRILLE from FORD MUSTANG '05-'06 V6
2. Connect the HALO RIM WIRE to PARKING LIGHT
3. Connect the FOG LIGHT WIRE to the FOG LIGHT WIRE KIT
4. Check the function on FOG LIGHT & HALO RIM.
5. When all the functions are correct, install the GRILLE to the MUSTANG '05-'Q6 V6

Installing the Lamps:
1. Select a mounting location that will give you a maximum beam adjustment range and will not cause any obstruction for your vehicle normal operation.
2. Mark the mounting position of the light units onto the surface. You may either upright mount or invert the lights. HINT: Have the lens point straight forward or 0-5 degrees to the center to get optimum illumination.
3. Attach the light units by securing the mounting bracket with the supplied screws. If the mounting screws are not accessible with the whole light unit on, disassemble the mounting bracket from the light and then mount the bracket without the lamp to the mounting surface, then re-install the lamp in the mounting bracket. Do not over tighten the screws.
Installing the Wires & Relay Switch
1. Disconnect the negative battery terminal. This may require resetting radio, clock, navigation or other electronic devices when reconnected.
2. Refer to the wiring diagram below, lay out the wires to their proper locations. HINT: Lay the relay and fuse holder as close to the battery as possible.
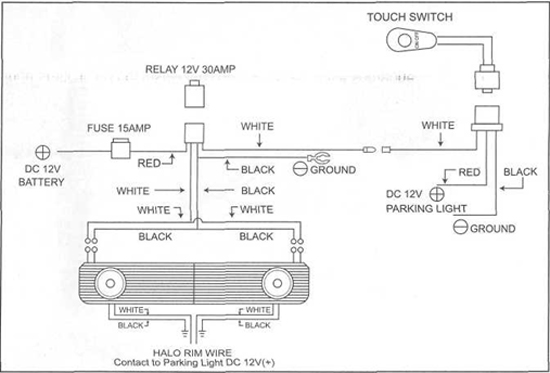
3. Find a convenient location with a flat surface on the dashboard or helm station and mount the switch.
4. Make secure wiring connections per diagram.
5. Reconnect the negative terminal to the battery and turn on the switch to test the whole system. If both of the lights do not come on, inspect the system in the following series: fuse/ground wire/battery connection/switch/ lamp connection/relay. Replace the defective parts if necessary. (Please ask your vendor about the replacement parts.)
6. With the system on, visually check the light beam, then turn off the lights and adjust the lamp's angle. (Let the lights cool down before each adjustment). Repeat this adjustment until a proper light beam appears, then firmly tighten all screws.
Note:Before drilling any mounting hole(s), carefully locate a suitable area where there is no obstruction behind.
Installation instructions provided by Manufacturer
