FREE 1 to 3-Day Delivery on Orders $119+ Details
Best Sellers


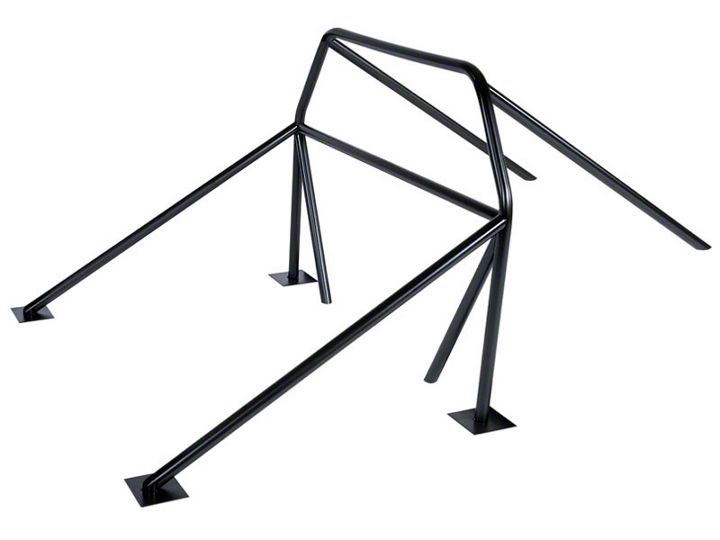
How to Install a Competition Engineering Complete 8-Point Roll Bar on Your 1979-1993 Mustang Coupe o
Installation Time
1 days
Tools Required
- Power Band Saw or Hand hacksaw to shorten tubing
- Body Grinder with coarse wheel to remove paint and rust. Also to refine tube notches.
- MIG or TIG Welder with 130 amp minimum rating
- Protective Face Shield for grinding and welding
- Sheetmetal Shears to modify or remove interior panels.
- Die Grinder or Electric Drill with rotary file to notch tube ends.
- Tape Measure, Hammer, C-Clamps, Locking Pliers, Magic Marker
- 4 Jack Stands to support vehicle
- Carpenter's Level and Angle Finder
- Bench Vise to hold tubing while grinding and cutting.
Shop Parts in this Guide
Installation
Please read the instructions completely BEFORE starting this project.
Competition Engineering 8-Point Roll Bars are not designed for use in vehicles where the stock floor has been removed. Check your sanctioning body's rulebook for installation guidelines.
To help you install this 8-Point Roll Bar; we've provided you with this step-by-step instruction manual.
These directions are a general guideline for a typical roll bar installation and are not written specifically for your application. If you have installed a roll bar before, this will be a quick refresher course. The installation process will involve fitting the bar components into the racecar, trimming the bars to fit and then tack welding the tubing together before making the final welds. By following this procedure, any minor mistakes can be corrected easily and with the smallest loss of valuable time.
NOTE: THE MATERIAL FURNISHED IS NOT TO BE CONSIDERED A COMPLETELY FINISHED AND FITTED ASSEMBLY. INSTALLED DIMENSIONS ARE NOT PROVIDED WITH THESE INSTRUCTIONS. THE ROLL BAR IS TO BE INSTALLED TO YOUR OWN PERSONAL SATISFACTION WITHIN SANCTIONING BODY RULES AND THE GUIDELINES SET BY COMPETITION ENGINEERING IN THESE INSTRUCTIONS.
This Roll Bar has been designed to eliminate some of the more critical operations for you, the installer. Some of the tubes have had the notches roughed in for you but will still require some minor trimming to meet your specific needs. Refinement of the notches should be done as carefully as possible. We recommend using a hand grinder or if possible a holesaw type tube notcher to prepare the ends of the tube for proper fit. The notches should allow for a slight gap to help maximize weld penetration. Also make sure to dress the notched end of the tube with a grinder or hand file to remove burrs and provide a chamfer for improved weld appearance.
We recommend that all welds be done with the approved MIG or TIG welding process. A machine with 130-amps or higher should be used. DO NOT USE FLUX CORE WIRE TO WELD THIS ROLL BAR. If you are unsure about your welding abilities, have a professional welder complete the installation. Follow all safety guidelines that are provided with the equipment you are using. Always wear eye protection.
PARTS LIST
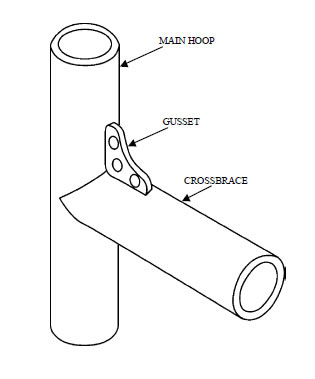
1) Main Hoop (sold separately)
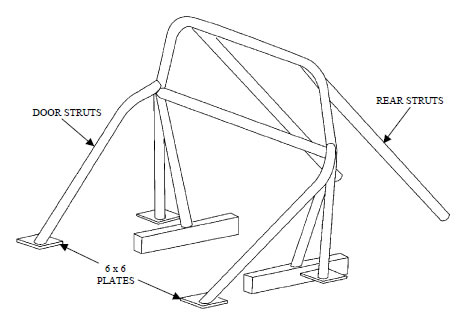
2) Rear Struts 72" Long
2) Door Struts 56" Long
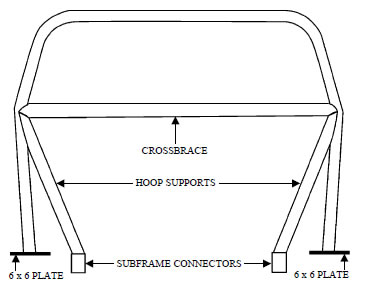
2) Main Hoop Supports 39" Long
1) Main Hoop Crossbrace
6) Gussets
6) 6"x6" Plates
For a professional looking installation we highly recommend the following materials and tools:
- .030"-.035" Mild steel welding wire
- Thin cardboard to cover the windows. This protects the glass from welding and grinder sparks.
- 80-Grit sandpaper to remove paint and light surface rust
- Holesaw type tube notcher
- Scrap pieces of sheetmetal to protect the headliner during welding.
INSTALLATION
1. Begin the installation process by removing the interior from the vehicle. This includes, front and rear seats, carpet and sound deadening.
2. Install the protective cardboard over all exposed interior glass. Don't forget to cover-up your gauges and radio if they are installed. Grinder and welding sparks go everywhere.
3. Jack-up the vehicle and support it in four places with approved jack stands. You want to take extra time to make sure the vehicle is level from front to back and side to side. Steel shims can be used between the jackstands and the chassis to achieve proper level.
NOTE: Do not let the chassis droop on the jackstands. If this is allowed to happen during the roll bar installation this droop will become permanent.
4. We are now going to trial fit the main hoop. Take a measurement from the headliner to the mounting point for the base of the main hoop. Turn the main hoop upside down on the shop floor and measure from the floor to the end of the hoop leg. Mark the hoop legs at the dimension you measured in the car. Cut the tubes at this mark.
5. With the driver's seat installed and the driver seated with helmet on, determine the position of the main hoop.
NOTE: It is recommended that the main hoop be no further than 6" from the back of the driver's helmet.
Trial fit the main hoop in the car. Try to align the vertical positions of the main hoop with the door pillar. Make sure it is centered in the vehicle by measuring from the door jam to the edge of the hoop on each side. If it fits snug, mark the leg positions on the floor with a marker. Remove the hoop from the car.
6. Grind the area marked previously so that you can install the supplied 6" x 6" steel plates.
7. Form two of the plates to conform to the floor under the area of the main hoop legs. Tack weld them in place.
8. Re-install the main hoop in the car and tack weld it to the previously installed plates. Re-check the position of the main hoop.
9. We are now going to install the rear struts. The rear struts connect the main hoop with the rear frame at the upper spring mounts. They should be installed parallel to each other and directly over the rear frame rails.
a. Drop a plumb bob down from the top of the main hoop even with the outside of the rear frame rails and mark the position on the hoop. This is the outside mounting point for the rear struts.
b. Take a measurement from the mark on the main hoop to the desired end point for the rear struts.
c. Cut the struts to this dimension. Remember to take into account the angle needed, if any, on the end of the tube.
d. Tack weld the rear struts in place. 6" x 6" floor plates should be used if the vehicle has the stock floor over the rear frame.
10. With the driver seated, measure for the height of the main hoop crossbrace. This is the tube that mounts between the legs of the main hoop and supports the driver's seat in the event of impact. It also acts as a structural member for the shoulder harness. Follow your sanctioning body's guideline for correct placement.
a. Cut the un-notched end of the tube to the correct dimension taking into account the notch that needs to be added to the end of the tube (typically 5/8" extra).
b. Trial fit the crossbrace and tack in place if the fit is correct. Make sure that the tube is level.
11. The next part of the installation is the main hoop supports. These tubes span from the intersection of the main hoop and main hoop crossbrace to the top of the subframe connector or rear frame rail near the front ladder bar or 4-link brackets. These supports will improve chassis reaction time and make the car less flexible.
a. Determine the route for the tube. Make a template of the notch required on the ends of the tube using a piece of paper wrapped around the end of the tube. Slide the paper up into the location for the notch and mark the contours on the paper. Trim the paper as if it were the piece of tube being notched. Refine the cut in the paper until your have a perfect fit. Transfer this shape to the end of the main hoop supports.
b. Trial fit the tube to the car. Tack weld in place.
12. The last part of the roll bar to be installed is the door bars. The door bar spans from the main hoop to the center of the floor plate. Most sanctioning bodies require that this bar pass by the driver at a point between the shoulder and the elbow. The driver should be seated in the car to properly locate the door bars.
a. Locate the position of the door bar on the rocker sill. Form and install a 6"x6" plate for each side.
b. The front of the door bar is to be located in the center of the floor plate. Trim the front of the door bar so that it fits flush to the floor plate.
c. Notch the back of the door bar to fit against the main hoop. Work slowly and carefully here, mistakes happen easily on this type of notch.
d. When you are satisfied with the fit, tack weld the bar in place.
e. Finish weld the floor plates in place.
13. With all the roll bar tubes tack welded in place, proceed to check each union to ensure that no tack welds have broken. Secondary tack welds are placed at every union and at areas where previous tack welds have been completed. You can obtain the best results by following this procedure. Begin by placing additional tack welds opposite existing tack welds. You will need between two and three tacks around each tube to prevent the cage from drawing. Secondary tacks should also be placed in areas that will be difficult to reach during finish welding. Other areas for secondary tack welds will include tubes that don't fit tightly or are in areas where the tubes form a deep angle.
14. Finally, we come to the last major step: finish welding all frame substructures and floor plates. This should be done from side to side and top to bottom of each union, starting from the inboard and working your way outward to the rocker sill area. Finish weld the entire roll bar in the same order you installed each component part. Work on the center section first, then move on to the rear and then the front sections, using the same side to side, top to bottom welding method.
If any porosity is encountered during welding, grind it out and re-weld. The final finish welding procedure will include the placement of the triangular gussets at every union where round tubes are joined in the main hoop center section. Check each union to be sure that they are welded 100%.
With the welding completed, the roll bar can be degreased, sanded and painted.