FREE 1 to 3-Day Delivery on Orders $149+ Details
How to Install Convertible Top Header Weatherstrip on your 1985-1993 Mustang

Shop Parts in this Guide
Installation Instructions
Remove old weatherstrip and make sure to clean metal rails of any left over pieces of old weatherstrip. Install new weatherstrip corners first then work toward the ends and middle. Raise the top to rest on windshield but do not latch. Position the weatherstrip to set properly against windshield post weatherstrip and rear rail weatherstrip. After weatherstrip is properly positioned use adhesive to glue the weatherstrip into the rails, glueing only one section at a time in order to retain proper positioning.
Following are instructions for making adjustments to windows and convertible top after installation of new weatherstrips

Window Adjustment
Tilt Adjustment
1. Remove armrest, door panel and weathershield.
2. In/out tilt adjustment may be achieved by loosening bolts on bottom nylon bracket on window bracket (Fig. 14, View A). Move nylon bracket in or out to achieve proper positioning.
3. Tighten bolts.
4. Water test vehicle for leaks by running water over
and checking for possible leaks.
Up/Down Adjustment
1. Locate stop adjustment nuts (two in front, two in rear, Fig. 14, View B). Loosen nuts and adjust stop bracket from inside door up or down to location desired. Tighten nuts when desired location has been achieved.
2. Water test vehicle for leaks.
Forward/Rearward Adjustment
- Loosen bolts on upper nylon bracket (Fig. 14, View C).
- Move window to desired location. Tighten bolts.
- Water test vehicle for leaks.
- Further adjustment may be made at glass run assembly upper nut if required, refer to Up/down
Folding Top Adjustment To Door and Quarter Glass
The rear seat back, cushion, regulator handle and quarter trim panels are to be removed.
Quarter Window Adjustment
To adjust the quarter window the seats and quarter trim panel and the quarter lock to wheelhouse reinforcement must be removed.
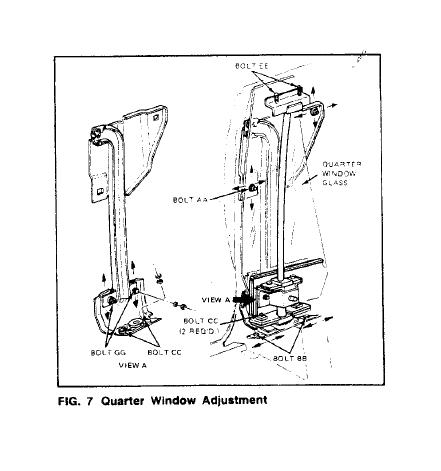
• Up/down position of gtassls obtained by adjusting the channel assembly quarter window guide by loosening the AA bolt and two GG bolts (Fig. 7).
• Fore/aft position is obtained by adjusting the AA bolt and two CC bolts Fig. 7).
• Inboard/outboard adjustment is obtained by loosening two EE bolts and two DD bolts (Fig. 7).
• Angulation of the window and tumblehome is obtained by the combination of fore/aft and up/down adjustment.
• The stabilizer assembly (used to prevent glass twist), is adjusted to provide stability to rear of glass when it is in the UP position.
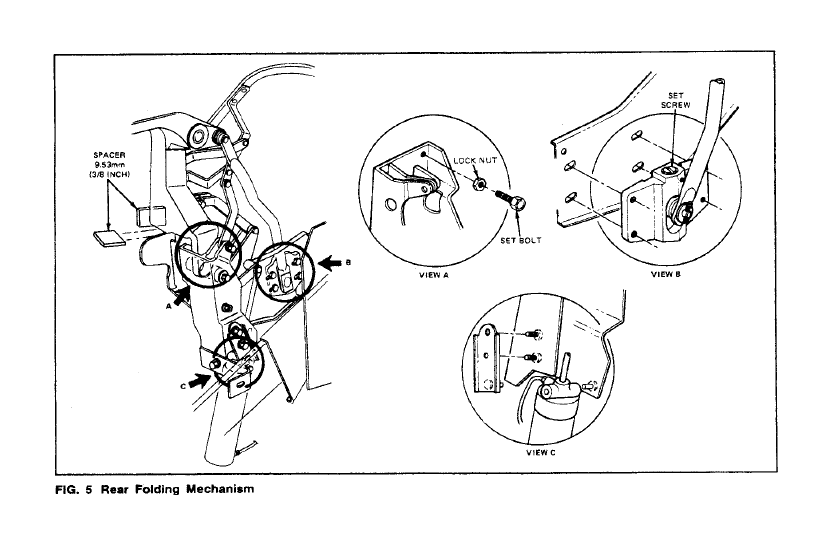
• Loosen two bolts on front face of main pivot bracket to support folding top (allows inboard/outboard adjustment) (Fig. 5, Main View).
• Loosen two bolts on inboard side of folding top main pivot bracket to main power link (allows rail adjustment up/down at door glass, and stack height adjustment) (Fig. 5, View C).
• By physically moving top stack, adjust the top to the vehicle.
- Adjust rear rail horizontally and vertically to the quarter panel by using a 9.5mm (3/8 inch) spacer (Fig. 5). (This allows clearance of top material and rails to quarter panel molding and trim panel).
- Adjust rear rail to quarter glass physically to provide weatherstrip sealing to quarter glass and lock set screw to contact rear rail (Fig. 5, View A).
- Align roof rails and weatherstrip to seal along top of door and quarter glass by adjusting set screw (Fig 5, View B).
• When alignment and sealing of weatherstrip to door and quarter window is finished, secure two bolts in header to front rail, rotate set screw to contact rear rail, secure four bolts connecting folding top to regulator panel, secure two bolts to front face of regulator and four bolts to control arm adjusting screw.
• Before rotating folding top, all bolts are to be secured so as not to damage the folding top mechanism.
NOTE: For additional quarter glass sealing, loosen weatherstrip attaching bolts and adjust strip strip inboard (Fig. 6).