 FREE 1 to 3-Day Delivery on Orders $119+ Details
Best Sellers


How to Install a Classic Design Concepts High Mount Third Brake Light on Your 1999-2009 Mustang
Installation Time
1 hours
Tools Required
- Ratchet
- 14mm Socket
- T-45 Torx Bit
- T-20 Torx Bit
- Trim Panel Fork Tool
- Test Light
- Pliers
- Wire Crimper
- Rubbing Alcohol
- Soft Clean Rag
Shop Parts in this Guide
Installation

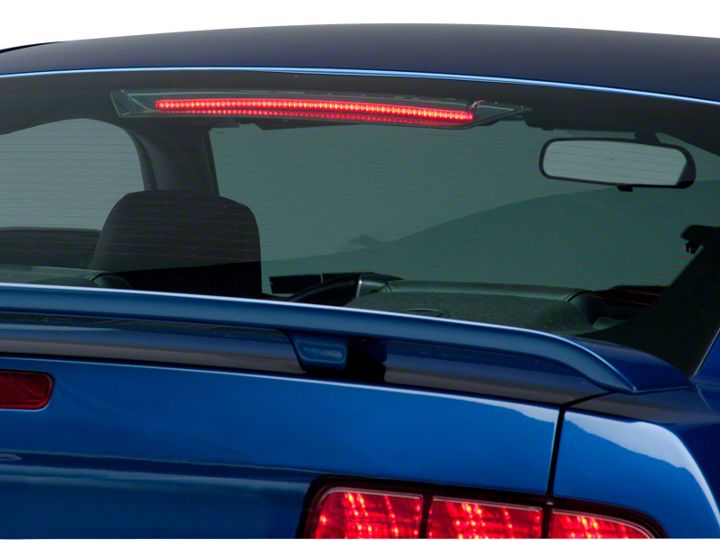
2005 - 2009 Mustang High Mount Brake Light CDC #110620
Note: Read installation instructions before starting.Kit Components
- 1 – 15.6” LED Brake Light & Housing
- 1 – T-Tap Electrical Connector
- 1 – Male Spade Electrical Connector
- 1 – Eyelet Electrical Connector
Attention:Tape surfaces must have a temperature of 70º F or above to properly adhere. If necessary, warm the vehicle and Chin Spoiler areas with a heat gun or hair dryer.Attach Brake Light to Rear Window:
1. Clean area of the window and Blackout where LED Housing will mount with Alcohol.
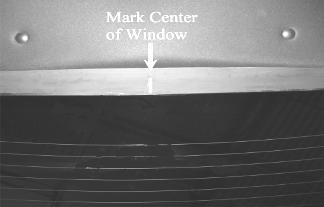
2. Mark center of rear window at headliner. Attach the LED Housing to the rear window, along headliner, so that the face of the LED is even with the solid edge of the Blackout, centered on window.
Remove Rear Seat Bottom:
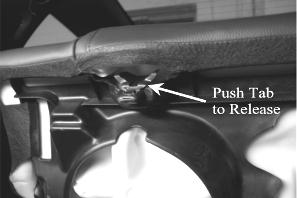
3. With Brake Light and housing attached to the glass, remove the rear seat bottom. There are locking tabs on each side, where the seat meets the floor pan. The tabs are located 10” in from ends of seat. Push tabs toward rear of vehicle and lift seat bottom.
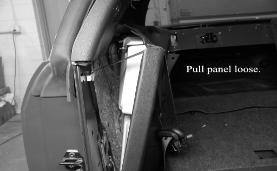
Remove Trim Panels:
4. Remove the Push Pin securing the quarter trim panel to floor pan in foot well. Release the seat back and tilt forward. Remove the 2-Push Pins securing the quarter trim panel to rear support.
5. Pull Lower Quarter Trim Panel loose from sheet metal, but do not remove, for the routing of Brake Light wire.

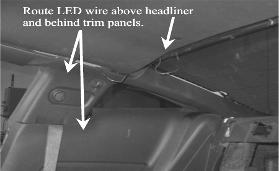
6. Open the cover on coat hook to reveal screw and remove screw (T-20 Torx Bit). Remove the cover from seat belt shoulder strap guide and remove nut (14mm).
7. Pull Upper Quarter Trim Panel loose from sheet metal, but do not remove, for the routing of Brake Light wire. Route the Brake Light wire above the headliner and down behind both the Upper and Lower Trim Panels
Wire Brake Light:
8. Locate the wire harness under the back seat bottom on the passenger side of the vehicle. Cut the tape from around the wires and pull the Tan wire with Blue Stripe out from the bundle. Verify function with test light. Attach the T-Tap connector (supplied with the Brake Light) to the tan wire with blue stripe. Crimp the male electrical connector (supplied with the Brake Light) onto the red wire from the LED and crimp the eyelet connector (supplied with the Brake Light) to the black wire from the LED. Plug the male electrical connector into the T-Tap connector. Remove the bolt securing the lower end of seatbelt to the floor (T-45 Torx Bit) and place bolt through the eyelet connector. Reinstall the seat belt bolt to vehicle and tighten.
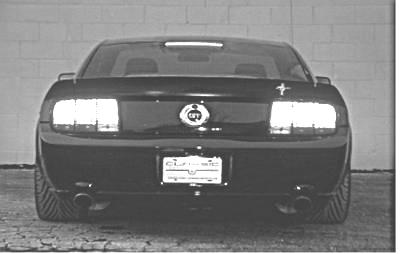
- Test 3rd Brake Light operation and reassemble trim panels and seat.
Thank you for choosing Classic Design Concepts for your restyling needs. If you have any questions or concerns regarding installation please contact [email protected] or call 866-624-7997
| ORIGINATOR: Jeff Carroll | REVISION DATE: 05/18/2009 | REVISION LEVEL: E |
| APPROVAL: | ISSUE DATE: 1-16-06 |
Best Sellers
Related Guides
-
Installation
-
Installation
-
Installation
