 FREE 1 to 3-Day Delivery on Orders $149+ Details
How To Wire Your Foglights Independently ('94-'04)
Installation
Note: In order to do this modification you MUST be able to splice wiring. If you don’t feel comfortable in doing this either get professional to assist in installing the wiring, or take it to a professional shop to be done.
This modification will change your foglights to be independently wired so that you can turn them on and off at will, without having to have your driving or headlights on. It gives quite an interesting effect!
1. Disarm the SRS (airbag) system by disconnecting the negative battery lead, and then the positive lead. Wait two (2) minutes before continuing.
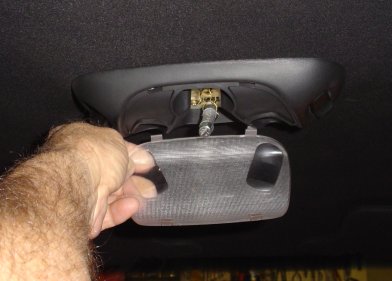
** If you decide not to disconnect the battery, disable the overhead interior lights, by pulling the bulb out of one of its clips. Don't touch the bulb glass with your fingers - it can cause it to burn out prematurely (either pry it out of the clip or use a paper towel). You can now work with the door open, and not drain your battery! The lens can be popped out with a small screwdriver. Mine had 2 slots on each side of the lens - carefully pry it up, and then remove the lens. Notice that there are four plastic tabs on the lens, that lock onto the light assembly. Be careful not to break them off, by prying too hard or too fast. It only goes back on one way!
2. Remove the lid on the center console glove box, either before or after the box, depending of the year model. There are about three screws on the hinge area. All are Philips head screws.
3. Remove the rubber pads near the front edge of the box (they press in and out), and then remove the screws that are in the recess (Figure 1). On some models there may be extra screws holding the box in. (Note: I uninstalled a 96 and installed a 99 console in my 1996 Cobra. I found that there are only three screws holding in both model years. All are phillips head screws).
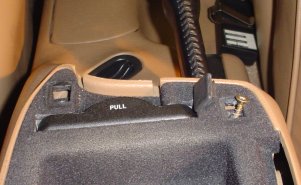
Figure 1
4. Pull up on the box, and remove it (For the 1994-1997 you may have to pull it up by the cupholder. Be careful, even though the cupholder is useless in that console, you don’t want to break it).
5. Push (carefully) up on fog light switch harness connector, to dislodge the switch from the console, and then disconnect the harness from the switch and pull the harness back into the console.
5a.Coupe only: The mod consists of (Figure 1) cutting the Red/Black wire 1-2 inches from the fog light switch harness connector (gray), install a crimp type butt connector (red, for 1 small gauge wire, and blue if two wires will be inserted) on the wire (at the harness connector), and capping off the other end of the wire you just cut (to keep it from touching anything). Tie or tape the capped wire to the harness to anchor it (Figure 2).
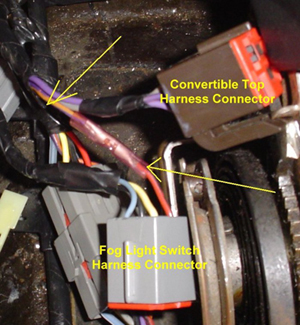
Figure 1
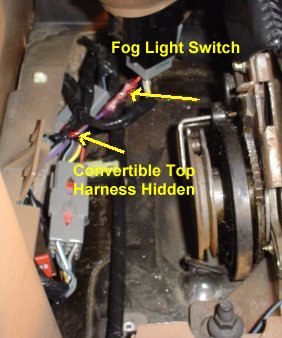
Figure 2
Locate the convertible top harness connector (not connected to anything) near the left side of the console. If it's anchored with a plastic plug, remove the plug to give the harness some slack (NOTE: There may or may not be a connector in your Cobra - you'll have to look and see). Cut the purple/orange wire (Figure 1) about 1 - 2 inches from the connector (in case you ever decide to reconnect the wire). Cap off (or tape) the end of the wire that's remaining on the connector. The other end of the wire will be crimped into the butt connector you installed on the fog light switch connector. Results: Red/Black wire at fog light switch harness connector will be connected with a crimp type butt connector to the Purple/Orange wire leading away from the convertible top harness connector. Re-anchor the convertible top harness. If there isn't enough slack in the Purple/Orange wire (Figure 1 & 2) (going to the butt connector), you can remove some of the tape / insulation on the wire harness, to free up the wire (or splice in an extra length of wire), and then add a little tape to secure the rest of the wires in the harness together. Connect the fog light switch harness to the switch, and reinstall the switch in the console. Connect battery leads and perform a test of the fog lights. Reinstall the glovebox insert and the lid... you're done.
5b.Convertible only:You will be working on the harness connector half whose wires are running towards the front of the vehicle (this will be the only other large wire harness connector in the console area. Use a blue butt connector). The only difference is that when you cut into the convertible top wire harness purple/orange wire, you will be putting both ends of the purple/orange wire into a blue butt connector - you are merely splicing into the convertible top wire harness. When you cut this wire, if you think there won't be enough slack in the harness to re-anchor it, add an extra length of wire (red butt connector) to the wire coming out of the harness. Make sure you cut the wire far enough away from the harness connector to allow for insertion into the blue butt connector.
Bada Bing! You're Done!
