FREE 1 to 3-Day Delivery on Orders $149+ Details
How to install a Daytime Running Lights on your 2005-2009 Mustang
Installation
Installing the DRL-1M5 Unit Into Your 05-09 Mustang

The DRL-1M5 module is designed to convert the front turn signal lamps into Daytime Running Lights. The module comes with all the necessary wiring and connectors to install into your 2005 Mustang.
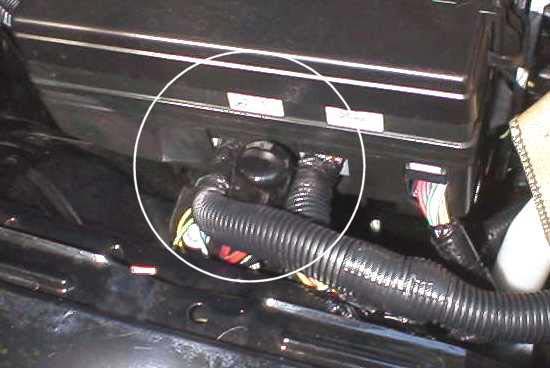
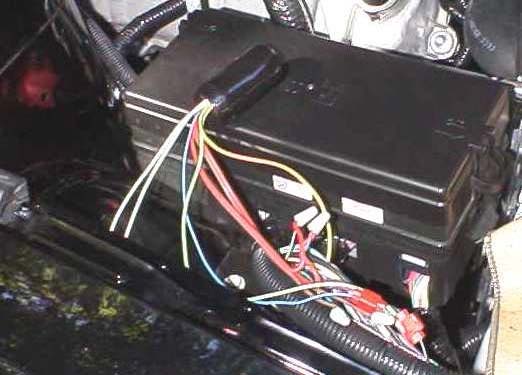
The unit is installed under the hood, near the Bussed Electrical Center on the passenger side of the car.
Installation should take about a hour. You will need a wire cutter/strippers and a pair of pliers to make the connections. Read the instructions carefully and familiarize yourself with the module.
This is a picture of the module. The module controls the operation of both turn signals.
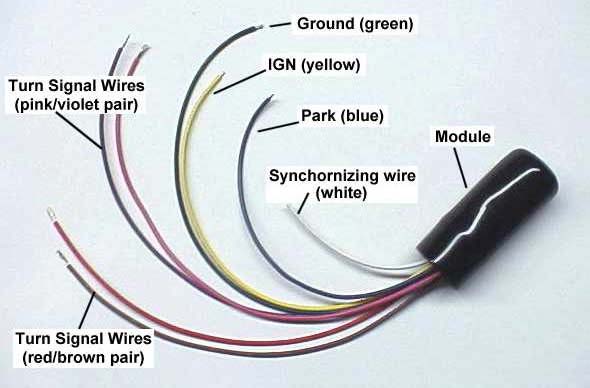
The Synchronizing Wire
The DRL module can be wired so that both left and right lamps are synchronized. In other words, when in DRL mode, if you turn on a signal, the other lamp turns off. After the signal is complete, both lamps come back on in DRL mode. The reason this is done is because there can be a situation if an oncoming driver just glances at your car while you have a signal on. If he looks when the turn signal is in the off cycle, he will see the other lamp on, and may assume you are turning the other way. In synchronized mode, the other lamp turns off, so there is no confusion.
In non-synchronized mode, the opposite lamp will stay in DRL mode when a turn signal is in use. This is the way turn signal DRLs operate on today's automobiles.
You can program the DRL module to work in synchronized or non-synchronized mode. As you receive the module, it is programmed in non-synchronized mode. If you want this mode, then you can skip this section and continue with the installation.
If you want the unit to operate in synchronized mode, use a quick-splice to connect the white wire to the green module wire. This is not a permanent setting. If you later wish to go back to non-synchronized mode, simply disconnect the two wires.

Installation
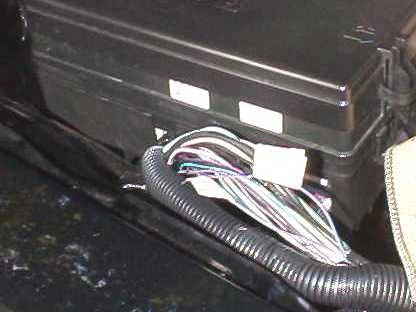
All wiring will be done at the Bussed Electrical Center (BEC) under the hood, on the passenger side of the car.
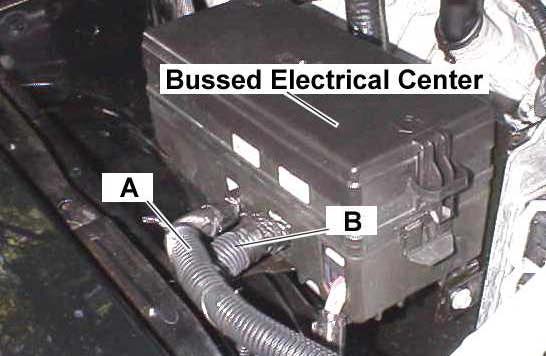
1. Open wire loom "B" (if necessary, remove or carefully cut any electrical tape to increase access to the wires). Locate a RED/YELLOW STRIPE wire. There are two of them -- you can pick whichever is easier to work with. Using a quick-splice, connect the YELLOW module wire to the RED/YELLOW STRIPE wire in the harness.
2. Open wire loom "A" (if necessary, remove or carefully cut any electrical tape to increase access to the wires).
3. Locate the BLACK/PINK STRIPE wire in the harness. Using a quick-splice, connect the BLUE module wire to it.
4. Locate a BLACK wire in the harness. There are several of them -- pick one that is as thin as the black/pink stripe wire from above. Using a quick-splice, connect the GREEN module wire to it.
5. Locate the DARK BLUE/ORANGE STRIPE wire in the harness. Cut it and strip 1/2" of insulation off both ends. Using a wire nut, connect the VIOLET module wire to the cut wire going to the front of the car. Using another wire nut, connect the PINK module wire to the cut wire going into the BEC.
6. Locate the GRAY/BLACK STRIPE wire in the harness. Cut it and strip 1/2" of insulation off both ends. Using a wire nut, connect the BROWN module wire to the cut wire going to the front of the car. Using another wire nut, connect the RED module wire to the cut wire going into the BEC.
Testing
Start the car. Both turn signals should be on. Turn on the left turn signal and see that the left signal blinks. Turn off the signal and after a couple seconds, the turn signal light will come on as a DRL. Turn on the right turn signal and check for proper operation.
Turn on the parking lights. Both turn signal filaments should go off, and only the park filament should be on. Turn the lights off and the turn signal filaments should come on as DRLs. If something isn't working, double check your wiring for errors.
Make it Neat!
Stuff the wires back into the harness looms and secure them using tie wraps or electrical tape. Wedge the module between the two looms at the BEC. Note that the module is oriented with the closed end UP and the wires pointing DOWN. This is to keep water out of the module in case it gets wet.