FREE 1 to 3-Day Delivery on Orders $149+ Details
How to Install an SHR Fuel Door on Your 2010-2012 Mustang
Installation Time
15 minutes
Tools Required
- 7mm Socket / Ratchet
- 3/8" combination wrench
- ¼" drill bit / drill
- Small flat screwdriver
- Safety Glasses
- Rag or small towel

Shop Parts in this Guide
Installation
Thank you for your purchase of SilverHorse Racing products. Please read all directions before beginning the installation. A factory shop manual should be available for reference during installation. If, after reading these and any accompanying directions, you feel that you may not be able to complete the installation safely and properly, please seek out professional installation by certified technicians. Please read and understand our product purchase agreement (included on yellow sheet) prior to starting installation. Vehicle should be off with key removed from ignition and in park with parking brake set prior to beginning installation.
1. No smoking, sparks, or open flames during installation!! Start by opening the factory fuel door, covering the filler neck with a small towel or rag (to avoid plastic chips falling into it). Drill holes in the plastic pocket holding the fuel filler neck in place with a ¼” drill. Use the 4 dimples in the edge of the plastic housing as a centering guide for the drill, being careful to only drill the plastic – no sheet metal needs to be drilled for this installation! Once the holes are drilled in the plastic, use the small flat screwdriver to release the clip-in tabs. The clips are located directly behind the molded “lines” next to each dimple location. Carefully remove the entire plastic housing being careful not to damage the cap-less filler neck in the process, as it is a glued-together assembly. The holes left open by the removal of this plastic piece are the 4 square holes shown in Fig. 1.
2. Using the 7mm socket, remove the two bolts that hold the factory fuel door to the quarter panel sheet metal. Hold the door while doing this so it does not drop and damage itself or the quarter panel. After safely removing the factory door, clean and touch up the opening if needed.
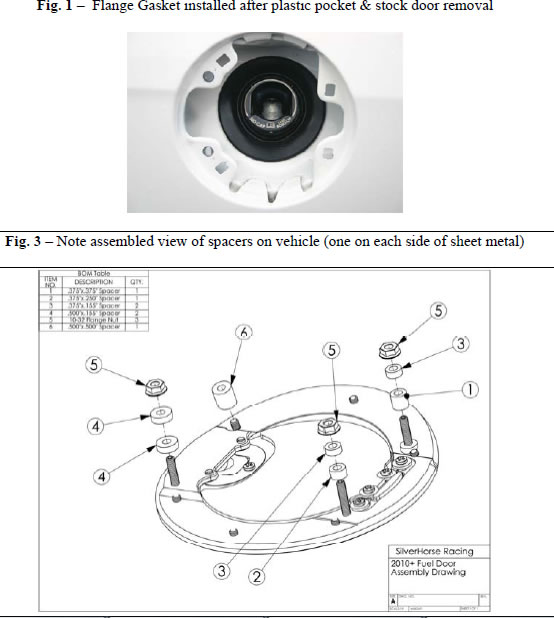
3. Install the new flange gasket by walking it in around the filler neck, and starting on one side, feed the back half of the flange into the quarter panel sheet metal. The larger diameter portion goes into the panel, the smaller diameter portion will be on the face of the sheet metal facing you when complete. When completely installed, the gasket / filler neck should look as it does in figure 1.
4. Remove the nuts from the back of the new fuel door, and remove the outer set of spacers. You can check the stack order of the nylon spacers against the drawing in Fig. 2. Leave the studs in place as well as the spacers closest to the ring. Assemble the door to the car, with the door open to help n alignment. Once it is in place, stack the previously removed spacers on the inside of the quarter panel, followed by the appropriate nuts (basically one nylon spacer on each side of the sheet metal). Once assembled by hand, use the 3/8” wrench to tighten using sufficient pressure to pull the door into final alignment. Loc-Tite, while not required, can be used on the studs to insure piece does not loosen on car, and is already used on studs where they attach to the fuel door.
5. Optional Fuel Lock cap (8U5Z-9C268-B) is available separately from your local Ford Dealer to further protect your fuel system from theft or vandalism.
6. Remove tools, close the door, and enjoy! Fuel doors are anodized or optionally plated for a long life, and normal care, maintenance, and periodic lubrication of the hinge mechanism will extend their life even more. This door is lighter than stock, saving valuable weight on the vehicle!