 FREE 1 to 3-Day Delivery on Orders $149+ Details
2005-2009 Mustang GT CDC Aggressive Chin Spoiler Installation Guide
Installation Time
60 minutes
Tools Required
- Phillips Screw Driver
- Masking Tape
- Marker
- 1/4 inch Drill Bit
- 80 120 grit sand paper
- Saw for cutting fascia (pneumatic body saw, hack saw, etc.)
- 6/32 inch Allen Wrench
- 1/2 inch Wrench
- Drill Motor

Shop Parts in this Guide
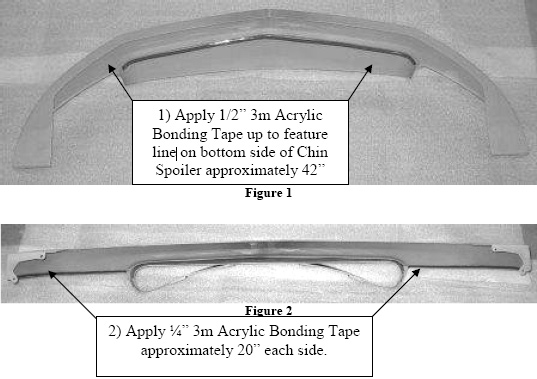
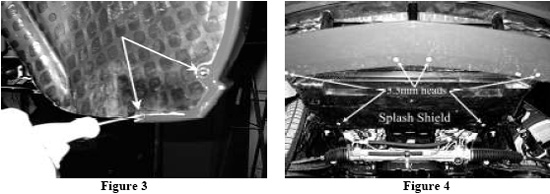
Apply 3m Acrylic Bonding Tape:
1. Sand area to be taped on the part with 80 – 120 grit sand paper.
2. Clean with supplied alcohol swabs. Allow time to dry.Caution:Proper ventilation should be used when handling all solvents. Inhalation and direct contact with skin or eyes should be avoided.
3. Apply supplied Adhesion Promoter. Allow time to dry.Note:Adhesion Promoter may discolor paint, only apply where needed. The drying time is generally 30 – 45 seconds but may depend on conditions. Tape should be applied within 60 Mins of applying Promoter, in a dust free environment.
4. Apply 3M Acrylic Bonding Tape. Cut tape with a razor blade where a continuous piece is not possible.Note:It is recommended that the temperature of the part be 60 - 110° F at the time of application.
5. Apply even pressure around part to set tape. As a general rule, a minimum of 15 PSI should be used.Note:Immediately after the tape is applied about 60% of the bond strength is achieved. After 24 Hrs approximately 75% - 80% is achieved. After 72 Hrs 95% bond strength is achieved
Preparing the vehicle for Chin Spoiler Installation:
1. Raise front of vehicle using ramp, hoist, jacks, etc. and properly support. To help ease installation, remove front wheels.
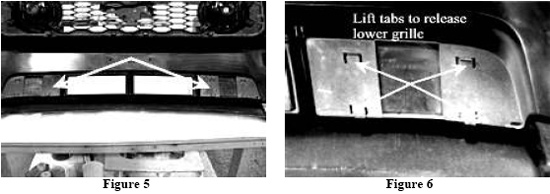
2. Remove the 2 lower screws from wheel opening that secure the wheel well liner to the front fascia (Figure 3). Remove the splash shield, secured to vehicle by six 5.5mm head screws, four in the fascia and two in the radiator support. (Figure 4).
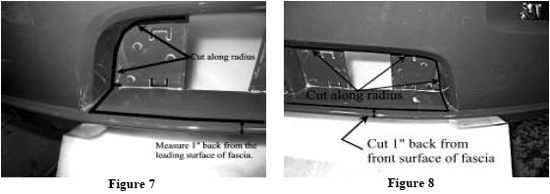
3. With the splash shield removed you can access the locking tabs that secure the grille in the lower fascia opening (we removed the fascia for picture taking purposes). Lift the locking tab (molded portion of fascia) to release the grille tab from the fascia slot. (Figure 5,6)
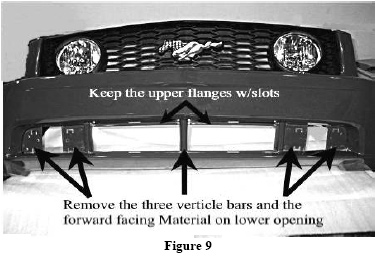
4. With the lower grille removed, mark the fascia for cutting. Measure from the front edge of the fascia’s lower lip back 1”(directly forward of the opening). From each end of the opening, mark a line straight out to the 1” line.(Figure 7,8)
5. The cut will be made along the marked lines below the fascia opening. The top and side cuts will be made on the radius of the grille opening. (Figure 9)
Chin Spoiler Fitment Verification:
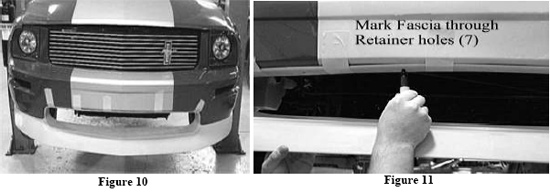
6. Install the Chin Spoiler to the fascia starting in the fascia opening. Stretch each end of Chin Spoiler into wheel openings. Start the screws in the wheel openings; do not tighten at this time. Tape the top ring of the Spoiler in place and mark the 7Retainer hole locations with a marker. (Figure 10,11)
Chin Spoiler Installation:
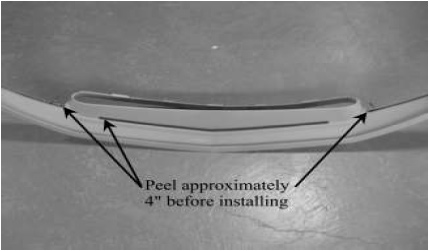
7. Once verification has been made, remove the Chin Spoiler from the vehicle. Drill Fascia for Retainers with a ¼” drill bit. Clean the fascia where the Acrylic Bonding Tape will contact and wipe with Isopropyl Alcohol, allow drying.BEFOREinstalling the Chin Spoiler, peel approximately 4” of the red backing from the acrylic bonding tape in the areas between the grille opening and the wheel opening and from the acrylic bonding tape located under the Chin Spoiler opening.
8. Install the Chin Spoiler to the fascia starting in the fascia opening. Stretch each end of Chin Spoiler into wheel opening. Secure ends of Chin Spoiler into wheel openings with the factory screws removed in step #2. Install the seven¼”-20 Button Head Screws through the Chin Spoiler through the fascia and secure with a washer and nut (see note). Pull the red backing from bonding tape (4” tabs from step #7) pressing over the tape area to seat the bonding tape to the fascia.
Note:Install the fender Washers on the topside of the Fascia. The corresponding area above the center hole in the Chin Spoiler will be removed during the removal of fascia material in step #5; the Fender Washer will span the gap to secure the Chin Spoiler to the fascia.
9. Reinstall Splash Shield to the factory locations at the radiator support and the bottom lip of the fascia with the factory screws.
Installation instructions provided by Classic Design Concepts.

