 FREE 1 to 3-Day Delivery on Orders $149+ Details
How to Install an Edelbrock Intake Manifold for 351 Windsor V8 Mustangs
Tools Required
- edelbrock air-gap intake and carb gasket
- intake bolt (optial but recomanded)
- torque wrench (must be able to do a of 30 lbs-ft of torque)
- a rachet set
- hammer
- new thermostat
- high temp silicone

Shop Parts in this Guide
Installation
1. You will need to unplug all the wires, hoses and vacuum tubes from the intake and the carb (cannot provide a picture of this because it will depend on your set up, your carb, your car and your anti-pollution). The easiest way to replug everything back on, is by taking some pictures of your engine before do you anything.
2. After all hoses and wires are unplugged remove the thermostat (on front passenger side of the intake there are 2 bolts check picture 1) then separate the elbow tube of the intake ( sometimes you will need a piece of wood and a hammer to remove it).
3. Now remove the carb from the intake. there are 4 bolts that holding it in place. in case of an upgrade of stock "2-barrel intake" to this "air-gap 4-barrel" you will not reuse your carb you will need a 4-barrel.
4. Now you can remove the 12 bolts (16 bolts if you have a 351w before 1977) that hold the intake in place (see picture 9). Now to remove the intake. There are two way to do it :
5. The easiest way to do it,but only if you will not reuse your old intake forever !Put a pry bar or a tube into the thermostat hole than pry the intake out or jack it with a long tube.
6. If you want your old intake then take a 1/4-3/8 steel plate the length and width are equal to the distance between the diagonal of the carb bolts. mark your hole with your old carb then drill the hole in the plate. Make another hole in the middle of the plate then put a ring bolt to make a lift point or you can weld it. Lift the intake with an engine lift.Be careful !the intake will pop out.
7. Now put a towel on the engine base and a piece of towel in each hole to ensure that are nothing fall in the block. remove the old gasket and all the dirt to be able to put the new gasket (see picture 2 and 3 to see how clean it need to be)

Now read and understand all the next step before starting it because you will have 30-45 minute to put the silicone, the gasket, the intake and torque all the intake bolt so be ready !
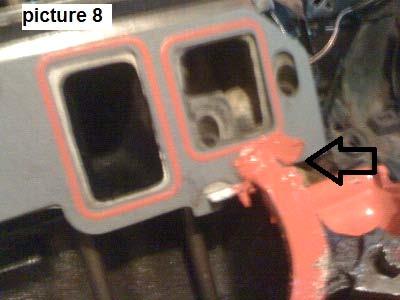
8. Put silicone on the engine base (see picture 5-6) you don't need a lot of it because it is under the gasket. Now put the engine base-to-intake gasket (on picture 4 the 2 little slices on the right of the picture). Put the head-to-intake gasket (you will see that they have a manifold side, it is really important to put the gasket on the right side ! See picture 7). Put silicone again on the base-to-intake gasket and in the corner of the base-to-intake and the head-to-intake gasket (put a generous amount in the corner see picture 8).

9. Now put the intake in place. Be careful to not move the gasket when you do this. I personally recommend to remove the distributor. You will see in your new or old intake bolts that they have 4 different bolts compared to the others (little more wide, if you don’t have this bolt just be careful to align the intake with the head) put these bolts (or if you don't have it just 4 normal bolts) in the corner of the intake then put it in place then screw all bolts with hand-force.
10. This is the bolt torque and pattern (picture 9) :
11. Now check the base-to-intake gasket if they are in their place. when you are sure that it is right in place the rest it is the same as the removal ( thermostat, carb, and replug all the hoses and wires).
12. Very important :flush your radiator fluid, change oil and filter. now i recommend to wait a minimum of 24h before you start the engine to ensure that the silicone is dry.
Done !
Related Guides
-
Installation
-
Installation
-
Installation
