FREE 1 to 3-Day Delivery on Orders $149+ Details
How to install a Flowmaster American Thunder Catback Exhaust on your 2005-2010 GT Mustang
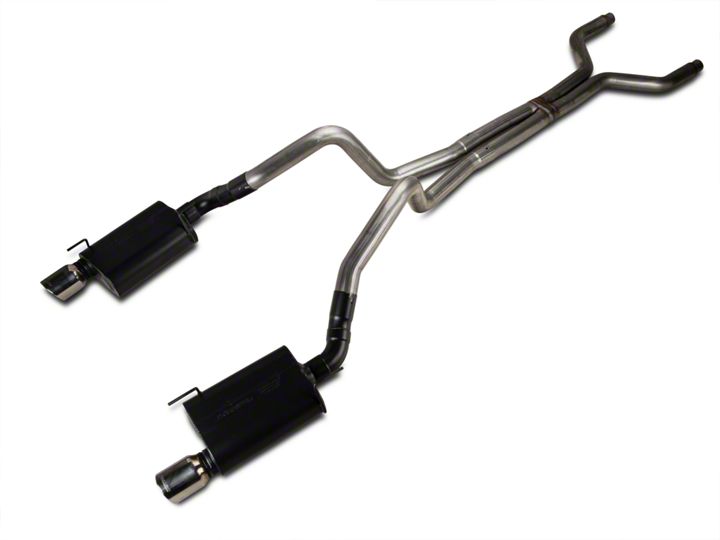
Shop Parts in this Guide
Installation
Removal:
1. Raise the vehicle up on a hoist or rack to working height. If you do not have access to a hoist or rack raise the vehicle and support securely with jack stands.
2. Use a 15mm socket to loosen the nuts on the clamped connections between the mufflers and the over-axle intermediate pipes. Then remove the bolts that secure the muffler hangers to the frame of the vehicle. There are four hangers, two on each side of the vehicle. A 13mm ratcheting box-end wrench works best to reach these six or seven bolts. Once the hanger mounts are freed, wiggle the mufflers down and slide off of the over axle pipe and set aside. Take the hanger mounts off of the stock mufflers and put them onto the new Flowmaster mufflers in the same orientation.
3. Use a 15mm socket to loosen the nuts on the clamped connections at the rear of the factory H-pipe and remove the intermediate pipes. The clamps have a clip that holds them onto the back of the H-pipe. Bend this clip back and remove the clamps. These clamps will be reused in the installation of the new system.
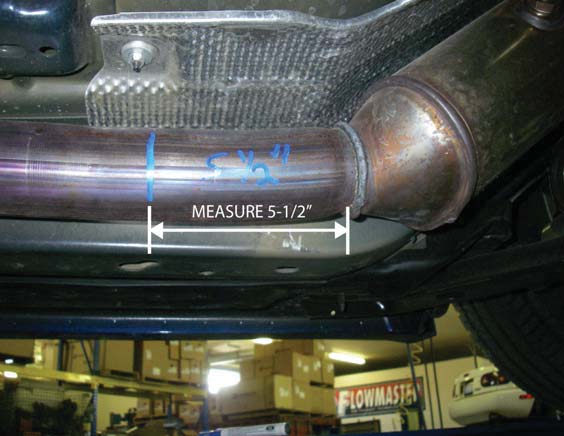
4. Measure 5.5” back from the bottom of the weld at the back of the catalytic converters and make a mark to trim (see photo). Using a sawsall, cut the factory H-pipe assembly at these marks. Try to make the cuts as straight and square as you can. After cutting, use a file or die grinder to deburr the ends of the pipes.
Installation:
1. Place the two factory band clamps that were removed in step 3, onto the inlets of the new Scavenger X-pipe assembly. Then place the assembly up into position and onto the back of the cats and support the rear with a stand of some sort. If the pipes don’t line up just right you may need to loosen up the flanged connections in front of the cats just enough to get them lined up.
2. Place a 3” clamp onto the slip fit end of the new intermediate pipes and then install the pipes up over the axle and onto the back of the X-pipe. When you install the clamps, make sure that they are oriented so that the nuts are offset to the outside.
3. Place a 3” clamp onto the inlet pipes of the mufflers. Slide the mufflers (with hanger mounts in place) onto the over-axle pipes, and support with stands. Secure the hanger mounts back into position on the frame using the factory bolts. A 13mm ratcheting box-end wrench works best to reach the bolts above the muffler.
4. Adjust the position of all muffler, pipes and tips to provide a satisfactory fit. This is a tight fitting system, so take your time and be patient, tightening and adjusting a little bit at a time. Be sure to maintain at adequate clearance around all parts of the system to avoid rattles or damage to heat sensitive components. Once you’re happy with the fit tighten all connections down very securely.
5. For a cleaner appearance and more secure installation, we highly recommend welding all slipfit connections.
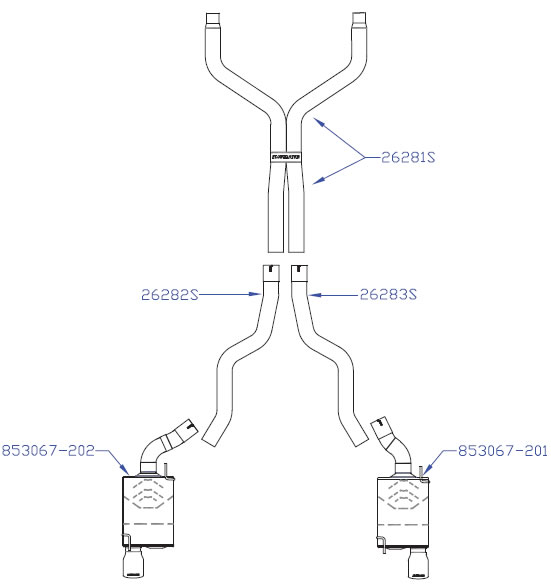
PACKING LIST
| Qty | Description | Part# |
|---|---|---|
| Box #85052 | ||
| 1 | Left Muffler Assembly | 853067-202 |
| 1 | Right Muffler Assembly | 853067-201 |
| Box #81080 | ||
| 1 | Scavenger Assembly | 26281S |
| 1 | Left Intermediate Pipe | 26282S |
| 1 | Right Intermediate Pipe | 26283S |
| 1 | PartsKit | PK513 |
| 4 | 3” Band Clamp | MC300BS |