 FREE 1 to 3-Day Delivery on Orders $119+ Details
Best Sellers


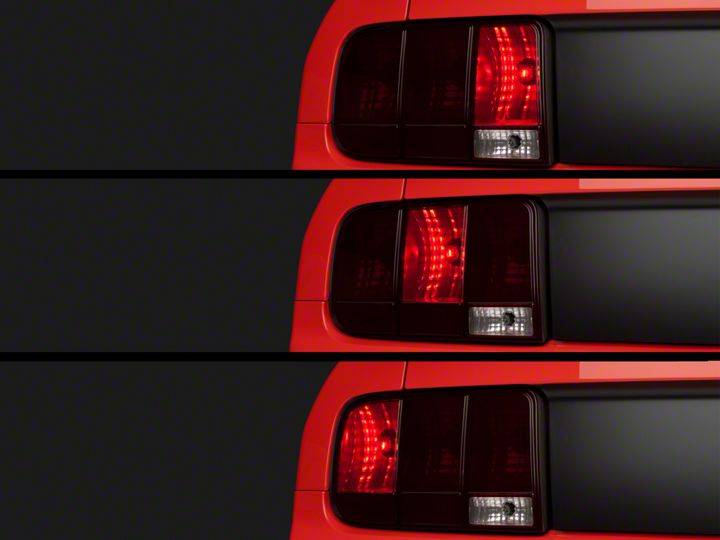
How to Install LED Sequential Chase Tail Light Kit - Splice-in on a 2005-2009 Mustang
Installation Time
30 minutes
Tools Required
- 1/4 Drive 11mm Deep Well or 11mm Wrench
- T-30 Torx Bit with Driver
- Small Flat Screw driver
Shop Parts in this Guide
Installation
Step 1
1. Open Trunk.
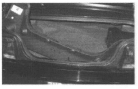
2. Remove the four center Pin Lock Retainers securing the plastic trim panel at latch by lifting the head of the center portion then remove retainer from panel. Remove the two Tors Head Plastic Screws from the upper area of trim panel, one per slide, directly behind each taillight in trunk. Remove trim panel, it is not necessary to remove the Shaker 1000 stereo subwoofers to remove this trim panel.
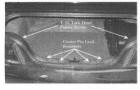
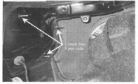
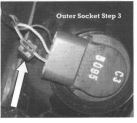
3. Remove 11mm nuts securing taillight housing to the vehicle, 3 per taillight housing.
It is not necessary to remove the housing from the car to disconnect the wire harness. The housing is shown here removed from the car for clarity only.
Make sure the lights are turned off and the ignition is off before you proceed further. Remove all the turn/driving lamps from each housing (6 lamps total).
Step 2 Attach Wire Tap Connectors
1. Start by attaching 3 wire tap connectors per side. It is not necessary to remove the harness from the car to modify the harness by cutting it in any way. Apply connections as follows:
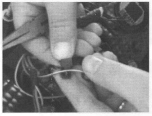
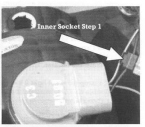
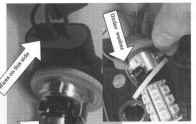
Step 1. Apply a wire tag connectory to the black wire on the inner lamp socket as show. This wire is located close to the edge of the lamp socket and is black.
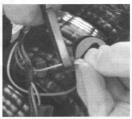
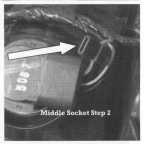
Step 2. Apply a wire tap connector on the red white stripe wire which exists the middle lamp socket this will be red with white stripe wire which exists the socket near the edge of the socket.
Step 3. Apply a wire tap connector on the red/white-stripe wire which exists the outer lamp socket--this will be the red with white stripe wire which exits the socket near the edge of the socket (see white arrow).
Three wire tap connections will now be installed on each side of the car.
Review your work: For 2006-2008 cars you will have installed wire tap connectors on the red with white stripe wire of the middle and outer lamp socket wires and also one wire tap connector on the black wire of the inner socket on each side of the car. Easy!
Step 3: Install LED Modules
Insert the LED modules as follows:
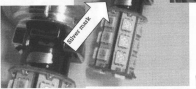
1. Install the inner most LED module first. The LED modules are inserted into the socket so that the silver mark faces towards the wires from the socket. Insert the module as shown. Be careful to allow the small diameter RED wire to exit the housing under the rubber washer so that it is not cut or broken by one of the locking tabs on the inner socket. Route the wire under the rubber washer as shown here.
2. Install the middle LED module, The LED modules are inserted into the socket so that the silver mark faces towards the wires from the socket.
3. Install the outer LED module. The LED modules are inserted into the socket so that the silver mark faces towards the wires form the socket.
Note: If a lamp does not light it may be reversed double check to ensure the y are oriented as above simply remove rotate 180 degrees and reinsert.
Step 4 Sub Harness Connections:
Now make sub harness connections as follows:
1. Connect the black wire from the sub harness to the wirelessly installed on the black wire of the INNER socket.
2. Connect either WHITE wire from the sub harness to the wire tap connector you previously installed on the red/white stripe wire on the middle connector.
3. Connect either white wire from the sub harness to the wire tap connector you installed on the re/white strip wire on the outer connector.
Step 5: Test the taillights BEFORE securing the light housings to your car.
Before testing complete the installation on both sides of the car. The computer control in the Mustang will have to be reset by removing the negative battery terminal and re-connecting it if testing is not done with both side installed properly.
Do all testing with the LED modules installed on both sides of the car. Do not reinstall the housings until testing is complete however.
Test as follows:
Start the car or turn the ignition to on or accessory.
1. With the headlights off have someone step on the brake. Make sure both sides sequence once and stay on.
2. With the headlights off activate the turn signal on each. Ensure that the taillights sequence from from inside to outside. If a module has been placed in the wrong socket you will see improper sequencing order. Just move the module to the correct socket. Remember that the inside socket must hold the LED module with the sub harness connected.
3. Now repeat the above with the headlights on. You will notice that during turn signaling the light sequence from dim to bright is correct operation.
Troubleshooting:
1. Some LED modules do not light. Make sure that you have the modules installed in the right polarity in each socket. The microprocessor must fact TOWARDS the socket wires. See pictures.
2. Sequencing is in the wrong order. Make sure you have installed the correct modules in the correct socket.
3. Lamps sequence rapidly but not properly. Make sure the sub harness is connected properly. Be sure he harness connector blades are inserted properly into the wire-tap connectors. A properly inserted connector hides the blade in the wire tap connector.
