 FREE 1 to 3-Day Delivery on Orders $149+ Details
Powerslot Mustang Rotors (Front Pair '94-'04 GT/V6) - Installation Instructions
Installation Time
2 hours
Tools Required
- Breaker bar
- Torque wrench (capable of measuring 80ft-lbs)
- Ratchet
- 3 extension
- 15mm and 21mm sockets
- 11mm and 3/8 wrenches
- C-clamp
- CR-VT-50 6-point torx driver
- Clear glass jar with lid
- 3/16 Rubber hose approximately 1 long
- Latex glove
- Paper towel
- Brake part lubricant
- Brake cleaner
- Penetrating oil
- Drill
- Floorjack, two jackstands, and wheelchock

Shop Parts in this Guide
Installation
Brake Bleeding Tool Construction:
1. To construct this apparatus, you need (1) glass jar with a lid and (1) length of rubber hose.
2. Drill a hole in the jar lid that is just a little bit smaller in diameter than the outer diameter of the rubber tubing.
3. Stick the rubber tubing into the hole in the jar lid.
4. Screw the jar lid onto the jar.
5. Now you have a brake-bleeding tool.
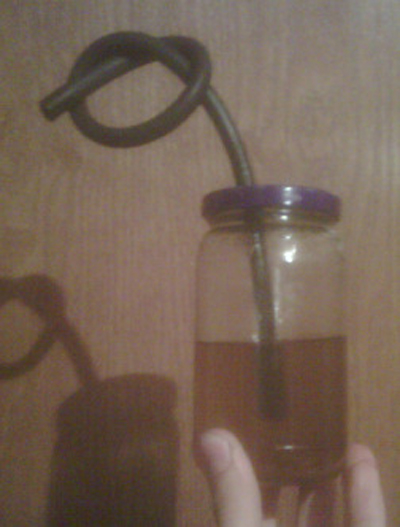
Brake Bleeding Tool
Installation
1. Break the five lug nuts loose on each of the front wheels with the breaker bar, 3” extension, and 21mm socket. Warning! Do not loosen bolts any further than the initial break at this time!
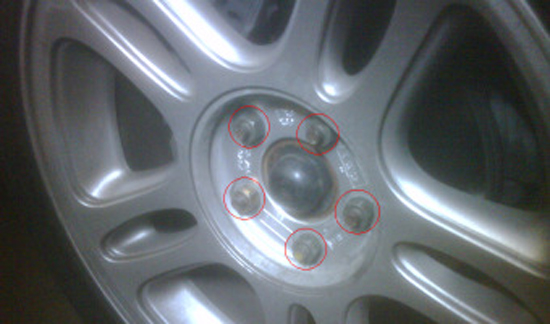
Passenger wheel with lug nuts circled in red.
2. Chock one of the rear wheels with the wheel chock. Then jack the front of the car up just far enough that the front wheels lift off the ground. Secure the car with the two jackstands.
NOTE:The rest of the instructions are for the driver’s side only. Repeat them for the passenger side when complete.
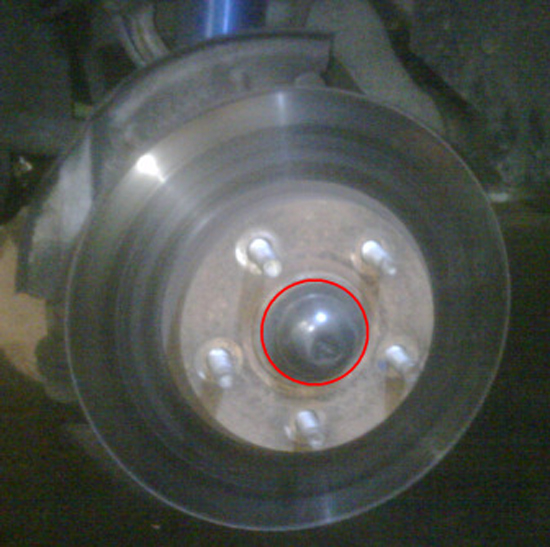
3. Remove the lug nuts with the ratchet, 3” extension, and 21mm socket. Then remove the wheel from the wheel studs.
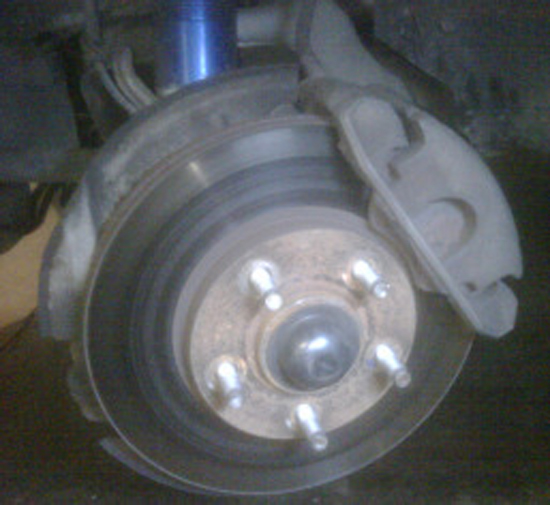
Wheel hub with wheel removed.
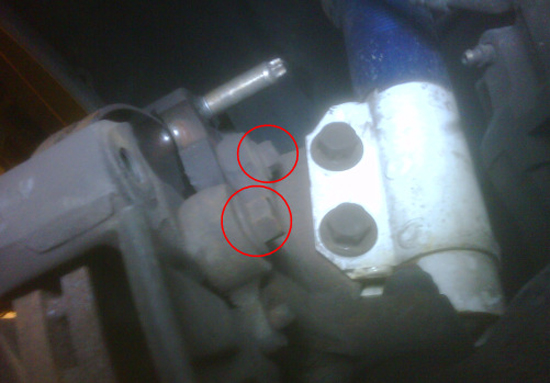
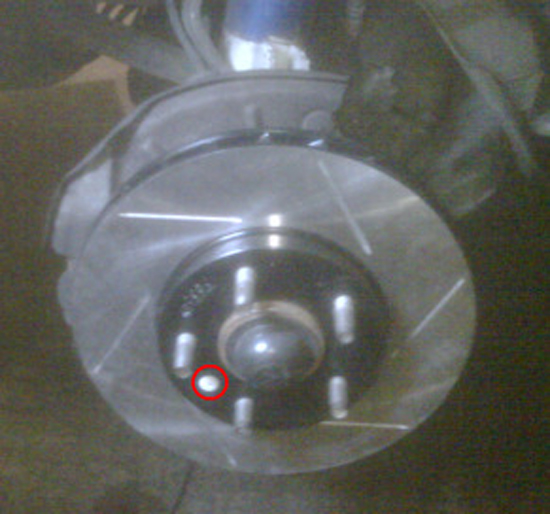
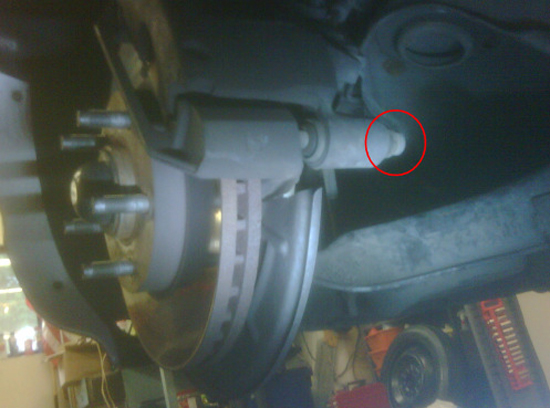
4. Remove lower caliper bolt with the CR-VT-50 6-point torx driver. Refer to picture below for bolt location.
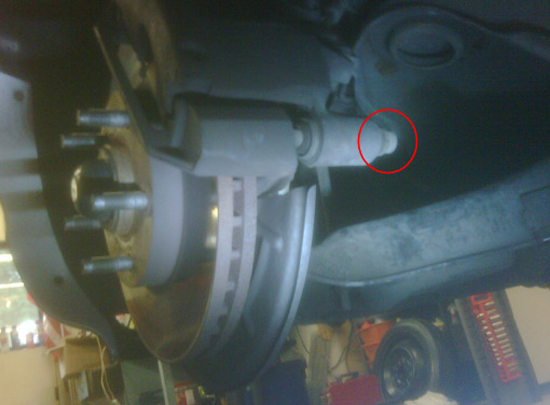
Wheel hub assembly. Lower caliper bolt circled in red.
5. Slide the caliper off the upper dowel (which is the only thing left securing the caliper to the car) and secure it in the wheel well using a bungee cord or string in a location and orientation that minimally stresses the brake line.
Warning!In this step, you will be removing the caliper! Make sure to have a way to secure it up in the wheel well in such a way that the line is not stressed!
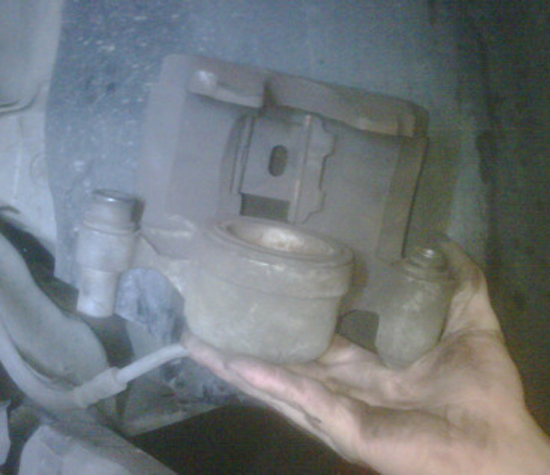
6. Remove brake pads out of the pad/caliper housing. They should just slide out of their tracks. There is one on each side of the rotor.
7. Remove the two 15mm bolts that attach the pad/caliper housing to the car using the ratchet and 15mm socket. Refer to picture below for the location of the bolts. Then remove the pad/caliper housing from the rotor.
Inside of pad/caliper housing (on backside of the rotor). The 15mm bolts are circled in red.
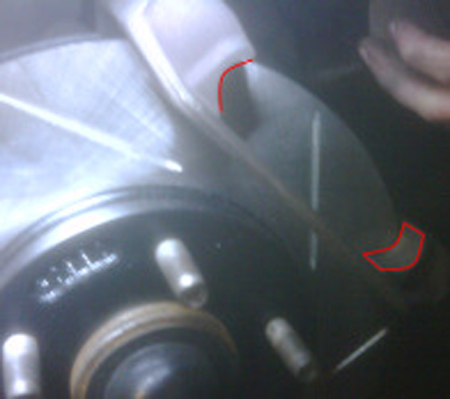
8. Slide the brake disk off the wheel studs. You may need to hit it with a rubber mallet and use penetrating oil where the rotor encircles the wheel hub to break the rust loose to free it for removal.
Wheel hub and rotor. Apply penetrating oil at the location of the red markings.
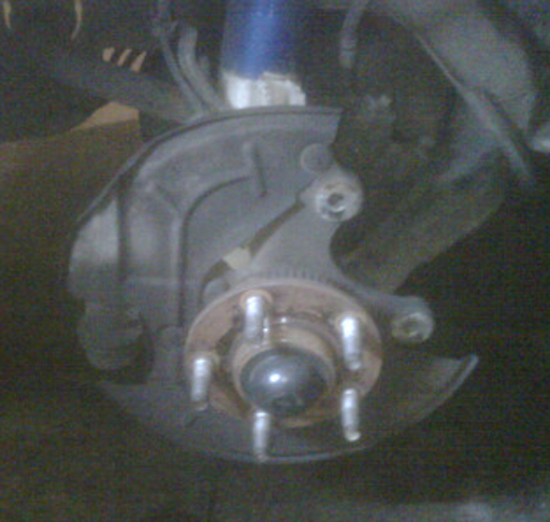
Wheel hub. Your car should look like this once you have the rotor off.
9. Clean both surfaces (front and back) of the new rotor with brake cleaner and paper towel. Keep applying cleaner and wiping with new towels until the towel comes out clean. Pay special attention to slot trenches. Use latex gloves for this step so that you don’t get your skin oils on the rotor after you clean the rotor surface.
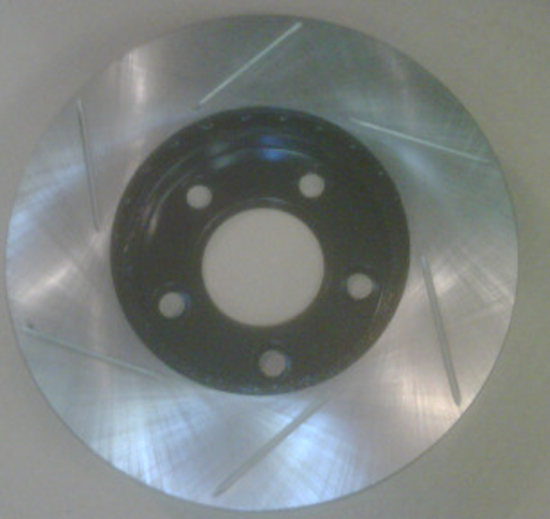
PowerSlot brake rotor. The surface that needs to be cleaned is the silver part. Make sure to clean the backside surface as well.
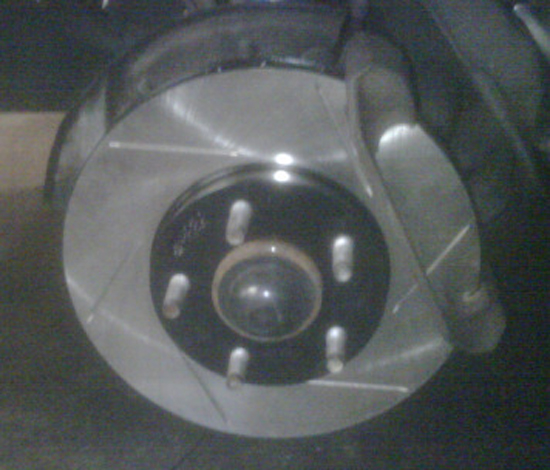
10. Slide new PowerSlot rotor onto your wheel studs. Make sure the one with the white “L” sticker on it goes on the driver side. Also, the white sticker should be showing when you put it on. If the sticker side is facing into the center of the car rather than out to you, then you have put the rotor on backwards.
PowerSlot rotor installed on wheel hub. Notice the circled white “L” sticker is facing out.
11. Peel off the white "L" (or "R") sticker.
12. Bolt the pad/caliper retainer back onto the car with the two 15mm bolts using the ratchet and 15mm socket. Snug the bolts tight.
Pad/caliper installed onto car around rotor.
13. Now you will need to bleed your brakes.
Warning!During this entire step, do not allow the piston to recompress when the brakeline valve is open! If you do, you will introduce air into your brake lines.
14. Snug the c-clamp onto piston as shown in the photo below. Use the 21mm socket in between the clamp and the piston cup to help distribute the load.
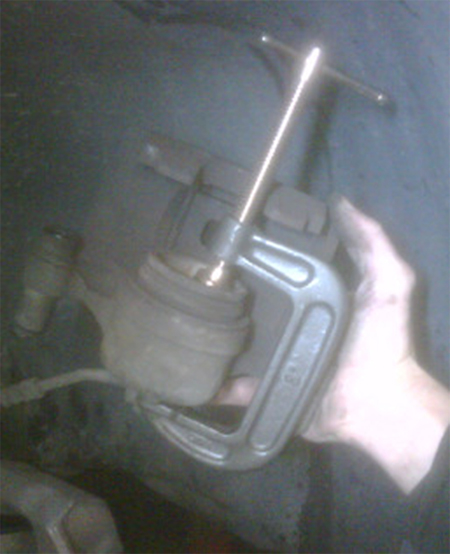
C-Clamp snugged onto piston.
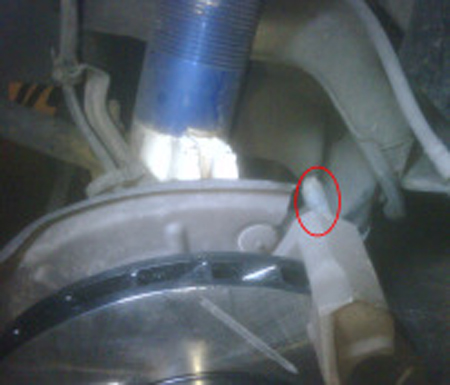
15. Attach rubber hose of the brake bleeding tool you constructed earlier to the barb of the brake bleeder valve.
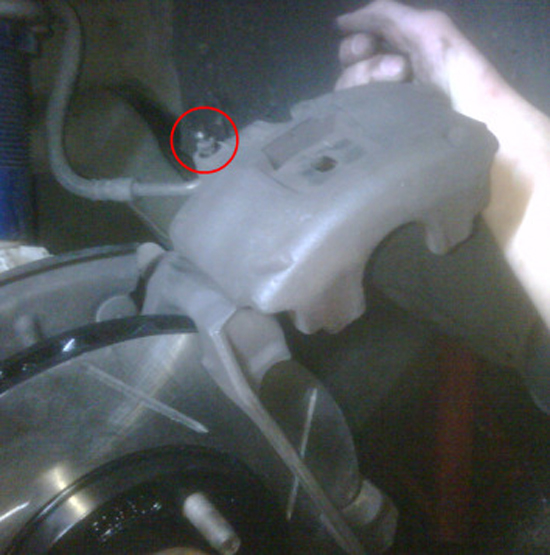
Brake caliper. The bleeder valve is circled in red.
16. Loosen bleeder valve nut with the 3/8” wrench 1/4 turn.
17. Compress piston until it is flush as shown below with the c-clamp. You should feel the piston bottom out.
Compressed piston. Notice the piston is flush with the cylinder wall.
18. Tighten bleeder valve until just snug.
19. Make sure you first tightened the bleeder valve before proceeding with this step. Remove c-clamp from piston.
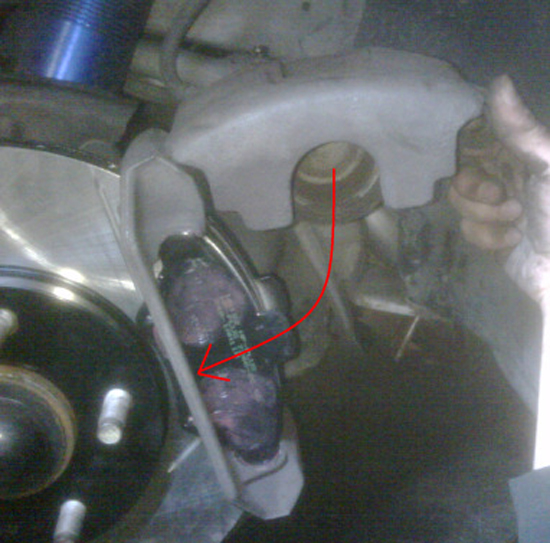
20. Use the brake part lubricant to grease all of the following: (1) Metal backs of new pads. (2) Caliper dowel (see photo below) (3) Brake pad seats in pad/caliper retainer (see photo below).
Warning!Make sure to not get any lubricant on the rotor surface. If you do, clean the rotor thorough with the brake cleaner.
Pad/caliper retainer on rotor. The caliper dowel to be lubricated is circled in red.
Pad/caliper retainer on rotor. The pad seats to be greased are circled in red.
21. Slide caliper onto upper caliper dowel. This dowel is the one that you lubricated in step 14.
22. Slide your new brake pads into the pad seats. Then hinge the caliper down over the pads to line it up with the lower caliper bolt hole.
Brake caliper swings down on upper dowel.
23. Bolt lower side of caliper to the pad/caliper retainer with the torx bolt using the CRVT-50 6-point torx driver.
Wheel hub assembly. Lower caliper bolt circled in red.
24. Repeat steps 3-18 for the passenger side and then continue below.
25. Bleed front calipers using the 3/8” wrench and brake-bleeding tool. If you have not flushed your brake system in a while, this may be a good time to do so. If you decide to flush the entire system, star with the wheel farthest from the master cylinder. This is the passenger-side rear wheel. The rear caliper bleeder valves use a 11mm wrench instead of the 3/8” wrench.
26. Burnish your new pads per Hawk’s instructions. A link to these instructions can be found here.
Installation instructions provided by AmericanMuscle customer Jeff Braun 10.11.09

