 FREE 1 to 3-Day Delivery on Orders $149+ Details
SLP Loudmouth Catback Installation Guide ('99-'04 Cobra)
Installation Time
2 hours
Tools Required
- Basic Metric socket set
- Basic Standard socket set
- Dremel with multi-purpose cutting attachment or similar cutting device
- WD-40
- Jack Stands
- Floor Jack
- Protective Glasses

Shop Parts in this Guide
Installation
1. First thing you will want to do is securely jack up the rear of the car. Donotsimply use ramps because you will need to take off the rear wheels, unless you have a lift and can easily make cuts from the bottom of the car.
2. Take off the wheels and locate the rubber supports for the exhaust (there should be one toward the back that is closer to the outside and one toward the front that is further inside behind the suspension components).
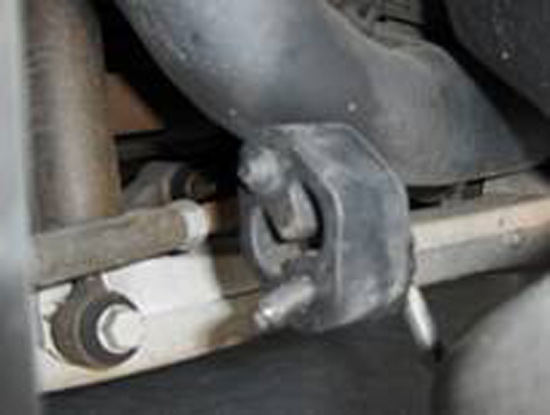
Image of rubber support
3. You will see how the metal piece (hanger) that is in the rubber has a cone shape at the end. You will need to cut this to be able to get it out from the rubber.
- First slide the hanger so that you have room in between the tip and the rubber to make the cut.
- Now you will need to use a dremel with a multipurpose cutting blade or other cutting device to cut the tip of the cone off. (If using the dremel make sure to buy at least 15 blade because you might break a few) Unless you have a lift I don’trecommend cutting from under the car. Taking off the wheel is much safer because if you break a blade it won’t go flying at your head.
- Once you cut the first tip off spray some WD-40 on both sides of the rubber to make it easier to slip out the metal hanger that you just cut the tip off of.
- Now move on to the other hangers and repeat.
Note:the one hanger that is further back will be easy to cut, but the one closer to the front of the car which is located further in towards the center of the car and behind the suspension is a little more difficult to access. To cut this one I put my hands on either side of the springs and was still able to maintain a firm grip on the dremel tool.
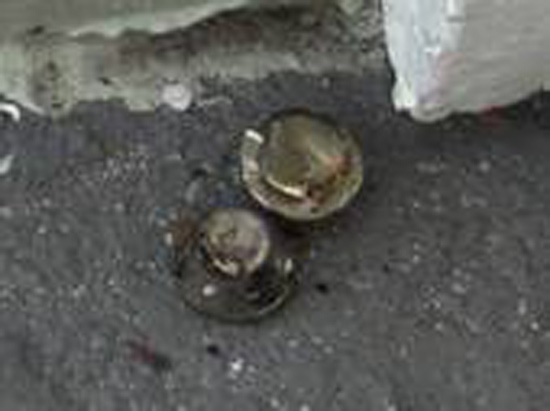
These are two of the cones (tips) that I cut off. You can see the top (left) and the inside where I cut (right)
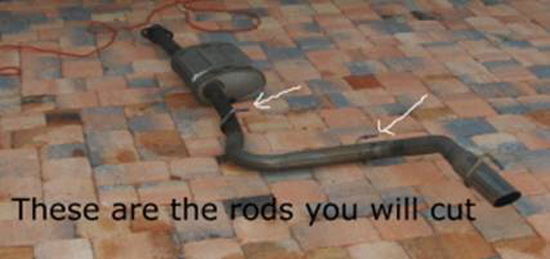
This is the old exhaust which has already been taken out.
4. Once you have both cones (tips) cut off the hanger you can unbolt the exhaust from the X or H pipe on your cobra. Make sure to keep track of the old nuts and bolts.
5. Unscrew the bracket that holds the tip and now slip the two metal rods (hangers) that you cut out and you should be able to drop the exhaust out. If it is still tight use some more WD40 to loosing things up.
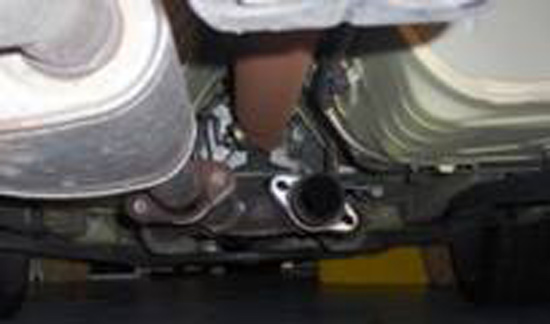
Image of passenger side cat-back removed.
6. First lay out the new SLP Loudmouth Mustang cat-back exhaust in an open area so you can see how they go together. Notice that one of the short pipes that connects the X or H pipe (mid pipe) and the muffler is shorter than the other. The shorter pipe will go on to the side where the mid pipe is longer (this should be the driver side).
7. I found it easier to connect the short pipe to the muffler and install it as one piece. As for the rest of the piping I installed them individually and then connected them all together.Note: Make sure to slide on all the clamps before assembling the piping (nothing will make you angrier than putting it all together and then having to take it apart cause you forgot the clamps). Also take note of the direction that the bolt faces on the clamp, so you can have them all facing the same way to make it easier to tighten them.
- First put in the short pipe and the muffler together and bolt the short pipe to the mid pipe with the hardware included in the kit and the old bolts.
- Then slide the rod (hanger) on the first curve pipe into the rubber support (use some WD-40 if needed) and then attach to the muffler.
- Repeat for the next pipe
- For the tip you will want to slide the rod (hanger) into the bracket and then screw the bracket back into place.
8. Now you can move the clamps into place right over the slits in the pipes and loosely tighten the band clamp.

9. When installing the exhaust tip you will want to move the tip into the proper position and then tighten it making sure you hold the tip in place so it doesn't move.
10. Repeat the above steps for the installation of the other side.
11. Once everything is in place, check that all of the piping is fitted properly and that everything is snug. It is now time to look and make sure that none of the piping is close to the rest of the car. Special places that should be checked are the flange pipes and their distance from the drive-shaft. Another very important point is the after-axle pipe as it comes near the fuel tank. After you are sure that the piping is all connected properly with no problems, start to tighten the band clamps.
12. While the car is running, lie down next to the car and look for leaks and listen for rattles. Leaks can be spotted by black or very dirty water shooting out between the pipes. Take note of where the exhaust leaks and rattles are and then shut the car off. Wait a few Mins until the piping cools off and tighten the places where the leaks are. If you hear a rattle, try and determine what two surfaces are touching and then move the pipe as necessary to stop the rattling. If the pipes are leaking, tighten them and then turn the car on to see if you fixed it. If they keep leaking, repeat the past steps until it stops leaking. Take it one step at a time and fix one leak at a time.
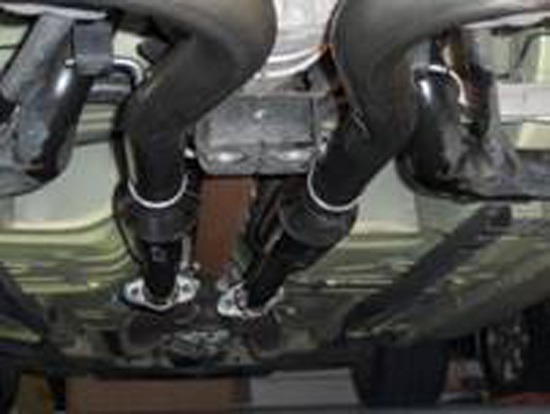
Image of the finished installation.
Installation instructions provided by AmericanMuscle customer Brandon Whelan
Related Guides
-
Installation
-
Installation
-
Installation

