 FREE 1 to 3-Day Delivery on Orders $149+ Details
H & R Race Spring '99-'04 Cobra Installation Guide
Installation Time
4 hours
Tools Required
- 2 Floor Jacks
- 21mm socket (3/4 drive)
- 18mm socket (3/4 drive)
- 15mm socket (1/2 drive)
- 15mm deep well socket (1/2 drive)
- Lug Wrench
- Drive Ratchet
- 3/4 Drive Ratchet
- 4 Jack Stands
- Tie Rod Puller (OEM27016) (Tool rental from AutoZone)
- Adjustable wrench
- 2 cotter pins
Installation
PREP:
1. Put the car in gear with the emergency brake engaged.
2. The car should be on a level surface.
3. Loosen bolts on all four wheels.
4. Jack the car up about 10-12 inches and place the car on jack stands.
5. The two front jack stands should be placed directly behind the front fender wells near the indented jack cutouts.
6. The two rear jacks should be placed near where the front IRS cradle bolts attach to the body.
7. Remove all wheels from the vehicle.
FRONT SPRING INSTALLATION
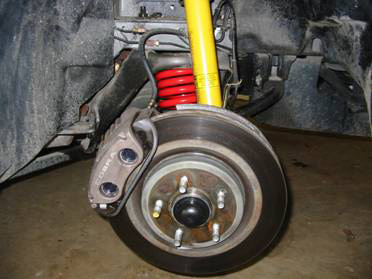
1. Start by removing the front brake caliper by loosening the two 15mm bolts on the back of the caliper. NOTE: if this is the first time removing the caliper you will need a ¾” drive or breaker bar since these are installed with thread lock from the factory.
2. Secure the caliper to the fender well using a zip tie or string. This will prevent the caliper from falling.
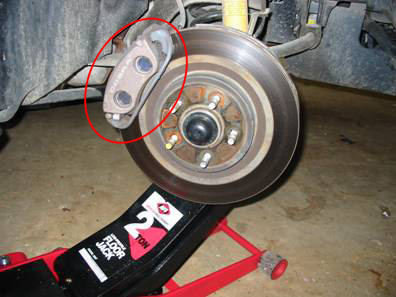
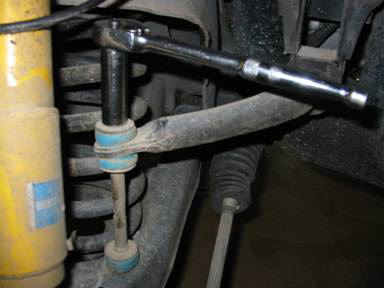
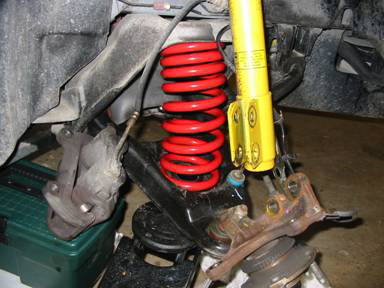
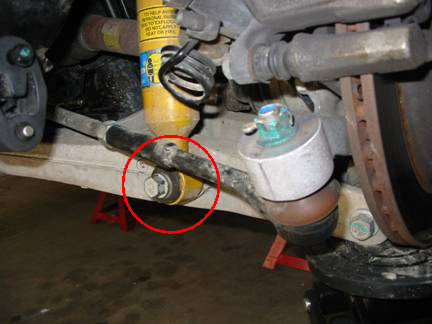
3. Place the floor jack under the lower control arm (as pictured above). Slightly raise the A-Arm to preload the shocks. This will make removing parts much easier.
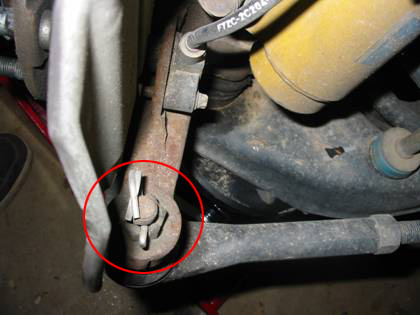
4. Next remove the front sway bar end link by removing the cotter pin and removing the bolt. The bolt can be removed using an 18mm socket. You will need a new cotter pin for reinstallation.
5. Once the bolt is removed you will need to separate the tie rod from the spindle using the tie rod puller. To do this place the puller on top of the bolt and fasten it down snug.
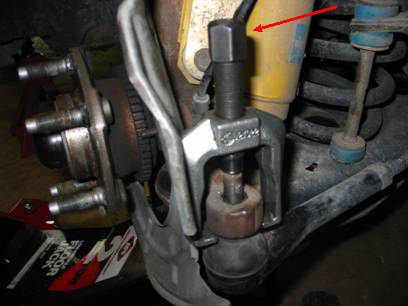
6. Place the ½” drive ratchet on top of the tie rod puller (red arrow). Using the ratchet screw the puller down a few turns. You will hear a loud pop and the tie rod will then be separated.
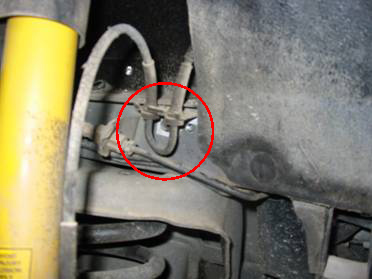
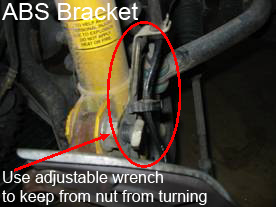
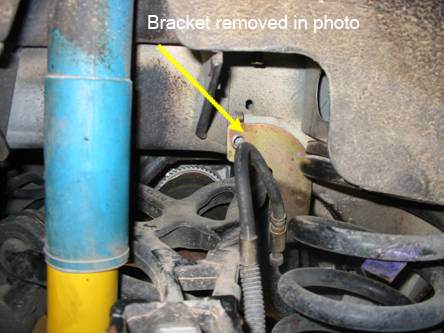
7. Next undo the ABS sensor wire from the bracket at the top of the wheel well. This will give the wire enough slack to release the control arm.
8. Using a deep well 15mm socket and ratchet disconnect the front sway bar end link.
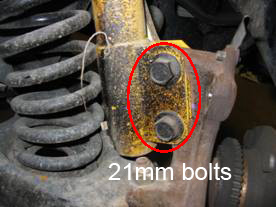
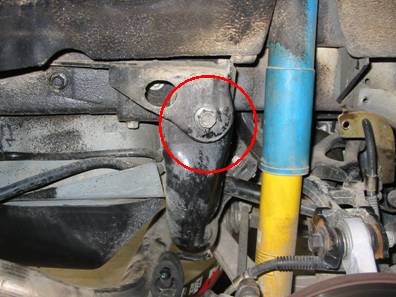
9. Next you will need to remove the strut brace bolts. Remove the ABS bracket and two strut bolts using a 21mm socket on the front and an adjustable wrench to hold the back.
10. At this point everything should be loose. Slowly lower the jack down. The control arm should also release down.
11. To remove the original spring you might have to push or pry the control arm down a bit more.
12. Once the A-Arm has been pulled as far down as it will go you can remove the spring. Be careful the spring still might have some force. Remove using a pry bar or spring compressor.
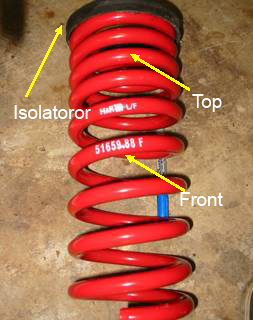
13. Once the spring is out remove the isolator.
14. Get the H&R race springs and place the isolator on the top of the spring. Make sure you get the correct spring. Each spring is labeled “F” or “R” for front or rear. The top end of the spring is the end that is more tightly sprung.
15. Put the spring back in (make sure that the spring is in the seat in the correct location), place the jack back under the ball joint location. Jack it back up to the point where the control arm is almost level (or until right before it starts to lift the car off your jack stands).
16. Line up the strut mounting holes with the holes on the spindle. Put your bolts back in and nut them. Tighten them down.
17. Next slide the tie rod back up into the spindle hole and thread the castle nut back on. Tighten this back down to specification and then put the cotter in back in to lock it down.
18. Put the ABS bracket back onto the strut bolts and tighten back down the retaining nut. Then put the ABS harness back into the brackets the same way you removed them.
19. Slide the brake caliper back on and place the pin back in.
20. Wait to reattach the swaybar endlink until you have finished the springs on the opposite side. Once you have completed the other side, jack up the control arm to get the sway bar end link back into place. Put the bushing and then washer/nut back onto the bottom of the end link and tighten it back up.
21. After that, all you need to do is put the wheels back on and you're done. I would recommend putting some pieces of wood under the tire when you drop the car down to insure that you can get your jack back out from under the car.
REAR SPRING INSTALLATION
1. The rear of the car should be on jack stands by now. You will need to work on both sides of the car together to remove and install the rear springs.
2. Remove the catback exhaust from the rear hangers underneath the rear bumper. You will need a 10mm socket and ratchet.
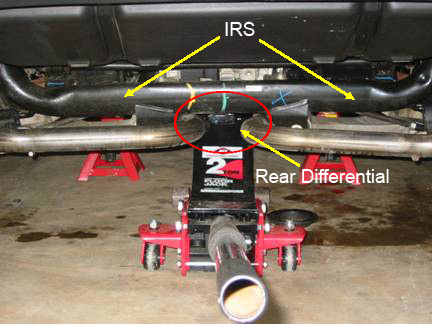
3. Take one of your jacks and support the rear differential. Do not lift, but just lightly support it.
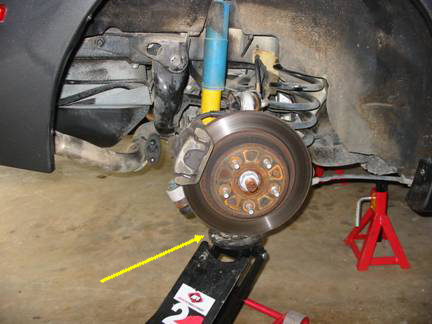
4. Using the second jack, support the rear lower control arm under the ball joint. You do not need to lift much, only enough to preload things a bit.
5. Next, remove the strut bolt using an 18mm socket and ratchet. Once the bolt is removed, slowly lower the jack.
6. Using a 10mm socket and ratchet remove the ABS wiring bracket from the top of the wheel well.
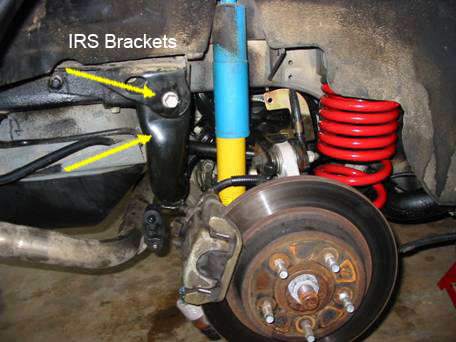
7. Next, remove the IRS bolt using an 18mm socket and ratchet. If you have access to air tools I would highly recommend using it to remove the bolt. To remove the bolt you will need to apply pressure (pulling toward you and away from the car). It is along bolt and will require some time to remove.
8. Release the jack holding the lower control arm.
9. Repeat steps 4-8 on the opposite side.
10. Very gently lower the jack supporting the rear differential. The IRS will drop. At this point drop the IRS far enough needed to remove the springs. Do not completely lower or remove the jack.
11. After removing the rear springs you will need to place the isolators on the new springs. The thick isolator goes on the bottom of the spring and the thing isolator goes on top. Remember that the top of the spring is the more tightly wound end.
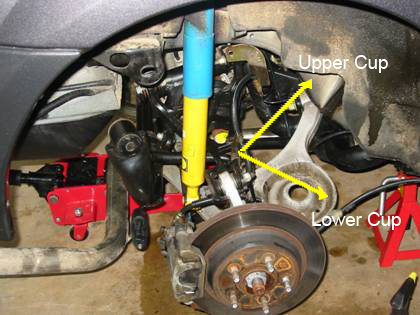
12. Place both new springs into the lower control arms and slowly raise the jack under the differential. Check frequently to make sure none of the top isolators are being pinched and that they are being properly seated in the upper and lower cups.
13. Once the springs are seated proper jack the differential and IRS up enough until the IRS brackets align enough to reinstall the IRS bolts.
14. Insert IRS bolts and tighten using 18mm socket and ratchet. Install and tighten the right hand and left hand sides.
15. Place the second jack under the lower control arm ball joint and raise the lower control arm until the strut bolts can be reinstalled. Tighten the bolts using an 18mm socket and ratchet.
16. Next reinstall the ABS bracket using a 10mm socket and ratchet.
17. Repeat steps15 and 16 for the opposite sides.
18. Remove both jacks.
19. Reinstall the catback exhaust into the rear bumper hangers using a 10mm socket and ratchet.
20. Put wheels/tires back on and tighten all lugs hand tight.
21. Jack the car up and remove all jack stands.
22. Lower car and use a lug wrench to tighten all lugs.
That’s it you’re done! The job should take one person about 3-4 hours to complete.Don't forget to get an alignment!
Installation instructions provided by AmericanMuscle customer by William Hutcheson
Related Guides
-
Installation
-
Installation
-
Installation

