 FREE 1 to 3-Day Delivery on Orders $149+ Details
Maximum Motorsports Caster/Camber Plates ('03-'04 Cobra) - Installation Instructions

Shop Parts in this Guide
Installation
1. Jack up the front of the vehicle and place firmly on jack stands.
2. Remove the front wheels.
3. On the passenger side of the car, place a floor jack under the control arm and jack up until slightly loaded.
4. Remove the strut top nut. Save the strut top nut, it will be used later. NOTE: It may be easier to initially loosen the nut with air tools.
5. Remove the three nuts/bolts that hold the factory strut mount in place. If present, drill and remove the pop rivet that retains the top mounting plate. Keep the top
mounting plate handy, as it will be used as a marking template for the fourth bolt hole.
6. Carefully lower the jack to bring the strut shaft down through the strut tower center hole, but do not completely unload the jack: the spring may become dislodged, causing injury and/or damage.
7. From the top of the strut tower, remove and discard the thrust washer, the top rubber bushing and the crush sleeves from the strut shaft.
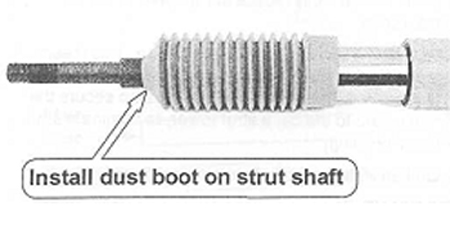
8. Collapse the strut shaft down into the strut body far enough to remove the factory bottom plate and dust boot. Discard the factory bottom plate and dust boot.
9. With the strut shaft still collapsed, install one of the supplied dust boots onto the shaft. Pull the boot down until the opening seats below the step on the shaft.
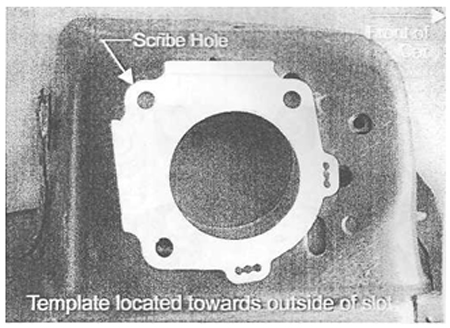
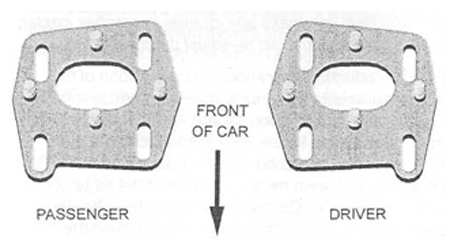
10. Now you must drill the fourth holefortheMM4-bolt bottom plate. Using the Ford top plate as a template, rotate it 180° from the stock position, aligning the holes with the inner edge of the factory slots in the strut tower. Scribe the position of the hole on the strut tower. Passenger side shown in the following photos.

11. Slide the Ford top plate to align the holes with the outer edge of the factory slots and scribe a second hole.
12. Repeat Steps 3-11 for the driver side of the car. You may now discard the Ford top plates.
13. On each side of the car, locate the intersection of the 2 holes you marked on the strut towers and center- punch this spot. Driver side shown in the following photos.
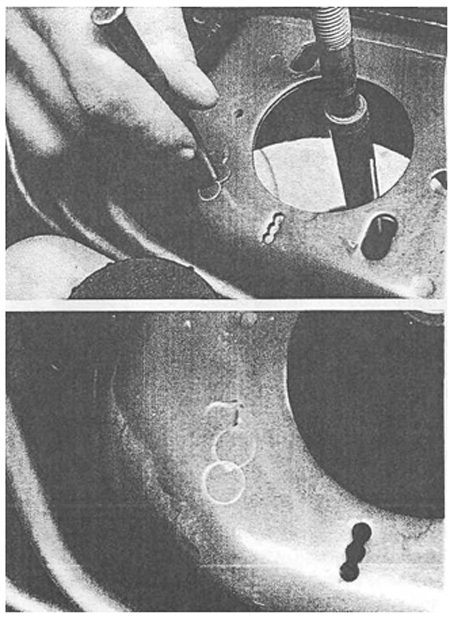
14. On each side of the car, drill a 1/8" pilot hole on the punched mark. Then drill the 1/8" hole to 32". Debur the top and bottom of the hole.
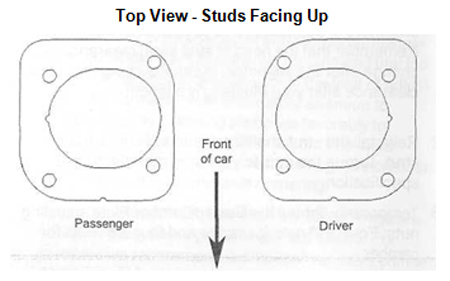
15. On the passenger side, install the MM bottom plate beneath the strut tower with the 3/8" bolts protruding upwards. Use the Illustration below to select and orient the bottom plates correctly.
Tip: It may be helpful to use silicone adhesive to stick the bottom plate to the underside of the strut tower
16. Install a 1/4" thick washer over each bottom plate stud. The thick washers will rest directly on top of the strut tower.
17. Place the passenger side main plate over the bottom plate's studs, and on top of the 1/4" thick washers. Install a 3/8" washer followed by a hex nut on each of the bottom plate's studs. Use the following illustration to select and orient the mainplates correctly.
18. Repeat Steps 15-17 for the driver side of the car.
19. On each side of the car, place a 3/8" washer over each of the four studs protruding out of the Main Plate.
20. Install the Bearing Plate over the washers on top of the Main Plate, followed by a washer and hex nut on each stud.
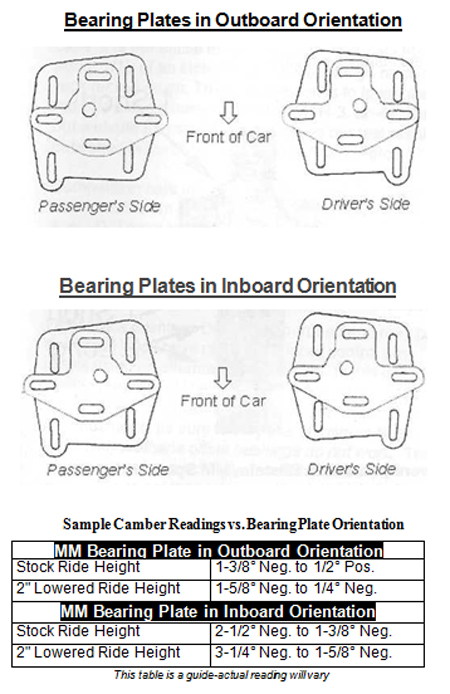
NOTE: The orientation of the Bearing Plate can be either 'outboard' or 'inboard'. Use the following illustration to properly position the Bearing Plates on the Main Plates. Use the table as a guide to determine the orientation of the Bearing Plates for your alignment needs. The majority of street cars will have the Bearing Plates installed in the 'outboard' orientation. The majority of race cars will have the Bearing Plates installed in the 'inboard' orientation. To change the Bearing Plates between outboard and inboard orientation, swap the Bearing Plates to the opposite sides of the car. For example, a bearing plate on the driver's side in the outboard orientation will be in the inboard orientation when moved to the passenger side.
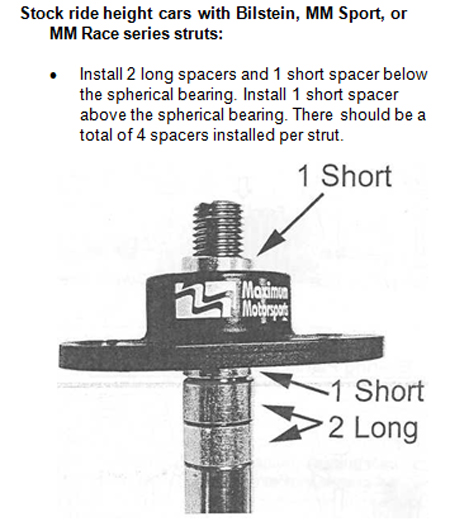
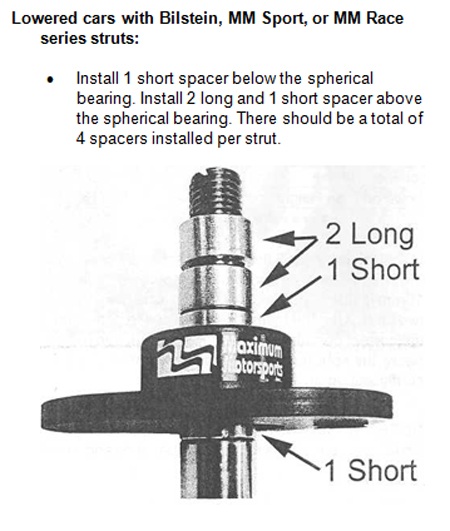
21. Install the strut shaft through the spherical bearing of the caster camber plates with four of the supplied 16mm inside diameter spacers per side (two short and two long). Use the following guidelines to determine the correct combination of spacers to put above and below the spherical bearing. Use the same spacer configuration on each side of the car.
NOTE: For MM Coil Over applications, consult your Coil-Over Instructions for correct spacer arrangement.
23. Important:At least one spacer is required to be placed above the caster camber plate spherical bearing to allow proper movement. Failure to do so will result in limited bearing articulation and possible damage to the bearing and/or the strut!
23. Carefullyclose the hood to check for interference between the top of the strut shaft and the hood. Check hood clearance by carefully closing the hood with putty or Play Dough on top of the strut shaft. The thickness of the smashed putty will indicate exactly how much hood clearance there is. if hood clearance is less than 1/8", reposition the strut shaft spacers to lower the strut shaft relative to the spherical bearing. If the hood hits the strut shaft, rearrange the spacers to lower the strut shaft. This can be accomplished by moving a spacer from above the bearing to below the bearing, thus making the spacer stack below the bearing taller. Repeat this process until there is adequate hood to strut shaft clearance. Remember that the hood to strut shaft clearance will change after the alignment is set. Re-check this hood clearance after your Mustang is aligned!
24. Reinstall the strut shaft top mounting nut on each strut. Torque the nuts to your strut manufacturer's specification.
25. Temporarily tighten the Caster/Camber Plate adjusting nuts: Four 3/8" nuts for caster and four 3/8" nuts for camber.
26. Reinstall the front wheels and carefully lower the vehicle to the ground.
27. Torque the lug nuts to the factory specification.
28. Have your car professionally aligned.
NOTE: Because camber and caster can be adjusted independently with the MM plates, you can adjust one, lock it down, and then adjust the other. Always double-check all camber and caster measurements after an adjustment of even one parameter.Rememberthat any time you make any change in camber, caster, or ride height, you must re-adjust the toe setting.
29. Ford's production tolerances on the position of the large center hole of the strut tower can cause interference when the camber or caster is adjusted towards the limit of travel. If you are adjusting towards the extreme limits of camber and/or caster, check the clearance between the strut shaft and the edge of the large center hole. Check not only with the wheels pointed straight ahead, but also while turning the steering from lock to lock. You may enlarge the center hole with a file or die grinder.
30. Caster and camber settings change the strut shaft's position relative to the hood. Double check hood clearance with the car on the ground, while turning the
steering from lock to lock. If necessary, reposition the strut shaft spacers to lower the strut shaft relative to the spherical bearing.
31. When the alignment is complete, torque all the caster/ camber plate adjusting nuts to 32 ft-lb.
Installation instructions provided by Maximum Motorsports
Related Guides
-
Installation
-
Installation
-
Installation

