Installation Time
(approx) 2 Hours
Difficulty Level:
Simple installation for anyone.
Installation Guides
- Customer Submitted:
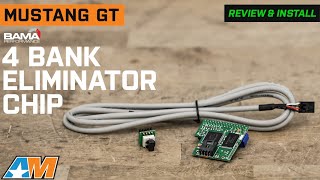
- SCT Mustang 4-Bank Eliminator Chip (88-04) - Installation Instructions
FREE 1 to 3-Day Delivery on Orders $119+ Details
$269.99
FREE Shipping Market Price $324.99 You Save 17% ($55.00) Up to 10% off for Military & First Responders! See DetailsSaved - View your saved items
We're sorry. We couldn't save this product at this time.
Justin: Hey, everyone. I'm Justin with americanmuscle.com, and today we're breaking down the Bama 4-Bank Eliminator Chip loaded with 2 Custom Tunes available for your '94 to '98 Mustang GT at home. Now, you should be considering the Bama Tune for your 5.0 or 4.6 if you're looking for more power through a highly custom-tailored tune, along with three tunes for life that does allow you to revise and update your tune as your mod list grows. A lot to talk about here, guys, with this particular product, along with a walkthrough install at the end of the video, so let's get into it.So first and foremost, interested 2-valve owners should be considering a Bama tune for their ride if you're looking to make the most out of your current mod list or future mod list and get two different custom tunes built specifically for your ride and, again, all of its modifications. Now, these tunes will factor in things like, of course, mods, fuel type, and driving style to really help wake up the untapped potential of your ride. In fact, Bama has pointed out that through their hours spent on the Dynojet here, they have been able to achieve gains upwards of 30 horsepower, 40 pound-feet of torque as kind of a best-case scenario. Now, that's not going to be everyone's experience, but it really is just gonna boil down to your setup, what your goals are, and what you are doing to the car.Now, this package does include two different custom tunes, again, along with being enrolled in the free Tunes for Life program. Now, these tunes that you will receive initially do include a performance and a race tune, which again, will offer a noticeable difference in performance and drivability. That performance tune, on one hand, will be a little bit more focused for street use with a balance of performance, drivability, and fuel economy. Now, that race tune, on the other hand, is certainly gonna be meant for your higher octanes, 91, 93, and will be the company's most aggressive tune and is essentially designed for all out-track performance. And again, these tunes are custom-built for your ride and its modifications. Now, as far as how you get the benefit out of these tunes and your mods, well, they do include changes to things like ignition timing, air-fuel ratio, and throttle response, just to name a few. Whereas, automatic Mustang owners will also be able to get a little bit more of that. And they also benefit from better drivability, adjustable shift points, and increased shift firmness.Now, these two tunes will be loaded on the SET 4-Bank Eliminator Chip shown here, and that is gonna be controlled by the dial selector along with the long cable here. And I really like this design. Yes, it might be a bit dated, but there are some perks. The first and probably most important is that unlike other tuners out there that take minutes to change tunes with the car off in stationary, that's not the case here with the eliminator chip. You can essentially swap tunes easily and on the fly simply by turning this little knob here and then basically extending it to the ECU thanks to the 6-foot cable.Now, coming in at or around that $300 price point, the Bama chip with the two custom tunes is going to be one of your more affordable tuning options on the site for the '94 to '98 GTs. Now, this is even more appealing once you factor in things like the free Tunes For Life, which if you're not familiar, basically allows your tunes to grow with your mod list as you change out parts down the road. So say you add in a set of long two-headers or something else, maybe a different intake and you need an updated tune, Bama has you covered. They'll gladly update your tune and send it to you here free of charge with this Tunes for Life program.Install according to the site is gonna get a solid one out of three wrenches on the difficulty meter taking you a couple hours at most to complete from start to finish. Now, if you've never done this before, it's not terribly difficult. However, you will need to gain access to your car's PCM located down there in the passenger side kick panel. At that point, you will need to remove it and then slightly disassemble it in order to access and install your new 4-Bank Eliminator Chip. Seems like a lot of work, seems like some pretty in-depth work. Trust me, it's not. I've done it a bunch of times. And honestly, guys, to make things even easier for you, we are now gonna present you with a detailed walkthrough provided by an AM customer. Check it out.Man: All right, so this video is to cover the installation of a Bama 4-Bank Tuner Chip for a '94 to '98 Mustang GT. Mine is a '94, however. Here we have the actual SET Bama 4-Bank Tuner Chip, the cable, and the switch. These are the tools I will be using, panel pry tool, 8-millimeter and 10-millimeter wrench, as well as an 8 and 10-millimeter socket wrench and a multi-bit screwdriver. All right, let's get started.All right, so the first step, we're gonna disconnect the battery from the vehicle so we don't have any problems with shorting anything out or frying anything, that would be bad. So we're going to disconnect the negative terminal of the battery first, then the positive. Tuck them away so they can't touch anything. Should be good. Now we can go on to the inside.Okay, so the first thing in here, I have to take off the sill plate on the car. So all that has to be done is just pull up, pops free. Pull it off and set it aside. All right. So then the next step is to pop this clip out. Set that aside. Okay, and then you have to kind of pull forward and out at the same time, and this panel comes right off. All right, so then after you get the panel off, we'll disconnect these three connections. And then the computer is back behind here. And to get the computer out, there is just a couple of screws and then it slides out. So we'll go ahead and start on that. Be a little delicate with these plugs because they are typically dry-rotted old and you don't want to be breaking them. So just kind of wiggle them, take your time. Now, once those are unplugged, we will reach behind here with our pry tool and you can pry each one of these. There's a little clip that holds it onto a frame. We'll just pry those off like that. And likewise, we can kind of tuck those out of our way.All right, one other tool that I forgot to mention earlier, I have this Sonex Tools magnetic socket set, well, sockets. I would recommend them. They're nice little small sockets so you don't lose anything, but it has a magnet inside. You do need a 7-millimeter for these bracket bolts. So we'll go ahead and take those out now. There's one there. There's one down here. Now that can pull away. And then to get the computer out, there's this nylon plastic holder. There is a 5.5-millimeter screw that holds that in there. So you will need that 5.5-millimeter socket. Okay, and then that can kind of swing up, and then the computer just kind of wiggles down and out. But before we do, we're going to go ahead and loosen this, which should be our 10-millimeter, and it is. There's that. Now the computer can come out.All right, next step, got to open up the computer so we can install the chip. So take out these screws. Okay, then we can remove the cover. And this is a two-part computer box. So the bottom should pop open. Once you pop this clip right here, you have to kind of squeeze it in and then it should pop right down like that. Then you remove this cover that goes over this. It plugs the factory service port. And that's where we need to be working. So right here is where our chip's going to be plugging in. All right, so the next step in the kit, it includes a little piece of Scotch Brite, and that's so that we can clean the pins off of the board here. They're coated in like a silicone coating, so we just have to get that all clear and clean so that the chip has something to connect to. So we'll go ahead and start doing that. Okay, that side's good. Now for this side. Go over it a little more, get a little bit of that copper showing through. All right, that should be good for cleaning that. All right, so now that we got that clean, we're going to go ahead and put the covers back together to protect the computer. [inaudible 00:13:46.286] down. Don't go too crazy on these, it's just aluminum, very lightweight stuff. Okay.So now the next step is to install the actual chip itself. So here I've already preassembled the SET Bama 4-Bank Tuner Chip with the connector plugged into it on one end, and the other end is the micro selector switch for all the different tunes. And now I'll just install it. It only goes in one way. There's not enough space on this side for it to go in. So all you'll do is you line up the chip this direction onto the board and press firmly to make sure it's fully seated. Then we will take this connector like this and we'll cover this whole port with some tape to make sure that no water or critters or anything get inside the computer. So we'll do a couple of pieces just to keep it safe. All right, now we'll go to install.Okay then, so now we will reverse the removal and start putting everything back in. So we'll slip the computer back up inside there. Careful to make sure you get this aligned nice so that it will thread in properly. Should mostly finger-thread in until you get most of the way. And again, you don't want it too crazy tight but snug enough so that you get all your pins connected. Okay, and then we will get this clip reinstalled and tightened down. All right. So once you get it up in there, you just finger-thread your retaining bolt back in the nylon, snug it on down. All right, that should be good and secure now. All right, so now we'll put our bracket back in place and then reconnect our wires.Okay, and then from there, all you gotta do is put your kick panel back on and your seal plate, and you're good to go. You can route this cable here wherever you want, up into your glove box or over onto your center console. I am not gonna show how to do that just because it is a personal preference. So anyway, let me put those two panels on and we'll call it good. All right, now for the side kick panel, then push pin. That's it in here. Now we'll just reconnect the battery and fire it up. Okay, last step, just reconnecting the battery. All right, that's it. And that's how you install a Bama SET 4-Bank Tuner Chip.Justin: All right, guys, wrapping this one up. If you are looking for an affordable way to maximize performance and modifications on your '94 to '98 Mustang at home, be sure to check out the Bama 4-Bank Eliminator Chip with the 2 Custom Tunes here at americanmuscle.com.
Subscribe to our YouTube Channel
Features, Description, Reviews, Q&A, Specs & Installation
**NOTE: Programming custom tunes may take 2-3 business days plus applicable shipping time. We recommend ordering other products separately to avoid delay. Heavily modified cars are not tunable with a mail order tune. Click for restrictions. Membership in the Tunes for Life program is is valid for as long as you own the car that was originally tuned and is non-transferrable.
Fitment:
DetailsBama 38000G94
CA Residents: WARNING: Cancer and Reproductive Harm - www.P65Warnings.ca.gov
Installation Info
Installation Time
(approx) 2 Hours
Difficulty Level:
Simple installation for anyone.
Installation Guides
What's in the Box
Chip/Handheld: | Chip | Custom/Strategy: | Custom |
Memory Size: | N/A | Custom Tunes Held: | 3 |
Year: | 1994-1998 GT | Model: | 4-Bank Eliminator Chip |
Manufacturer: | SCT | Special Features: | Free Tunes for life through AmericanMuscle |
Tech Guides:
10 More Questions