 FREE 1 to 3-Day Delivery on Orders $149+ Details
How to Install a TCI Street Fighter Torque Converter on a 1980-2010 Mustang
Shop Parts in this Guide
Installation
REMOVAL
Step 1 Before you begin - let vehicle cool for about an hour. Disconnect battery. Raise vehicle and support on jack stands. The higher you raise it, the easier it is to work under. If your installing a new transmission and converter, skip toSTEP 3
Step 2 Drain oil from transmission by removing the drain plug. This is a good time to install a TCI® Drain Plug Kit, TCI® #805800. Pans without plug must be slowly removed by freeing one end and allowing bolts on other end to hold pan. The pan will drop down to allow the fluid to run out the end. Use a drain pan to catch fluid. Remove remainder of bolts and slowly lower pan and pour remainder of fluid in drain pan. Replace filter and clean pan and install new pan gasket. (New gaskets and filters available from TCI®). Reinstall pan and torque pan bolts to OEM specs.
Step 3 Expose converter-flywheel bolts by removing converter dust cover.Ford and Chrysler- rotate converter to locate drain plug at 6 o'clock. Remove plug and drain converter. Separate converter from flywheel. Remove four (4) bolts on Chrysler, three (3) bolts on GM, and remove four (4) nuts on Ford. (You should get a box to keep all bolts, parts, and etc...so they won't get lost.)
Step 4 Remove driveshaft, disconnect speedometer, selector, and throttle linkage, wires, vacuum lines, cooler connections and remove dipstick and tube. Remove starter from bellhousing on Chrysler and Ford.
Step 5 Support bottom of transmission with a wide block of wood or use a transmission jack. Remove crossmember. Lower transmission slightly. Support rear end of engine if engine is mounted at front end. Remove transmission to engine bolts. Before separating transmission from engine, take precaution to keep converter in transmission - DO NOT ALLOW IT TO FALL OUT!! Remove transmission with converter.
Step 6 Remove converter from transmissioncarefully.
FORD C-4 & C-6 TRANSMISSIONS CAUTION!
Input shaft may pull out with converter. Be careful to avoid this to happen. Some Ford input shafts must be installed one way due to different length splines. Installing wrong way will damage converter. If shaft has slipped part way out, simply push it back as far as it will go. Inspect input shaft for wear and burrs. You may need to replace the input shaft. TCI® has several different applications available that can be purchased from your TCI® Dealer or factory direct.
CONVERTER INSPECTION
(If installing new transmission, skip to step 3)
Step 1 Inspect the old converter hub for wear, scoring, or damage. Such defects indicate that the bushing that supports the hub should be replaced before installing the new converter. The front pump seal should also be replaced. Both of these operations should be done by a reliable transmission service shop having the equipment and experience necessary. The lip of the seal is delicate and the coil spring inside can be damaged easily. The body of the seal can be distorted by improper installation. The seal must also be positioned to its wiping axis.Failure to attend to these two steps can result in damage to the new converter and cause leaks.
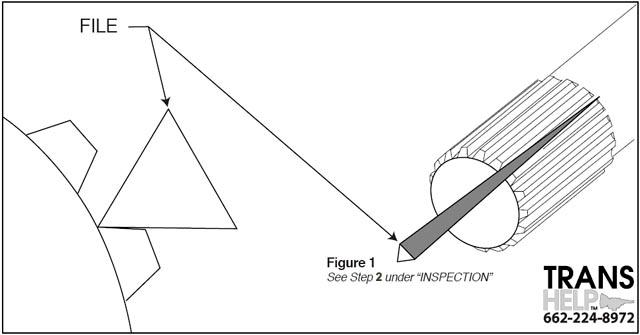
Step 2 Inspect splined couplings (input shaft and stator support) for burrs and damage.A burred or damaged spline can cause installation to be difficult if not impossible.A burred spline can easily be corrected. Using a small triangle file, as shown inFigure1, remove all burrs the full length of the spline. After all burrs have been removed, position a straight edge in the same manner as the triangle file. Using the straightedge as a guide, check to make sure the splines are not twisted. Twisted splined shafts should be replaced.
Step 3 Examine the mating surfaces of engine block and transmission case for nicks, dirt, etc. If necessary, use a mill file to remove raised areas - Be careful not to remove metal from mating surfaces! Examine crank pilot hole and converter pilot hub for dirt, rust, paint, etc. Clean as necessary with emery cloth. Also check the condition of the dowel holes in the case unless installing new transmission. They should be sleeved if damaged.
Step 4 Inspect dowel pins in engine block. Pins must be secure and must be in good condition. Replace if loose or damaged with TCI® # 930055 extra long dowel pins.
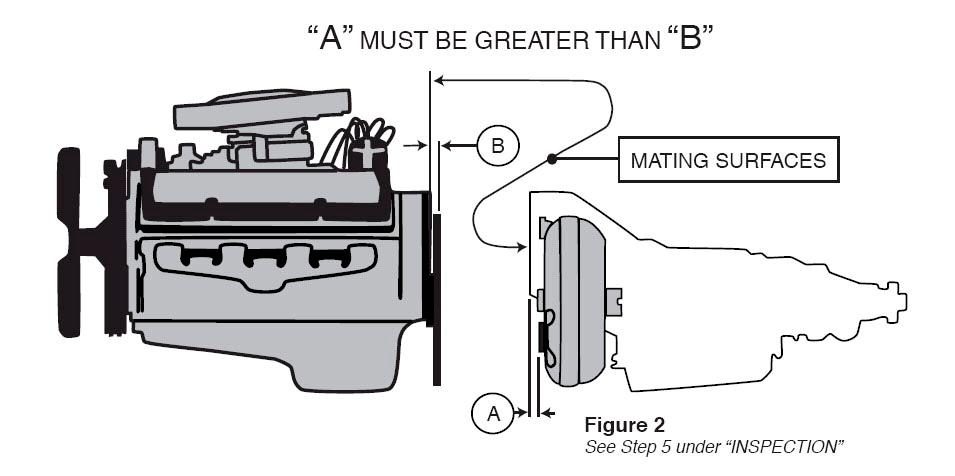
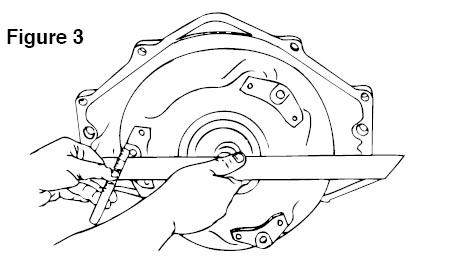
Step 5 Coat the wiping surface of the hub of the converter with a film of Automatic Transmission fluid. (TCI® has formulated a special transmission fluid –MaxShift™ that will work in any application). This fluid helps reduce friction letting your vehicle run cooler. It is designed to take the abuse that off-road, towing, RV daily driven and racing applications put on transmissions. Pour one (1) quart of Trans Fluid in converter. Install converter on transmission carefully, supporting the weight of it to avoid damage to the front pump seal. Rotate converter as you push it on. The splined couplings (input shaft and stator support), and the pump lugs must engage properly to allow the converter to slide all the way onto the transmission. Take measurement"A"shown inFigure 2. The correct method of measuring"A"is shown inFigure3. Now take measurement"B"on the engine as shown inFigure2. This is the distance between the engine block mating surface and the converter mount mating surface on the flywheel of flexplate. Compare the two measurements that you have taken."A"must be greater than"B". If"A"is not greater than"B", converter is not installed properly. Pull converter off slightly, then push it on again, rotating it at the same time. Continue to do this until you feel the converter move inward and stop at proper engagement. Repeat measurement"A"and compare it again with"B"."A"must be greater than"B". Do not proceed further until you have installed converter properly. See Depth Chart for correct depths.
**Before installation, make sure you have the correct dipstick configuration for your application. TCI® offers a complete line of dipsticks for most applications. Improper fluid level can
lead to immediate failure and will void your warranty.
INITIAL INSTALLATION CHECKS
1. Check flexplate for cracks around crank and converter mounting holes.
2. Make sure converter bolt pattern and bolt hole size matches the flexplate. Most 10” and smaller diameter converters utilize a 7/16” x 20 bolt hole. It may be necessary to enlarge the converter bolt holes on the flexplate.
3. Check drive shaft yoke for excessive wear and apply small film of transmission fluid to yoke before installation.
INSTALLATION
Step 1 Install transmission on dowel pins. Converter MUST be free to rotate and to move forward and backward (end-play) after transmission is bolted to engine. Transmission and converter should mate with engine, crankshaft and flywheel with relative ease. Face of transmission flange must be flush with engine all the way around before any bolts are tightened. NEVER use bolts to "draw up" transmission to engine.DO NOTallow the transmission to hang on the dowel pins. Transmission must be supported until at least two (2) bolts have been installed and fully tightened.
Step 2 Check freedom of movement (thrust) of converter as soon as transmission and engine are bolted together. Converter must rotate freely and must have end-play. Converter must be free to move a minimum of 1/8", but not more than3/16". If no end-play exist, converter is improperly installed. Remove transmission and correct.Note:If using a motor plate/mid-mount plate please refer to instruction sheet with spacer kit.
Ford C-4 & C-6 TRANSMISSIONS –
Drain plugs must be exposed through holes in flexplate.
Chrysler TRANSMISSIONS –
Align converter drain plug opposite small hole in flexplate. This will align all four (4) converter bolts properly.
Step 3 When end-play is satisfactory, complete the transmission installation. Apply Loctite® to converter bolts before installing them. Tighten converter bolts or nuts to 30 ft./lbs.
Heat causes 90% of all transmission failures so NOW is the time to install a TCI® Trans Cooler, Part #820500
Step 4 Attach shifter linkage to shift arm on transmission. If installing aftermarket shifter, skip this step and follow that manufacturer’s instructions for shifter adjustment. Otherwise put transmission and shifter in neutral and install cable/linkage to transmission and check for proper movement in each gear. There should be no tension on the shift lever when in any gear and the cable end should slide in and out of the lever with no resistance. If your transmission utilizes a vacuum modulator, hook that up as well as any wiring that will be used. Also attach cooler lines and tighten to 12 ft. lbs.
Step 5 Rear wheels must be elevated 3" off ground. Install four (4) quarts of Trans Fluid. Start engine and complete filling as quickly as possible. Do not overfill. Run selector through all ranges with light throttle and recheck fluid level. Fluid level should be on full mark with selector in neutral or park when vehicle is on level Surface.
Step 6 Inspect for leaks with engine running. Inspect all connections - especially cooler lines and radiator fittings.

