 FREE 1 to 3-Day Delivery on Orders $119+ Details
Best Sellers


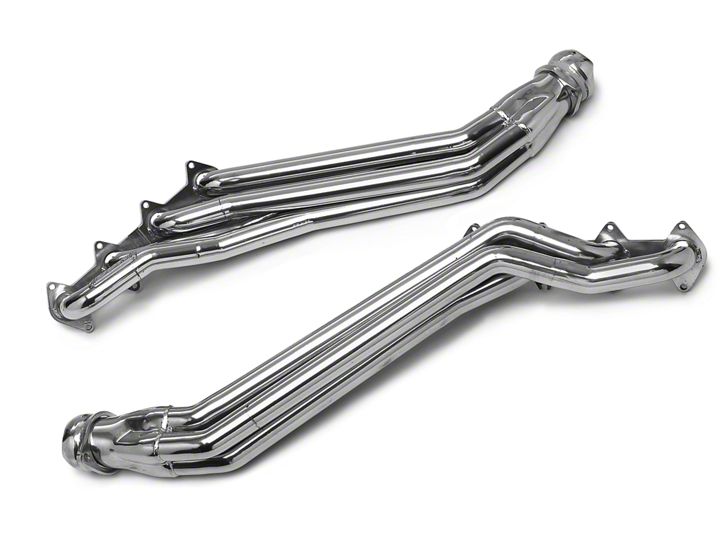
BBK Ceramic Long Tube Headers ('05-'10 GT) - Installation Instructions
Installation Time
1 days
Tools Required
- Jack
- Jack stands
- Wood blocks
- Ratchet
- Ratchet extensions and universal joint swivel
- Sockets: 5mm, 7mm, 8mm, 10mm, 13mm, 15mm
- Deep sockets: 13mm
- End wrench: 5mm, 13mm
- Flat head screw driver
- Crescent wrench
- File
- Vice
- Utility knife
- Wire cutters
- Soldering iron and solder
- Shrink tube and/or electrical tape
Shop Parts in this Guide
Installation
1. Jack the car up and support it with jack stands or wood blocks. Note: I put the tires on 8” blocks. You want the maximum amount of workspace under the car and you will be working under the hood as well.
2. Disconnect the negative battery terminal. (8mm socket)
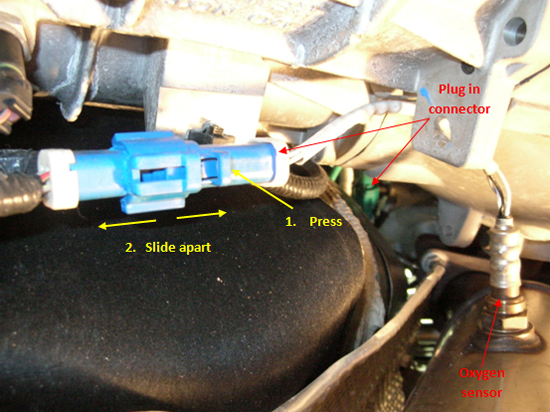
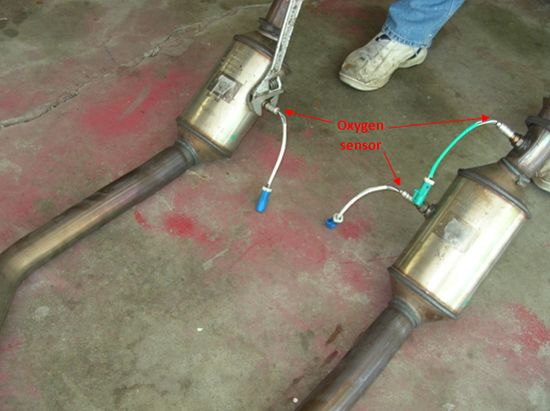
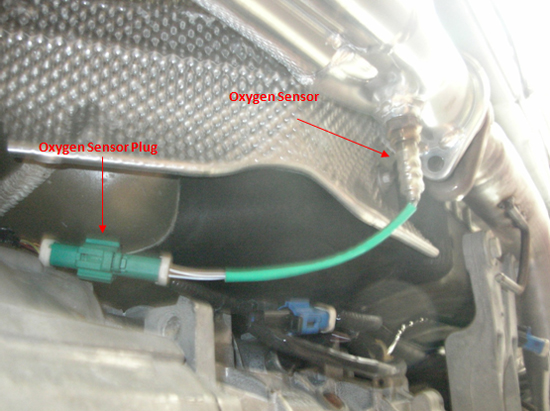
3. Unplug all four oxygen sensors. There are two blue ones and two green connectors. Press down the tab and slide the connectors apart.
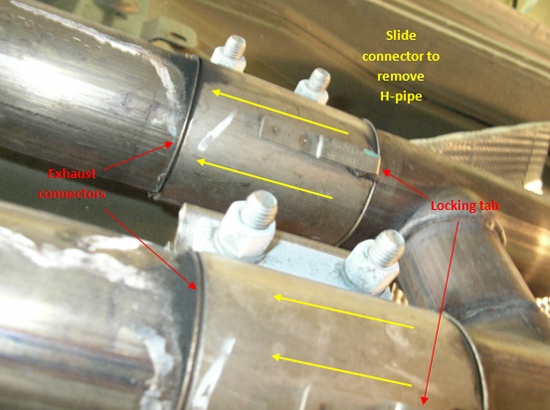
4. Remove the stock H-pipe. First loosen the nuts on the exhaust connectors (15mm socket), lift the tab locking the connectors (flat head screwdriver), and slide out the stock H-pipe. Then unbolt the other end of the H-pipe from the stock manifolds.(13mm socket)
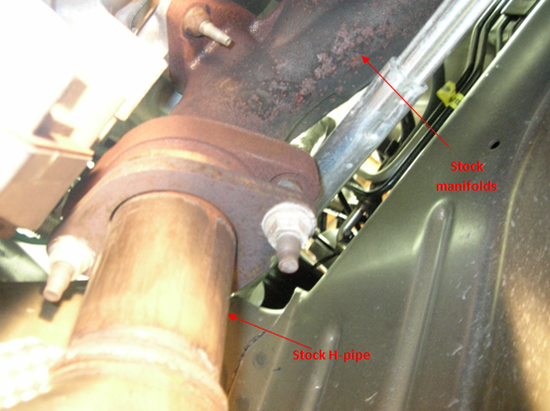
5. Remove the oxygen sensors from the H-pipe. (crescent wrench) Note: The remaining oxygen sensor is located on the stock manifold. Also, it’s a good idea to label them to distinguish where the correct ones go once you reinstall them on the new headers and midpipe.
From the Driver's Side:
1. Unbolt the oil dipstick tube bracket and remove the dipstick tube. (7mm socket)
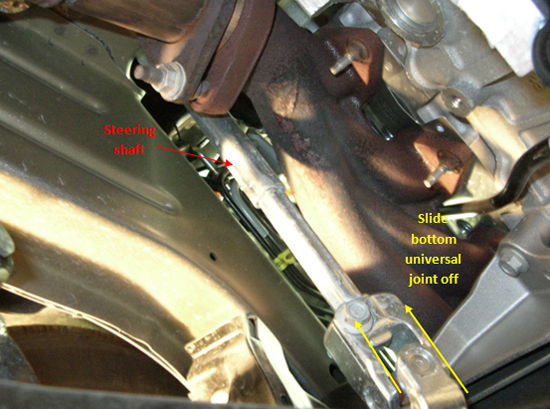
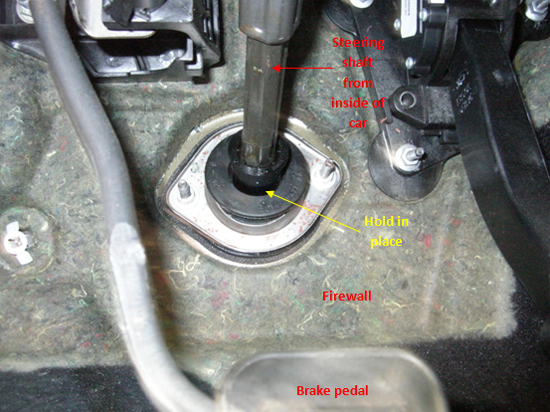
2. Disconnect the steering shaft at both ends and remove it. (13mm socket) You will have to remove the bolts all the way to remove the shaft. Note: Remove the top joint first by getting inside the vehicle and retracting the steering shaft. Accomplish this by grasping the steering shaft as it enters the firewall and pull back. After the top joint is removed, the bottom will slide off easily.
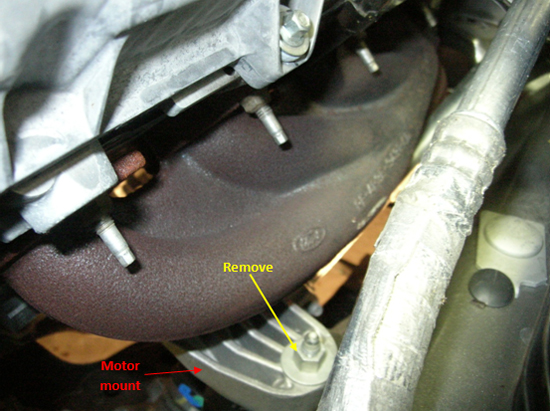
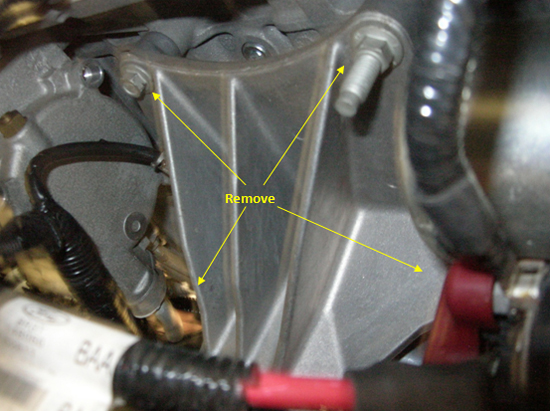
3. Remove the nut on the stud, securing the motor mount to the car on the driver’s side.
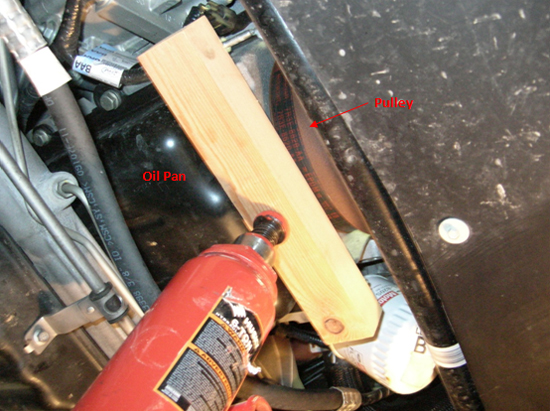
4. With a wood block placed between the jack and the engine, CAREFULLY jack up the engine enough to take the weight off the motor mount. Note: DO NOT jack under the oil pan. Do not jack the engine up more than a couple inches. It is best to place the wood block right behind the bottom pulley on the bolts that hold the oil pan on, but NOT on the oil pan itself.
5. Now remove the four bolts securing the motor mount to the engine and remove the motor mount. (13mm socket)
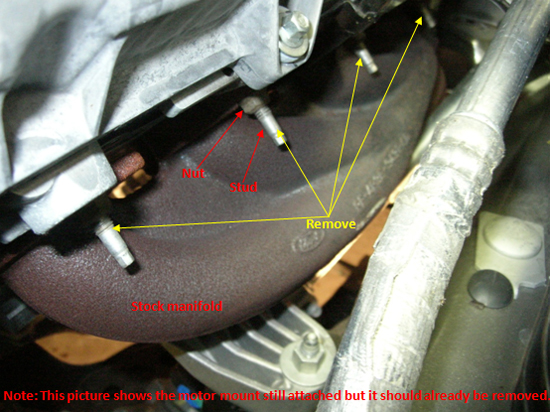
6. Unbolt the eight nuts securing the stock manifold to the engine and remove it. Then remove the eight studs from the engine.
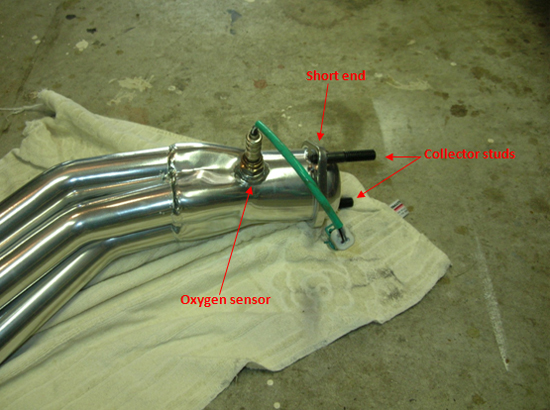
7. Install the supplied collector studs into the new header hand tight. Then install the correct oxygen sensor into the collector with a crescent wrench. Note: The shorter threaded end of the stud goes into the header. Be sure to install the correct oxygen sensor. This is why you labeled them when you removed them from the stock manifold. You can go ahead and repeat this step for the other header as well.
8. It’s best to get the header under the car and insert the bolts into the header, then putting the new BBK gasket on, all before you try to lift it into place. The bolts will help you align the bolts with the holes in the engine.
9. Slide the new driver’s side header into place and HAND TIGHTEN all eight header bolts. For this side you will be able to use the supplied bolts from BBK. Note: Do not start bolts with ratchet, and make sure the bolts do not cross thread. It’s also a good idea to start the new bolts into the engine block to make sure everything is correct before installing the new header.
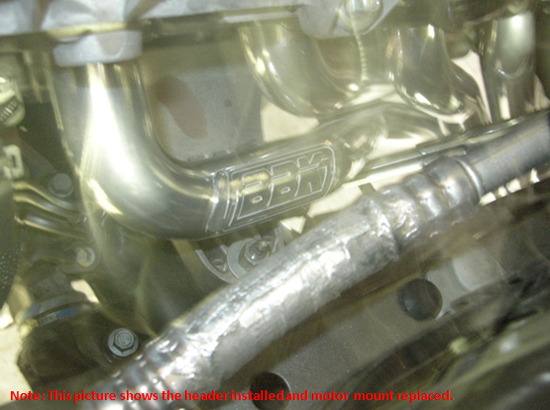
10. Once the new header is in place and all of the bolts are hand tight, you can then tighten all of them with a ratchet.
11. After the new header is installed, plug the oxygen sensor back into the car. Note: Plug it into the green receptacle.
12. Replace the motor mount and reattach it to the engine, tightening the four bolts you removed in Step 10. Then carefully lower the engine back down onto the stud and tighten the bolt securing the motor mount to the car. Note: Leave the jack and woodblocks in place as you will need to lift the engine again for the passenger’s side.
13. Replace the steering shaft by sliding the universal joints back into place and tightening the bolts. (13mm socket) You will need someone to hold the steering wheel in place and someone else to hold the steering shaft in place through the firewall soit doesn’t slide back up into the car. Note: Picture below was taken from inside the car underneath the steering wheel.
14. Replace the oil dipstick tube and reattach its mounting bracket. (7mm socket)
From the Passenger's Side:
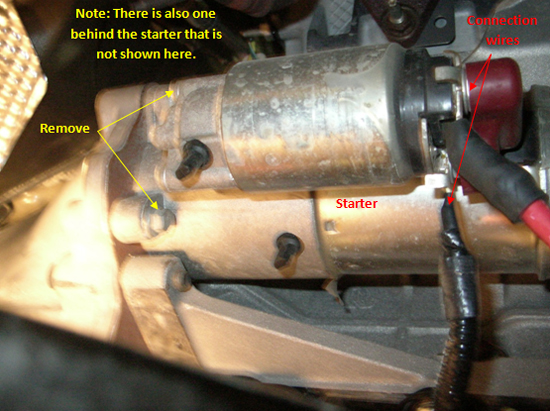
1. Remove the connection wires from the starter. Then remove the starter by unbolting the bolts around its base. Note: There is one bolt on the back of the starter, and you may need a universal joint and/or extensions to remove it.
2. Remove the bolt securing the motor mount to the car. Then, just as you did in Step 9, CAREFULLY jack the engine up enough to take the weight off the motor mount. With the pressure off the motor mount, remove the four bolts attaching the motor mount to the engine and remove the motor mount. Note: Same procedure as followed on driver’s side; basically repeat Steps 8-10 on the passenger’s side.
3. Unbolt the stock manifold from the engine and remove it.

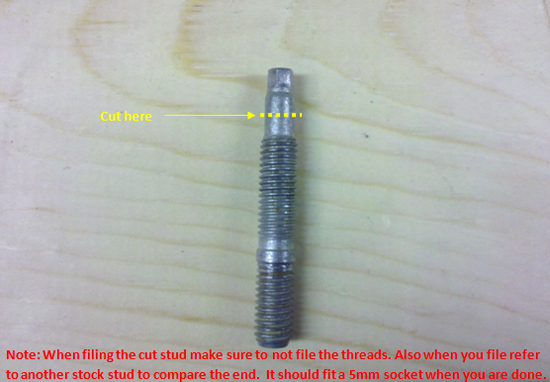
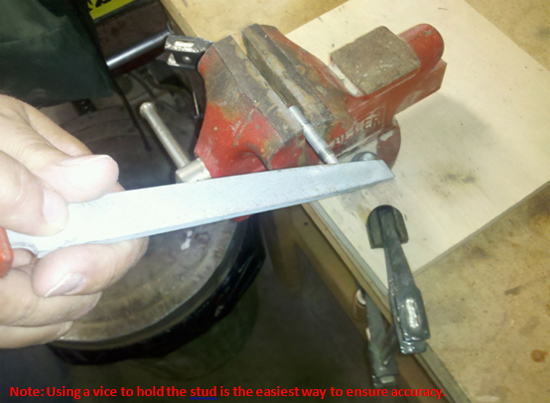
4. Before installing the BBK headers you will notice that on the top you cannot get the supplied bolt or the stock stud to go through the flange because they are both too long to fit. To overcome this, you can cut one of the stock studs and file the end to fit a 5mm socket.
5. If you didn’t install the oxygen sensor into the new header in Step 12, do that now. Use a crescent wrench and be sure to install the correct oxygen sensor in its correct port.
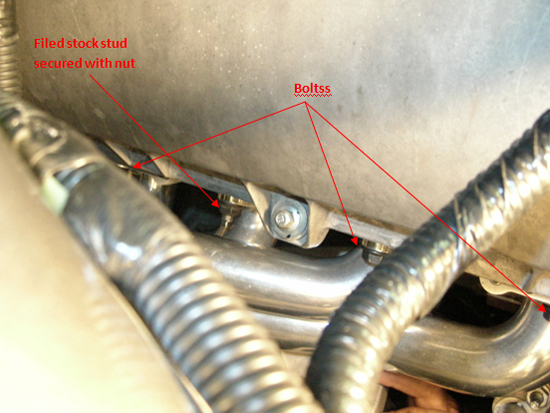
6. Screw in the stud you cut and filed in Step 22 into the engine block. Then, just as you did in Step 13, get the header under the car and line up all the bolts through the header flanges. Note: It’s helpful when lining up the bolts, to go ahead and line the header up and secure the nut on the stud you installed.
7. Just like you did for the driver’s side, slide the new header into place and HAND TIGHTEN all eight header bolts. Note: Do not start bolts with ratchet, and make sure the bolts do not cross thread. It’s also a good idea to start the new bolts into the engine block to make sure everything is correct before installing the new header.
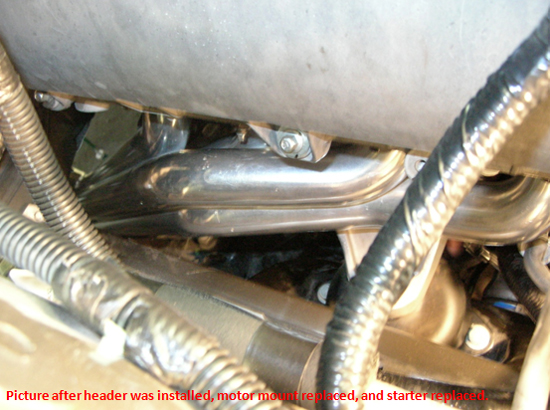
8. Once the new header is in place and all of the bolts are hand tightened, you can then tighten all of them with a ratchet.
9. Replace the motor mount and reattach it to the engine, tightening the four bolts you removed in Step 20. Then carefully lower the engine back down onto the stud and tighten the bolt securing the motor mount to the car.
10. Reinstall the starter and tighten all the bolts around the base of the starter. Note: Make sure you correctly slide the gear teeth on the starter to the teeth on the flywheel before tightening the bolts. Refer to the picture in Step 19, if needed.
11. Reconnect the starter wires just as you removed them in Step 19. Also make sure the plastic cover is secured back over the connection terminal.
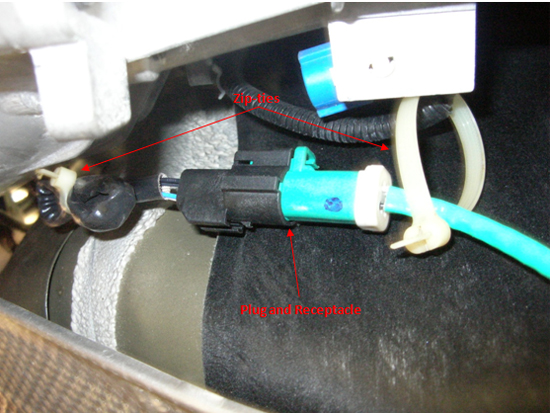
12. When you try to reconnect the oxygen sensor to the car’s receptacle, you will notice that it’s too short. If you bought extensions, you can use one. If not, you will have to splice a longer wire so it will reach. Note: Do not use the supplied BBK extensions as these will be used for the oxygen sensors in the midpipe. It’s also best to use some shrink tube and electrical tape around the wire to protect it.
13. Once you have spliced together the oxygen sensor wire, you can plug it in as you did for the one on the driver’s side. Remember that the green plug goes into the green receptacle. Note: It’s a good idea to use zip-ties to secure the wires to the car so they aren’t dangling underneath the car.
Now that you have successfully installed your new BBK Long Tube headers, it’s time to install the matching midpipe.
Installation of New BBK Midpipe:
Since the stock midpipe has been removed before installing the BBK Long Tube Headers, you can begin installing the new BBK Shorty midpipe. Instructions for removing the stock midpipe can be found in Steps 1-5.
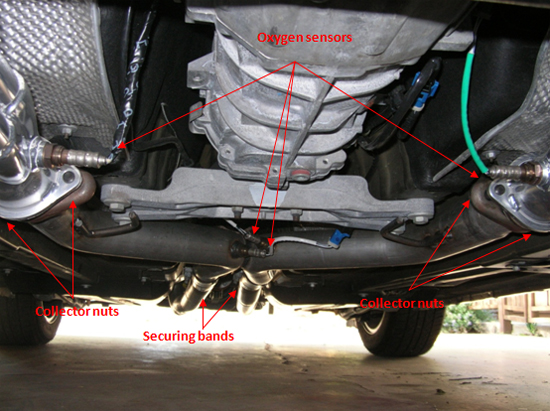
1. Slide the new midpipe under the car, lift it up and slide it onto the collector studs on the headers. Note: It’s best to have someone hold the new midpipe up while someone else puts the washers on and starts the nuts. Also do not tighten tents yet because you will need to be able to slide the midpipe to get it to fit into the cat-back system.
2. After you have the bolts started onto the collector studs, you need to slide the cat-back system or mufflers onto the rear end of the midpipe, and secure them with the bands.
3. Once everything is in place, you can tighten the nuts at the collector and the bands at the end where the midpipe is connected to the cat-back system.
4. Now, using the oxygen sensor extensions supplied by BBK, plug in the remaining two oxygen sensors. Note: The blue receptacles are the correct ones.
5. Lower the car back down off the jack stands or woodblocks with the hydraulic jack.
6. Reconnect the negative battery terminal.
7. You have successfully completed the installation of your new BBK Long Tube headers and BBK Shorty midpipe.
When you start your Mustang after installing the new BBK Long Tube headers and BBK Shorty midpipe, it may run rough for the first 10-30 seconds, but it should smooth out shortly. Your Mustang may also light a Check Engine warning in the dash. It is highly recommended that you retune your Mustang’s computer system after this installation to get the full performance out of your BBK products.
After you drive the car 50-100 miles or go through 2-3 warming and cooling cycles of the engine, you will need to retighten all the header bolts. To do this, follow the steps you took during the installation to jack up your Mustang and retighten all 16header bolts. Note: Do not over torque the bolts, this is just to make sure after the bolts have settled that everything is tight to prevent any leaks.
Installation instructions provided by AmericanMuscle customer Brian Gurley 9.29.10
Best Sellers
Related Guides
-
-
Installation
-
Installation
