Talk to a Mustang Sales Tech
1-877-887-1105
M-F 8:30A-11P, Sat-Sun 8:30A-9P
$20K Sweeps! 10 Chances to Win! Enter Daily >

JLT Series 3 Cold Air Intake and BAMA X4/SF4 Power Flash Tuner (05-09 Mustang GT)

Item 101675
Verify parts fit and get product recommendations.
Mustang Sales Techs: Connect Now M-F 8:30A-11P, Sat-Sun 8:30A-9P
$0.00
Our Price

$594.99

FREE Shipping Market Price $666.39 You Save 11% ($71.40) Up to 10% off for Military & First Responders! See Details

Will this fit your Vehicle?

Select a different vehicle Help?
Update or Change Vehicle

Item Options

Out of Stock

Ship to: Ashburn - 20149
Sorry, please enter a valid US or CA postal code
We're sorry, zip can't be updated at this time.
    Create a list
    Add to New List

    Saved - View your saved items

    We're sorry. We couldn't save this product at this time.

      Video Review & Installation

      Jake here for American Muscle. And in this video, we're taking a look at the JLT Series 3 cold air intake and Bama X4/SF4 power flash tuner kit fitting 2005 to 2009 Mustang GTs. Now, this is a great well-priced kit that's going to get you some easy, additional power for not a lot of money. Featuring the popular JLT Intake and the Bama X4/SF4 power flash tuner, this is an easy way to make power without having to make permanent or huge modifications. And it's also going to allow you some additional flexibility for more modifications and power down the line as well, plus, makes your car sound a bit cooler in the process.Now, before we get into all the details and specific features, let's talk dyno numbers. Now, we tested this setup on our 2006 Mustang GT that you see behind me here. This is an otherwise stock GT with a five-speed manual transmission, and we did our runs in fourth gear for that ideal one-to-one ratio, and we had a full tank of 93 octane in the car.Now, in stock form, the car laid down 274 horsepower at 5,100 RPM and 302 pound-feet of torque at 4,200 RPM. Now, after installing the JLT intake and loading up the Bama Race tuner, we saw improvements. We saw 287 horsepower at 6,000 RPM and 306 pound-feet of torque at 4,350 RPM. And that gave us peak gains of 13 horsepower and 4 pound-feet of torque. Now, as you can see from our graph on the screen here, we did see some pretty interesting results. First and foremost, the Bama tuner increased the redline by about 500 RPMs to just amount 6,800 versus 6,200 in stock form. And where we really started to see a noticeable difference was in the upper rev range. We saw our biggest curve gains at the top end as well, right around 5,400 RPM. And there we saw increases of 18 horsepower and 18 pound-feet of torque. Now, that's not a ton of power, but it really made the car feel stronger at higher RPMs, and that's where these larger displacement V8s tend to fall off in stock form. And you can see that illustrated on our graph here. So overall, a darn, good result for not a whole lot of work.Now that we've covered numbers though, let's dive into the actual pieces of the kit that can get you there. First, the intake. Big thing you'll notice here is this gigantic filter. Now, this is a big, pleated, and oiled filter, so you're going to get a lot more air flowing through here than you do with your stock filter. That oiled surface is going to be excellent at filtering out even small particles and dirt. Now, having an oiled filter also means that you don't need to worry about replacing this. You can just wash it out, re-oil it, and be back on your way. So if you're going to be keeping your car around for a long time, or you live in a place where that filter gets dirty very quickly, this is going to save you some money in the long run.Now, to help keep that filter cool, JLT does provide you with a heat shield. Now, this is not a closed box system, but the heat shield will still do a pretty good job of keeping engine bay heat away from the filter itself, making it more of a true, cold air intake than something that does without a heat shield. Now, this is designed to pull in that cool air from the fresh air vent in the fender where your stock intake would pull it, and you've got some space around this once, so it's mounted under the hood to make sure that that filter is bathed in cool air, so to speak. The kit also includes a big piece of weather stripping on top of the heat shield here to help seal the box off once the hood is closed as well. Now, all that cool air is going to get funneled through a 5-inch diameter intake tube that provides a nice, smooth passage into your intake manifold and throttle body. The tube also has some nice resonance to it as well. So you get some additional sound versus stock. Hopefully, you can hear that in the dyno runs because this thing does sound pretty, darn, good.Now, an intake is great on its own, but they are better with a tune, and this one does actually require that you have a tune. And that's where the other half of this kit comes in. The Bama X4/SF4 tuner module is a great, all-in-one tuner that can hold up to 10 custom tunes at a time, and it allows for not just datalogging and monitoring, but it also functions as a diagnostic tool so you can read and clear engine trouble codes. Now, this kit comes with two custom tunes to match the mods that you have on your car, plus the intake that you get in the kit. And you get free, unlimited tune revisions for life. So if the JLT is your first mod, but you're thinking of adding additional modifications down the line, like an exhaust, or maybe going forced induction later on, you'll be able to get free updates and keep your Mustang making as much power as possible, and Bama just makes it easy.Now, these custom tunes are just that as well. They are fully custom-tailored to your car. When you order this kit, you're going to submit some information to Bama. Things like what options your car has, any mods that you already have, and what octane fuel you plan on running, just to name a few. Now, it's going to take them two to three days usually to write those two custom tunes. And once you've got them returned to you, all you've got to do is drag and drop them into the file on the tuner via your computer. Pretty easy stuff. The software is very easy to use, and it's free to download, plus you get the included USB cable here to have everything uploaded and updated before you plug it into your car.And again, if you do add some more modifications down the line because we know the modding never quite stops, all you have to do is submit the new information to Bama, and they're going to write you a new tuner for it, all free under the Bama Tunes for Life program. So you get tune supervision for as long as you own your car. Now, that alone is worth the price of the entry here. The X4/SF4 also features a full-color LED display, so it makes it easy to read, especially if you decide to mount it up in your car to show some information while you're driving or take advantage of their datalog feature. This also has built-in Wi-Fi, so you don't even need to plug it into the computer to get regular updates, just set it up and you'll get the latest software updates automatically. Now, one other thing that is worth noting here is that this does retain your stock tune as well. So if should ever decide to return your car to stock, you can just plug the tuner in, and with a couple of clicks, flash it right back to OEM specs.Now, when it comes to construction, that filter we were talking about earlier is an eight-layer, cotton, media blend with the oiled surface. Both the heat shield and the intake tube are constructed from textured black ABS plastic, giving them a nice finish, good heat resistance, and durability, plus, they're nice and light. The heat shield is also roto molded and you get that weather stripping we were talking about along the top edge as well for a good seal.Now, when it comes to the X4/SF4, I really like this unit because it is very compact and it features, again, that full-color, 2.75-inch screen, which you can display in either portrait or landscape mode. The five-button interface makes navigation very easy as well. And I am a big fan of physical buttons, especially on something small like this. And like I mentioned earlier, it also comes with the USB cable that you need to update your unit or upload your tunes and the OBD2 cable that's going to connect right to the car to get your tune loaded up onto the car's computer itself. So it makes this a pretty easy setup.Pricing for this kit comes in at about $650, which is really good considering all you're getting. Now, just one custom tune is usually a few hundred on its own, so considering you're getting two tunes, the tuner, and the intake right away, I think this is a really good deal. And, of course, you, again, get those free tunes for life through the Bama Tunes for Life program.Installation is a very straightforward process. It gets a one out of three on our difficulty meter. It should take you about an hour all told to complete. Now, intakes are pretty easy to install, definitely a job you can accomplish in your garage. And this tune actually doesn't take very long to load up. So you should be back up and running with more power pretty quickly. Enough talking about it though, let's jump over to the car and I'll walk you through that process.Tools used in this install include an electric or standard ratchet, an extension, 8 and 10-millimeter socket, a Torx T20 bit or T20 driver, Phillips head screwdriver, and a flat head screwdriver or panel clip removal tool. All right, everybody, now it is time to install the JLT Series 3 intake and the Bama X4/SF4 power flash tuner on our 2006 Mustang GT here. So we're gonna start by uninstalling the stock intake. We'll get the new one on it and then we'll go ahead and do the tune. So first let's dive into uninstalling our stock intake.All right, so we're gonna start on the driver side of our intake. We're gonna take this off basically in one unit because we can. So I'm gonna start over here with this bolt. We've got one 10-millimeter bolt that holds the air box in. So we're just gonna take our ratchet, loosen that up. Now, you wanna hold on to this bolt because we're gonna need it again later for the new one, so let's set that aside. Next, we're going to disconnect our MESS airflow sensor right here, right behind the air box. So this is just a little retaining clip, so you should just be able to pull that lockout with your finger, press this down, and pull the clip off. We're going to set that aside because we're going to swap this over to our new intake later.Next, we're going to undo our clamp right here on the throttle body. Now, you can use either a flathead screwdriver, a nut driver, or as I've got right here, an 8-millimeter socket on my ratchet. We're just going to loosen this up. It's not as loose as we need it to be. And we should be able to just pull this right off of our throttle body. All right. We got one more thing to do, and then we can take our intake out.Last thing we have to do to get our intake out is disconnect the PCV line right over here. Now, there is a little green clip on this. On the back, you'll feel a little tab, pull it towards the front of the engine, and just lift this right up. You can spin it out of the way. Now that we have everything disconnected, we can just grab our intake and lift it right out of the engine bay. Next, we're going to remove our radiator cover here because we need access to one of the bolts on this side. So, taking my little clip removal tool, I'm just going to work the centers of these up. You can also use a flathead screwdriver for this if you don't have a clip removal tool, or in this case, you can't really get in there all that well. So if that's the case, take a little flathead, just work that up, and you can pull those right out. Once we've got all our clips out, we can just lift the radiator cover right out and set it aside.All right. Now that we've got our stock intake out, we have to do a couple of things here on the table before we can start putting things back together on the car. First thing I'm gonna do is take out the original mass airflow sensor because we're gonna reuse this. So, we're gonna take our ratchet with the T20 Torx bit on it, and we're gonna undo these two screws right here. These should come out very easily. These don't have to be very tight. Same is true when we put the new ones in. Set that aside because we do have new ones. All right. Once the screws are out, this will just slide right out. Now, pay careful attention to the orientation. This opening is going to face toward the intake box and the filter. So, we're going to do the same thing when we put it in our new intake tube.All right, now we're going to go ahead and install that mass airflow sensor we just took out on our new intake tube here. So, included in the kit is a new gasket plus two, new Phillips head screws for it. So, first, we're going to take the gasket and just slide this over onto our mass airflow sensor. And you'll see, this only goes one way. It's pretty hard to get that wrong. Once we do that, I'm going to take the screws and feed them through because the holes on the gasket are a little small. Get that through so we can get them started. We'll go ahead and pop this into the tube. So this is going to go back in, again, the same way that we took it out. So this is the filter side. This opening is going to face this way. Once we get everything lined up, take my Phillips head screwdriver here. Let's go ahead and tighten these up. There we go now that it's seated properly. And just like the ones that we took out, these don't have to be super tight. Just get them nice and snug. That gasket will do most of the work for us and make the seal that we need here. Okay, now that's nice and snug. We're gonna pop the PCV line on the bottom of this, and we're gonna head back over to the car.Before we head back over to the car, we're gonna take the included, new PCV line, and we're just gonna connect this on the bottom of the intake tube here. So the open end is just gonna slide right on here. We have to give this a little bit of pressure. If you need some extra help, you can grab some of the oil off of the new air filter, lubricate it up a little bit. Let's get this on. All right. Now that's on, we'll head back over to the car.One other thing we have to do before we get our heat shield in is remove this bolt on the radiator shroud. So this is just an 8-millimeter bolt, so I'm just going to take my ratchet here. Might be a little hard for you guys to see on the camera. We're going to pull that all the way out, and we have a new bolt to go in that area. Now, we're going to go ahead and put our heat shield in. So this is going to be a little bit of a tight fit, and it's important that this tab goes behind the shroud where we just took that bolt out. So what I'm going to do is kind of set this in first. This is going to tuck in between this coolant line and our brake lines down here. And you have to just do a little finessing to get this in. Once that's in, we're going to take the shroud, pull it out towards the engine of the car, and slide that tab behind it. Just make sure our bolt holes are roughly in the right place, and we're not pinching anything. So we're looking good right now. And we'll get our bolts in to this heat shield.We're going to start by installing the new bolt in the radiator fan shroud area for our heat shield. Now, this is a bolt that is included with the kit. It is a 10-millimeter bolt. It's a little bit longer than the one we took out. Now, this is going to be a little bit hard to see, but this bolt is going to go back right in the same place that we took the last one out of. So, I'm going to just kind of feel this around because it's a little bit hard for me to see as well. And once we get that seated in the back of the clip there, and get it started by hand. There it goes. There it goes. We get it started.Now, again, you want to make sure that the heat shield goes in between the radiator and the fan shroud here. Once we've got that started, I can take my ratchet and tighten it the rest of the way down. That should pull itself all together right there. Nice and snug. You don't have to go super-duper-tight on that. We just want it to stay in place. Next, we're gonna take our original 10-millimeter bolt from our airbox, feed it through right here, and tighten it down into this clip that stays on the body of the car.Again, this is a 10-millimeter bolt, the same one we took out earlier. Just gonna get that started. Gonna get things aligned here with that collar. Again, making sure we're not pinching anything either. I'll take my ratchet and tighten the rest all the way down. And that's not going to go all the way down just because of the way this is set up, but that's okay. We've got it nice and snug there. All right. That should be good right where it is. Now, we'll go ahead and get the intake tube on.Next, we're going to go ahead and take our coupling here and get this slid onto the backside of the air intake tube. Now, this is going to be a little tight. You should be able to just work it on bit by bit. Once you get it started, it gets quite a bit easier. We want to have a nice, little lip here on the inner side of it. Flip that over and check it just like that because this side is going to attach to the throttle body. We got to get a clip on here as well. Next, we're going to go ahead and put our intake tube into place. So, I'm going to feed the filter side in through the hole in the air box that we just put on. Then we're gonna take this and seat it around the edges of the throttle body. You want to make sure, especially on the bottom, you don't pinch this. It goes all the way around.All right. That looks pretty good. So now we'll get our clamps on this. So you've got two of these worm gear clamps. Now, I already opened one of them up. I just find this a little bit easier than fighting with them to get them on before we do this step. So, I'm going to take one, slide it around. One is going to go on the inside of this lip, closer to the throttle body, and the other one will go here on the outside of this little lip here. It's a little hard to see it on camera. We'll just slide them around like so. And both in pretty close proximity. I'll just get these started. These are a little tough to start by hand, but I find it much easier to do it this way than to fight with it before or after we get this on.Again, once we've got these both started, we'll make sure that they are where they're supposed to be and that this thing is seated on these little flanges on the outside of the throttle body. Now, again, just like the other ones before, you can take either a flathead screwdriver or I'm gonna use my ratchet with an 8-millimeter socket and just gently tighten these down. Once these start to get tight, you're going to have to keep an eye on them because they are going to form to the shape of this intake tube. Again, you want to keep this one on the outside of the lip here so it seals this side of the tube. Okay. That one's starting to get tight. We're gonna go ahead and move to this one here. Again, same thing.I was checking the orientation of this. I've got my hand underneath here to make sure this stays in place and it stays on the bottom of the coupler as well, which this is staying in place pretty nicely. All right. We're gonna get this one nice and tight on the throttle body side here. I have to actually pull it off ever so slightly. I'm going to back this off a bit. These are not the easiest things to work with, but that's okay. We'll get it figured out. And again, as long as it's on the throttle body and outside of that lip here on the intake tube, it should be fine. All right, now that's nice and tight. We'll go back and tighten this one up a little bit more. What? That's on there pretty snug. It's not going anywhere, so we're good to move on.Next, while we're over here, we're gonna take our new PCV line and we're just gonna clip this back onto the valve cover on this side. This is a factory-style connector, so we'll just push down, and you'll hear it click into place and it's nice and snug. Now that we've got these started, we're gonna go ahead and rotate them around. So you kind of have to squeeze a little bit. And just gently work them around to the side so the bolts are facing up like this. We'll do this for this one as well. It's going to make for a slightly cleaner install. Make it easier for us to access these later should we need to.And we can go ahead and get these lined up, make sure that that is seated properly. We're gonna take our ratchet with an 8-millimeter socket on it. We're gonna tighten these down. Now, you can also use a nut driver if you have one, or you can use a flathead screwdriver on these as well. For this one in the front, it's really important that it stays ahead of this lip on the back of the intake tube. So just make sure that's where it stays while we tighten this down. You don't have to go super tight with these, but you do wanna make sure you get a nice, good seal on it. All right. So that's tightening itself up pretty nicely. Go ahead and work on this one in the back too, making sure that the coupler is butted up against those flanges on the throttle body. Just double-check that as we go. Check the bottom side as well. Everything is looking good so far. That's nice and snug. We'll check that one as well. Good. Now we can attach our PCV line and we'll go ahead and get the air filter on.Next, we're going to install our air filter. So, we're going to kind of just feed that in underneath the fender there. And then, we should just be able to work this on to our intake tube. And you'll kind of feel that sit nicely. That's in a good spot. Then we'll take our clip right here. Just like the other ones we just did, we're gonna tighten this up. Again, you can use either a flathead screwdriver, a nut driver, or in this case, you can use an 8-millimeter socket on a ratchet. This one's a little bit tricky because it's going to move until you start to get it tight. You want to make sure that it stays in this groove all the way around the air filter. We're in a good spot now to start tightening this down. You wanna make sure that stays in the groove, kind of going around the filter. All right. That's nice and tight. So we'll go ahead and plug our mass airflow sensor in now.The last thing we gotta do over here is plug our mass airflow sensor back in. So this is gonna plug right in like it did before. Feel a little click and push the locking tab in and we're good to go. The last thing we have to do under the hood here is put our shroud back into place. So this is just gonna slide right in. There is a little tab here that goes underneath of the top of the grille. Slide that back into place and we'll take our pushpins, just gonna put them back in, push the pin down. Do that for all six of these. Now we're all wrapped up under the hood, so we'll hop in the car and get our tuner loaded up.All right. Now it's time to get our tune loaded up, so we're gonna take our Bama X4/SF4 power flash tuner. I've already got our tunes loaded onto here, and this thing is updated too, so I'd recommend doing that before you get started with this process. Of course, you're gonna want your custom tunes on there anyway. We'll just plug this in using the included cable. Just plugs in one way like an HDMI cable. And then, this is gonna plug into our OBD2 port underneath the dash. We'll do that and get this fired up.Now, we'll just take this and plug it into the OBD2 port underneath the dash. Now, we've got our tuner plugged in and loaded up. I'm going to go ahead and get the tune loaded up onto the car first, then we'll run you through some of the features of the X4/SF4. So, of course, the most important thing right up here is the Program Vehicle section. So, using our little arrows here and the center button select, we're going to select Program Vehicle. It's going to give us a Street Use notice. We're just going to have to hit Continue in order to continue through this, and we'll have us turn the key on. Now, I've already got the key turned on. The engine is not running now, so this is very important that you're able to do that. Once you've got that set up, hit Continue, and that brings us to our tune menu. Now, you can see we've got three on here. We've got the preloaded tune for this Mustang, and we've got our two, custom Bama tunes as well. Now, we're interested in how much power we can actually make with this thing, so I'm going to go down and I'm going to select our Race tune. So, we're going to hit Select.Now, this gives you the option to adjust a bunch of different parameters in here. I'm going to tell you to leave these alone, especially with your custom tune. The folks at Bama know best. But if you are confident in adjusting these, you can go ahead and do that. So, this gives you the option to adjust spark timing and advance, light up and throttle, air and fuel ratio, your axle ratio if you've gone ahead and re-geared your car, but again, that's something that should have been taken into account when you got your tune done. But if you happen to do this again later or change that axle ratio later, you can do that as well. Your tire size, if you want to change your speed limiter, if you want to set one, not sure why you'd want to set one, but you can change that here as well. Your rev limiter in gear, your rev limiter in neutral, your idle speed in gear, and your idle speed in neutral. These ones aren't gonna make too much of a difference for us because we do have a manual transmission car, but if you have an automatic, you might wanna be able to change those up. So we can go ahead and check those as well.Selecting any of these will bring you to a menu just like this. Now, we're going to press the left button and go back. This will take us back to that menu that we were just in. So you can see there's a ton of different stuff that you can adjust in here. You've also got your low-speed fan, your high-speed fan, and when they kick on at different temperatures. So, again, we're leaving everything otherwise stock, so we eliminate variables here. You can see what this is going to look like. So if you're happy with that, you can just press the right arrow. That will bring you down to the Approve section. We'll hit Yes.Now, this is one thing that I want to point out here. Using a custom tune on these modules is going to disable the preloaded tunes. So, because you have modification in your vehicle, we're taking that into account, especially with this kit, we've got the JLT intake on there. This is going to require a custom tune. So, it's going to make you scroll down through that, and you're just going to have to confirm. All this is going to do is disable that preloaded tune that we saw on there earlier.So this is going to give you one last check of the different options. If you want to change anything, you'll have to go back. Again, we didn't do anything different. We're just using the tune as it is. So we'll hit continue. Now, this is asking us to turn the ignition key off and then turn it back on. Not start the engine. So the first thing this is going to do is go through and save all of the stock data. One of the nice things about the Bama setup is that this does allow you to save your stock tune. So if you do need to revert the car to stock at some point, you can do that. So this usually takes a little bit of time. We're just going to have to be patient with it.Now, through this process, you might see some lights flash on the dashboard, some warning messages, you might hear some relays click, and some odd stuff happening. Just make sure, as this process happens, you don't touch anything. And before you start this, it's really important to make sure that your battery is in good health or you've got your car hooked up to a battery tender. Make sure that you've got your car in a safe space to do this because if something does happen and you're not able to start it up afterwards, in the worst-case scenario, you want to be able to make sure you can leave it. Really, it's just a matter of following the prompts with these things. So, this is going through and processing some stuff. Just, again, leaving everything as it is.Now, here, this is automatically going through and clearing any diagnostic trouble codes that may have been caused by loading the tune. Again, you might see some things beeping and flashing on the dashboard. Just let it go. It'll be okay. So, now, it's telling us turn the key off, and turn it back on. And our tune is complete. Now we can turn the key off here, and we'll hit Done. And that brings us back to our main menu.So, now we're back in the main menu, I want to show you some of the other features of the X4/SF4. Before we do that though, I want to go back into the Programmed Vehicles section because we have a couple of options. Right here, this first one, you can click over and hit Return to Stock, that will automatically do it for you. Or if you hit Continue, we go back to this menu that we saw before where we have our tunes listed. And right up at the top, you'll notice Preloaded Tune and Support disabled. So if you want to go back to stock, it's going to be right here in this one. So we're not going to go back to Snog just yet. We're going to run this on the Dyno first and see what kind of power it makes.But back in the main menu, we've got our gauges and datalog section next. Now, this is probably the most comprehensive one. You're going to, again, have to have the key turned on. So we're going to go ahead and hit Continue. You can start by configuring this right away, but hitting Continue will bring you to the default setting. So this is where you can see a bunch of different engine data and parameters in your car. The first thing we're going to have to do is go ahead and select our vehicle. We're going to scroll down. See? You've got some Mustang choices here. Now this is a 2006 Mustang. So we're gonna go to Ford Gas 07 and prior years. Just again, you'll scroll down and see the right one for your vehicle. Press over and we'll hit Continue. This will take a moment to load. And then there we go.So you can see, our car is very cold right now. We've got a coolant temperature of 52 degrees. We're running just under 12 volts. Now, this is where you can see a bunch of different stuff. So, if you press over to the right, you can start or stop your datalog right here. You can view and select other datalog files if you've got some stuff. But the more fun thing is selecting your gauge layout. So, you can see from here you've got a bunch of different choices. If you want to display more options on here, you can have up to eight different things loaded up on here. And you can also set this up in landscape format. So if you want to mount this up in your car somewhere, you can see all kinds of live data as you drive. We have a separate mount available for that. Again, you'll have to buy it separately. But for now, let's pick this one. I'll show you a bunch of different things.Now, in this menu, if you press down, you'll see it'll start to highlight any one of these. So, we have intake air temperature, load, all kinds of different stuff. So, if you select any of these...I'm going to pick this one. You can hit Item and it'll give you a list of all the different stuff that you can see. So, you can scroll down. You've got things like Fuel Trim, again, Intake Air Temp, Engine Percent Load, Air Flow Sensor, Injector Pressure, RPM, all kinds of different stuff. And you can add some different analog inputs as well if you do that later on down the line. So we're going to hit Spark just because we can. And then down in your unit, if it is able to be changed, you can do that as well. Otherwise, like this one, you're only going to see it in degrees. We're going to hit Approve. Take a second, and now we see we have Spark there.Now, if you want to start recording right from this menu, you can just hit the center button. You'll see a little record comes up. Hit it again to stop. So we're going to go ahead and go back. Again, you can stop and start. Here you can see your datalog. You can reset some stuff as well. To go back to our main menu, you're going to select Stop Datalog, and it's going to bring us right back. Next is vehicle function. So, this is where we can read and clear diagnostic trouble codes. So, if you do get a check engine light for anything, this is where you're gonna be able to see what it is. So, we hit Read. Again, have our key turned on, which I already do. Take a second. Let's see if we have any codes. We do have one there, and if it does pop up, you can select it and it'll tell you exactly what the definition of it is. And we can go right down here to clear, continue, and this will go ahead and clear any codes for us. Turn the key off. Hit Exit and then right back.Now, down here in Special Functions, there's one other thing you can do with this particular car. Now, these might vary, these special functions, depending on what year and model you have. But in our car, the only thing we have is the Keep Alive Memory Reset. So, basically, what that is going to do is it's going to reset the factory computer back to stock form. So, these newer cars, they have some learning capabilities, so as you drive it, you'll learn some things. You'll learn what kind of fuel you're using, all that kind of stuff. If you want to reset that back completely to stock, you can use that Keep Alive Memory Reset. Again, we're not going to do that. We're going to leave it alone so we get some accurate numbers here. So, we'll go back to our main menu.Only a few other things. Vehicle information, this will just tell you your VIN and a couple of other pieces of information here. This is important for your Bama tunes. So, things you're going to need are your ECU strategy code when you send the information to Bama to get your custom tunes written. So, all that is available just by plugging it in. And device info will give you some more information about the device. It'll show you what firmware version that you're on. Again, if you want to check, you can plug this in using the included cable, using the free software too to get this updated. And it'll show you if custom tuning is supported, your tune revision, and if this is married to a car or not.And then down in Device Settings, you've got some other things. Now, you can use Wi-Fi for this if you want to update via Wi-Fi. Change your brightness and your display orientation. So, if you want to set this to landscape mode, you can change the theme so you get a different color. This also does have a light sensor in it. So, if you do display this on your dashboard, you can have that turned on. And when it gets dark, it'll automatically dim the screen for you. And you can turn that beep off if you want it. I like having it on. And you can go to demo mode, and you can also reset this back to factory stock. And that brings us to the end of the functions here on the X4/SF4.That's going to wrap it up here for our review and install of the JLT Series 3 cold air intake and Bama X4/SF4 power flash tuner Kit, fitting 2005 to 2009 Mustang GTs. Thanks so much for watching. And as always, for all things Mustang, be sure to keep it right here at AmericanMuscle.com.

      Product Information

      Features, Description, Reviews, Q&A, Specs & Installation
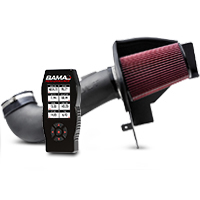
      Features & Specs

      • Add 17 HP and 18 TQ with Optional Tune
      • Bama SF4/X4 Tuner with 2 Custom Tunes
      • JLT Series 3 Cold Air Intake Included
      • Holds Up to 10 Custom Bama Tunes
      • FREE Tunes for Life
      • Fits 2005-2009 GT Mustangs
      • Includes Datalogging w/ Unlimited Revisions to Guarantee Maximum Safe, Reliable Power

      Description

      Bama Performance
      The Intake
      The Intake

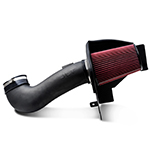
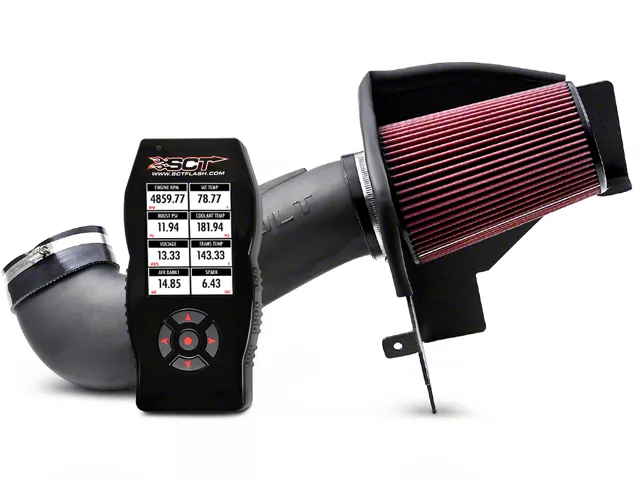
      Improves Airflow for More Power. An JLT Performance Series 3 Cold Air Intake completely replaces the restrictive stock air box and inlet tube allowing for a measured increase in airflow for more horsepower, improved torque, andbetter fuel economy, all while filtering out harmful power robbing particles.

      More info about this cold air intake - Here


      The Tuner
      The Tuner

      Power. Performance. Personalized. The SCT Power Flash Tuner features Bama Performance custom tunes that are written specifically for your Mustang. Our tunes are based on a 19 point questionnaire to deliver the most power and performance possible for your Mustang's modifications. All Bama Performance tunes are tested and proven on our very own in-house Dynojet 224xLC Chassis Dyno.

      More info about this tuner - Here


      The Combo
      The Combo
      • More horsepower and torque
      • Better throttle response
      • Enhances existing modifications
      • Custom Dyno proven tunes
      • Free Tunes for Life


      **NOTE: Programming custom tunes may take 2-3 business days plus applicable shipping time. We recommend ordering other products separately to avoid delay. Heavily modified cars are not tunable with a mail order tune. Click for restrictions. Membership in the Tunes for Life program is is valid for as long as you own the car that was originally tuned and is non-transferrable.

      Bama Performance

      Fitment:

      Details

      CA Residents: WARNING: Cancer and Reproductive Harm - www.P65Warnings.ca.gov

      Installation & What's in the Box

      Installation Info

      What's in the Box

      • (1) SF4/X4 Power Flash Tuner
      • (1) USB PC Interface Cable
      • (1) Intake tube
      • (1) Silicone coupler
      • (1) ABS Heat Shield
      • (1) 4.5x9 S&B powerstack air filter
      • (2) Clamps
      • Hardware

      4.8

      Customer Reviews (286)

        Questions & Answers

        10 More Questions

        Will It Fit My Mustang

            Related Mustang Categories