 FREE 1 to 3-Day Delivery on Orders $149+ Details
How to Install an NX Bottle Heater - D-4 on Your 1979-2012 Mustang

Shop Parts in this Guide
Installation
With over 60 square inches of heating area, it will keep your bottle at the correct pressure under the most demanding conditions. Nitrous Express’s heater is the only one on the market that is controlled by internal bottle pressure, not by temperature. Your bottle heater will begin to heat when bottle pressure drops below 900 PSI and will turn off at approximately 1050 PSI, the ideal bottle pressure for you NX system. Use the red liquid NX thread sealer on all pipe thread connections. DO NOT use any sealer on flare connections, hose, or bottle connections. Use no other sealing compounds or Teflon tape. All Threads must be clean and dry, apply only enough sealer to wet the threads, too little is better than too much. Excessive tightening of parts is not necessary, snug is enough.
While the product may seem simple and straight forward, there are several cautions that must be observed for safe reliable performance:
1. NEVER OPERATE YOUR HEATER WITH THE BOTTLE VALVE IN THE CLOSED POSITION. THE PRESSURE TRANSDUCER CANNOT SENSE THE INTERNAL BOTTLE PRESSURE WHEN THE VALVE IS CLOSED!!!
2. NEVER TOUCH YOUR HEATER WHEN IT IS OPERATING. THE SURFACE TEMPERATURE MAY REACH 400 DEGREES.
3. NEVER OPERATE YOUR HEATER UNLESS THE HEATING ELEMENT IS INSTALLED ON THE NITROUS BOTTLE, TIGHTENED FIRMLY AND COMPLETELY FLAT. IF YOU DO NOT OBSERVE THIS CAUTION ELEMENT BURNOUT WILL RESULT! THIS IS NOT COVERED BY WARRANTY!!
4. DO NOT ATTEMPT TO OPERATE THE HEATER WITHOUT THE HEAVY DUTY RELAY PROPERLY INSTALLED, PER THE WIRING DIAGRAM. FAILURE TO DO SO WILL RESULT IN PREMATURE PRESSURE TRANSDUCER FAILURE.
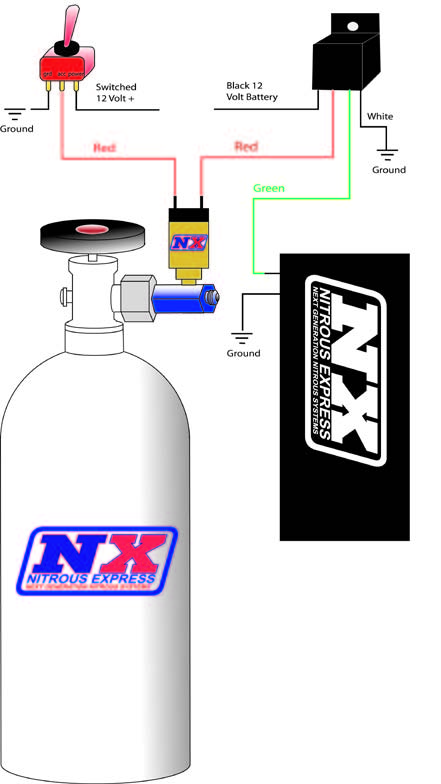
WIRING THE BOTTLE HEATER
Disconnect the battery ground cable. Install the heater element on the nitrous bottle, being sure the element is square and flat with the bottle surface. Install the pressure transducer on the bottle outlet nipple. Connect either wire from the heater element to a ground source, usually the bottle bracket if it is mounted to the vehicle chassis or body. The heavy-duty relay should be mounted as close to the heating element as practical. Connect the remaining element wire to the green lead from the relay wire harness. Connect the black lead to the battery positive terminal. Connect the Red wire to one side of your heater transducer. The other terminal will connect to the toggle switch’s ACC terminal using the 18gauge blue wire supplied with your heater. The toggle switch must be grounded and connected to a 12-volt source controlled by the ignition switch. Refer to the wiring diagram if further help is needed. Check all wiring circuits for correct routing and confirm all connections. Reconnect the ground cable. You “NEXT GENERATION” bottle heater is now ready for use! (NOTE: The heater will not come on unless the bottle pressure is below 900 PSI and will not automatically turn off until the bottle pressure is approximately 1050PSI.)
Related Guides
-
Installation
-
Installation
-
Installation

