 FREE 1 to 3-Day Delivery on Orders $149+ Details
How to Install a Roush Cold Air Intake on Your 2010-2012 Mustang
Installation Time
1 hours
Tools Required
- 1/4" Drive Ratchet with Extensions
- 8mm and 10mm Sockets (short or deep)
- 1/4" Drive Torque Wrench capable of 15 Nm.
- T-20 Torx Bit Screwdriver or Socket
- Fender Cover

Shop Parts in this Guide
Installation
PACKAGING LIST FOR COMPLETE COLD AIR KIT
| Part Ref | Description | RPP Part Number | Qty |
|---|---|---|---|
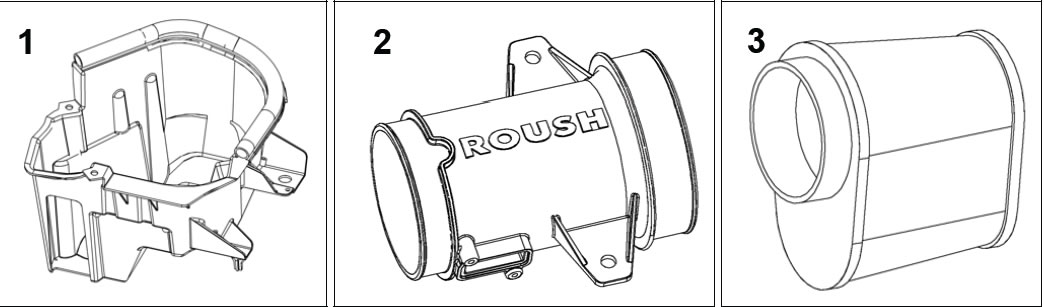
| 1 | Airbox Assembly | 13109A600 | 1 |
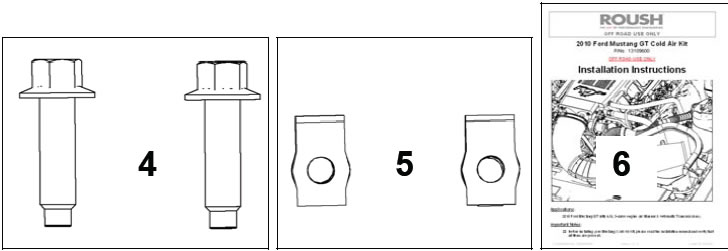
| 2 | MAF Tube | 131012B579 | 1 |
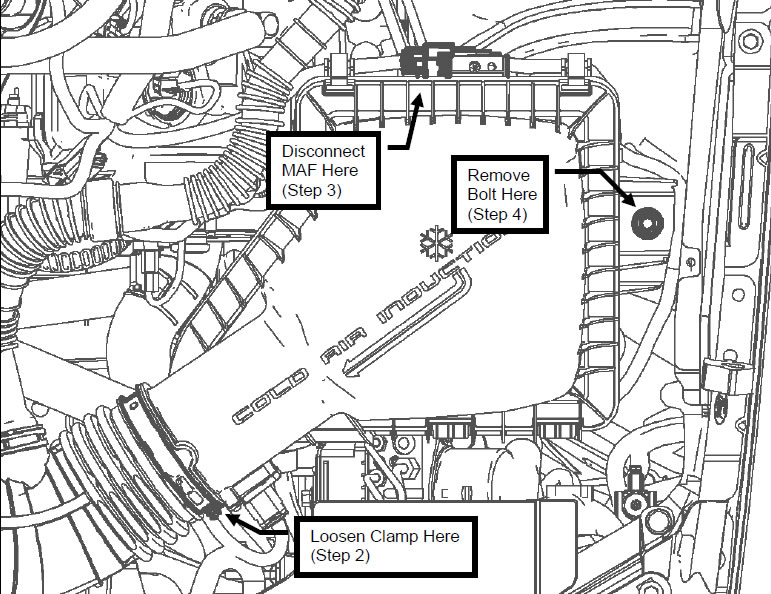
| 3 | Filter with Clamp | 13109601 | 1 |
| Part Ref | Description | RPP Part Number | Qty |
|---|---|---|---|
| --- | Hardware Kit – Cold Air Kit | 13109600HKA | 1 |
| 4 | Bolt – MAF Tube to Airbox (M8 x 1.25 x 25mm) | W500224 | 2 |
| 5 | J-Clip – MAF Tube to Airbox (M8) | W520823 | 2 |
| 6 | Installation Manual | 13109600IM | 1 |
LIMIT OF LIABILITY STATEMENT
The information contained in this publication was accurate and in effect at the time the publication was approved for printing and is subject to change without notice or liability. Roush Performance Products (RPP) reserves the right to revise the information presented herein or to discontinue the production of parts described at any time.
SAFETY PRECAUTIONS
STOP! CAREFULLY READ THE IMPORTANT SAFETY PRECAUTIONS AND WARNINGS BEFORE PROCEEDING WITH THE INSTALLATION!
Appropriate disassembly, assembly methods and procedures are essential to ensure the personal safety of the individual performing the kit installation. Improper installation due to the failure to correctly follow these instructions could cause personal injury or death. Read each step of the installation manual carefully before starting the installation.
- Always wear safety glasses for eye protection.
- Place the ignition switch in the OFF position.
- Always apply the parking brake when working on the vehicle.
- Block the front and rear tire surfaces to prevent unexpected vehicle movement.
- Operate the engine only in well-ventilated areas to avoid exposure to carbon monoxide.
- Keep yourself and your clothing away from moving parts when the engine is running.
- Do not wear loose clothing or jewelry that can be caught in rotating or moving parts.
- Allow the engine, cooling system, brakes and exhaust to cool before working on a vehicle.
- Do not smoke or use flammable items near or around the fuel system.
- Use chemicals and cleaners only in well-ventilated areas.
- Batteries can produce explosive hydrogen gas which can cause personal injury. Do not allow flames, sparks or flammable sources to come near the battery.
- Keep hands and any other objects away from the radiator fan blades.
SECTION A – DISASSEMBLY
The following section will guide you through the disassembly of the stock components.
- Cover the driver side fender to protect the vehicle finish.
- Using an 8 mm socket, loosen the clamp that secures the clean air tube to the airbox lid.
- Disconnect the MAF (mass air flow) sensor harness from the engine harness at the back of the airbox assembly.
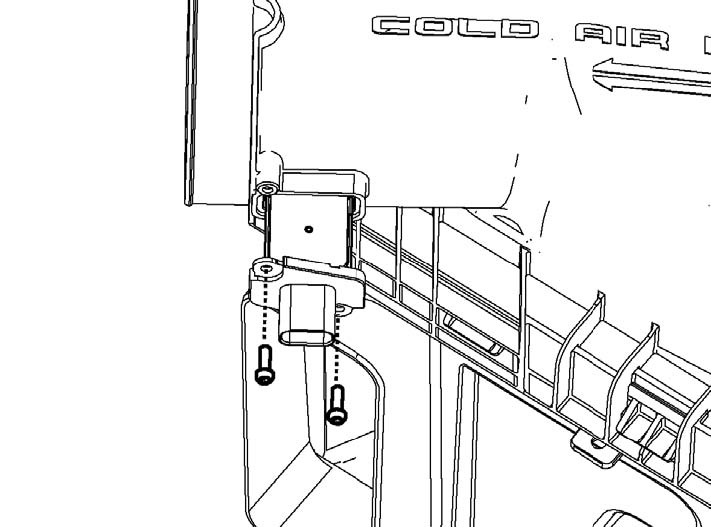
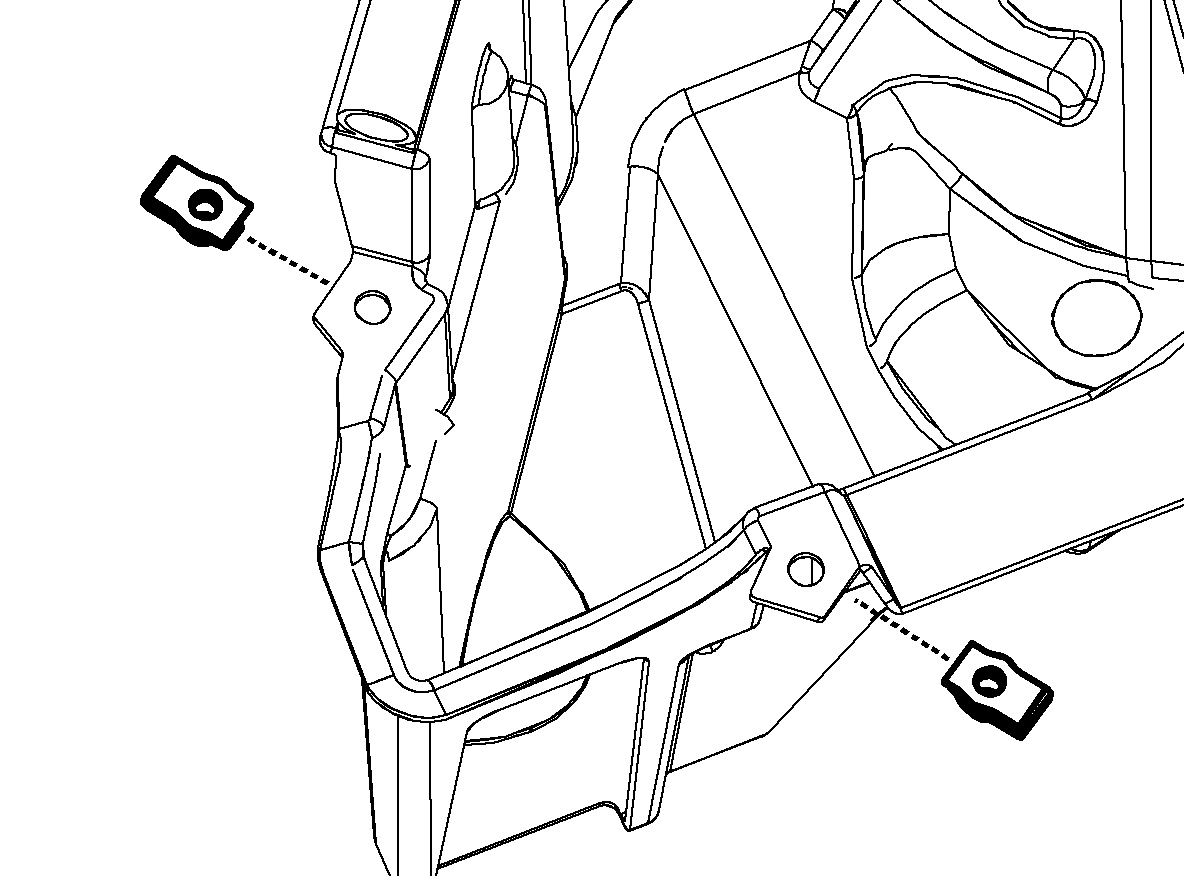
- Remove the M6 bolt that secures the airbox assembly to the chassis using a 10 mm socket. Save this bolt for later use. Remove the airbox from the vehicle.
5. Disconnect the MAF sensor connector by pulling the red locking tab back and pressing the black release tab. Remove the entire MAF sensor wiring harness from the airbox. This harness will be reused.
6. Remove the MAF sensor from the airbox lid using a T-20 Torx screwdriver or socket. Save the sensor and screws for later use.
SECTION B – SUBASSEMBLY
The following section will guide you through the build up of the kit. This work can be performed away from the vehicle.
1. Install the stock MAF sensor into the MAF Tube (131012B579) using the take off screws. Torque the screws to 1.8 – 2.2 Nm. Be careful not to over tighten these screws.
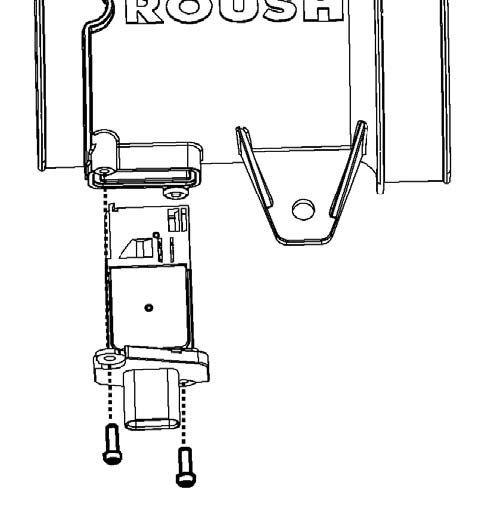
2. Install the Filter (13109601) onto the MAF Tube. Align the tab on the filter with the notch on the MAF Tube. Torque clamp to 3 – 5 Nm.
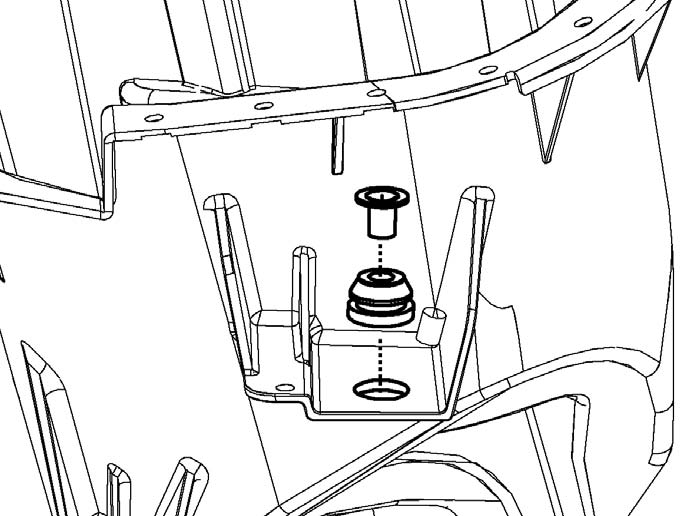
3. Remove the grommet and sleeve from the mounting tab on the stock airbox and install them in the new Airbox Assembly (13109A600) in the same orientation.
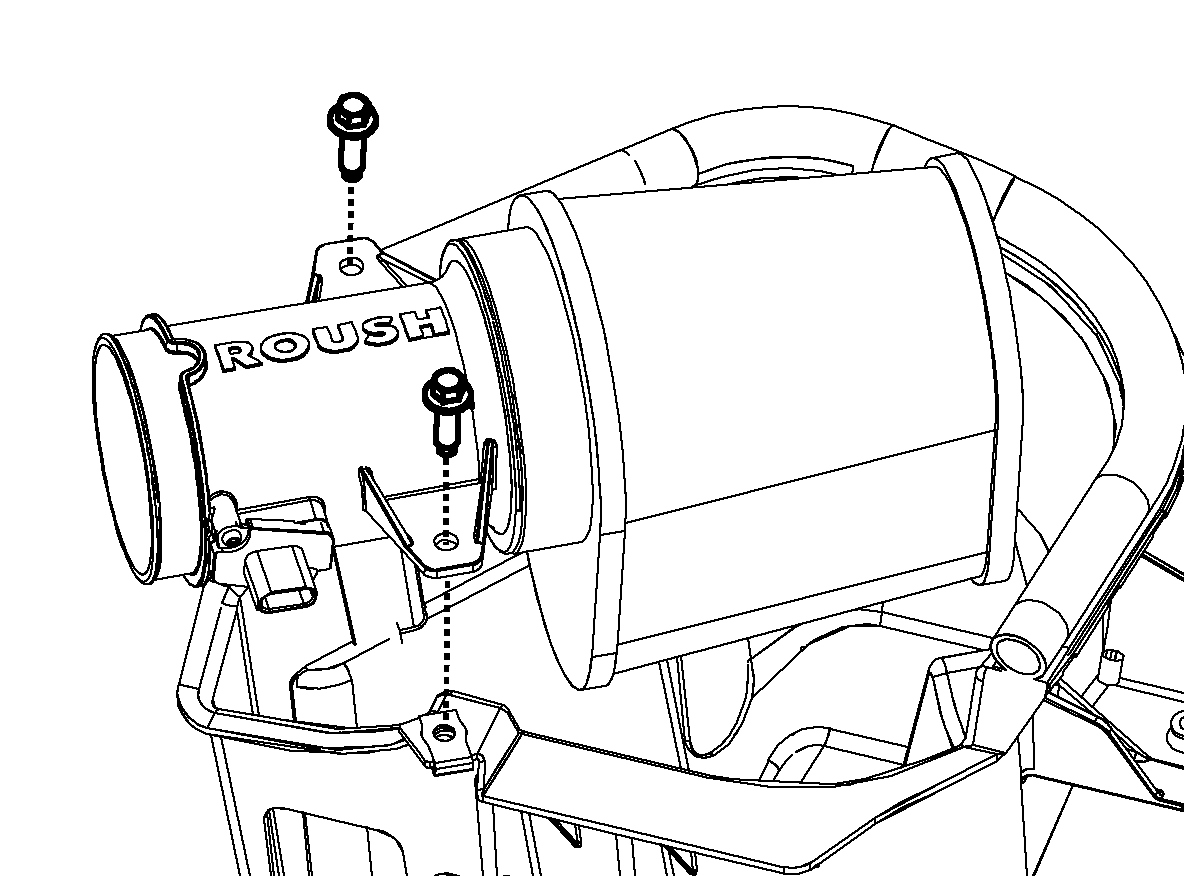
4. Install (2) J-Clips (W520823) on the Airbox.
5. Secure the MAF Tube and Filter to the Airbox using (2) M8 x 1.25 x 25 mm bolts (W500224). Torque bolts to 11.5 – 13.5 Nm.
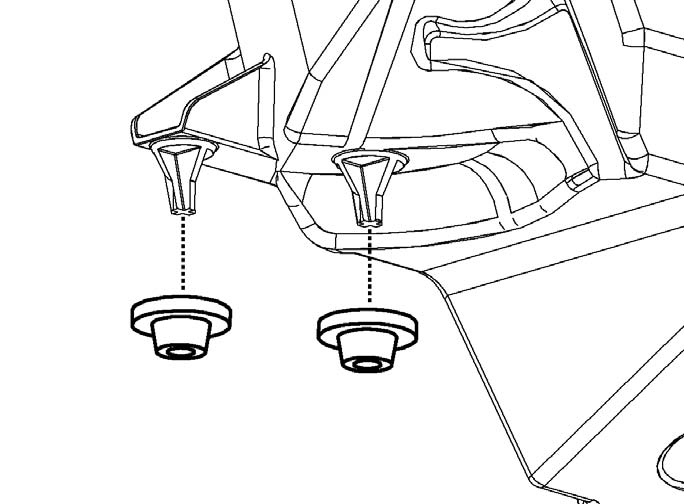
6. Remove the rubber mounting isolators from the bottom of the stock airbox and install them on the bottom of the new Airbox in the same orientation.
SECTION C – INSTALLATION
The following section will guide you through the final installation of the kit into the vehicle.
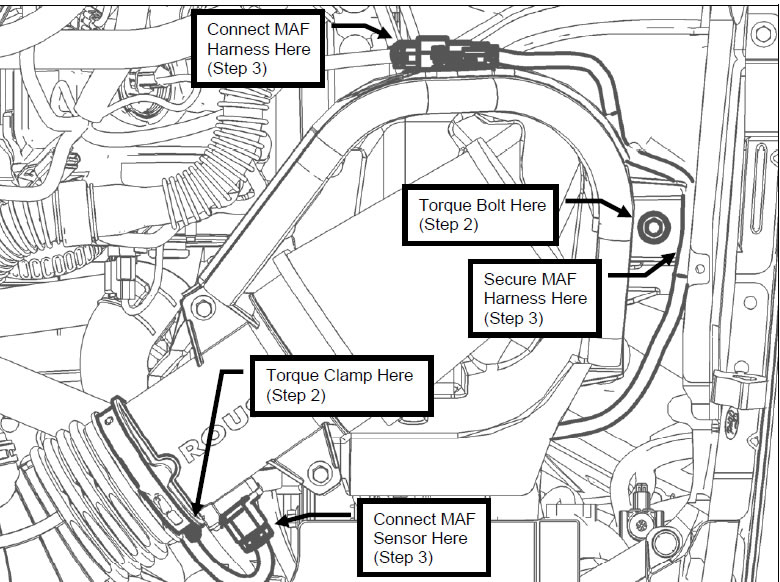
1. Install the new airbox assembly into the vehicle. Secure it to the chassis using the take off M6 bolt and torque to 8 – 12 Nm.
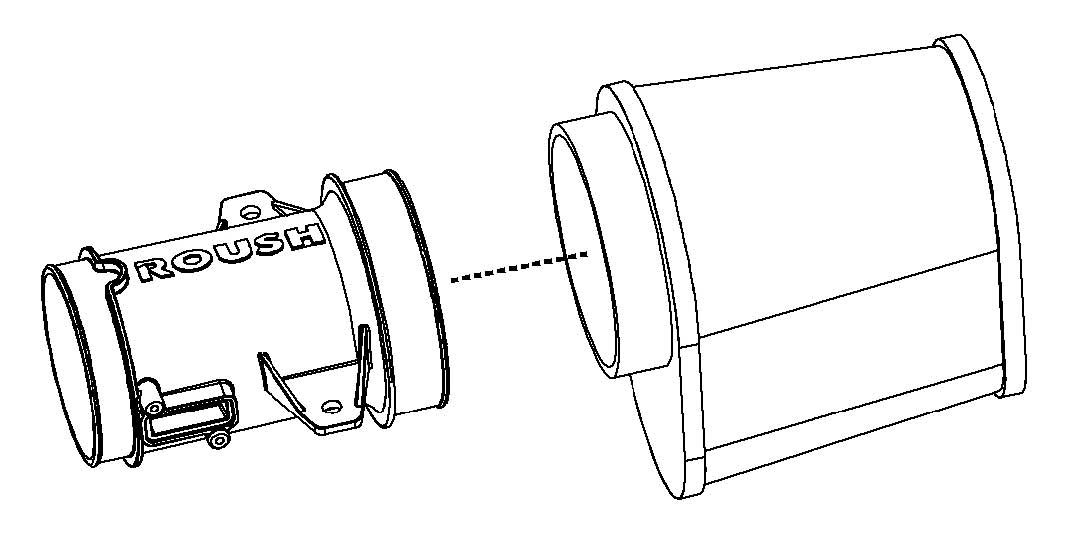
2. Connect the stock clean air tube to the MAF Tube using the stock clamp. Torque clamp to 3 – 5 Nm.
3. Connect the MAF sensor wiring harness to the engine harness at the rear of the airbox. Route the harness around the airbox away from the engine and plug in the MAF sensor. Secure the harness to the airbox by pushing the second push pin from the 6 pin connector into the hole by the airbox mounting bolt. Tuck the loose harness in front of the airbox under the radiator cover.
Related Guides
-
Installation
-
Installation
-
Installation

