 FREE 1 to 3-Day Delivery on Orders $119+ Details
Best Sellers


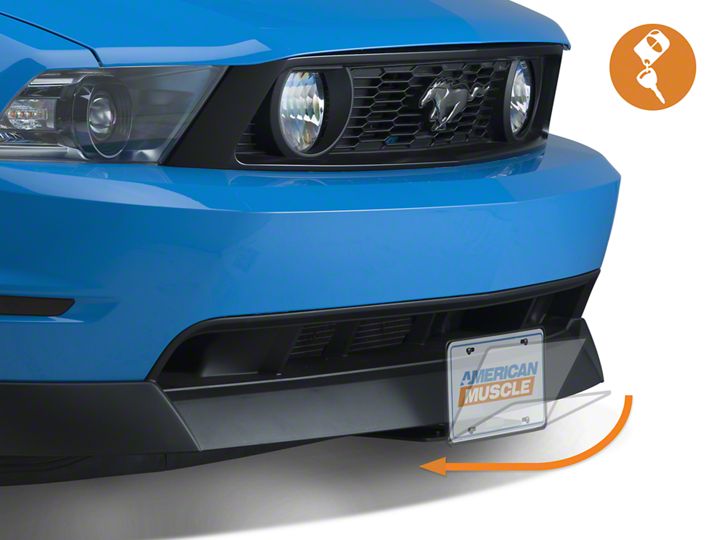
Mustang Flip Down License Plate Holder - Motorized - Installation Instructions
Shop Parts in this Guide
Installation
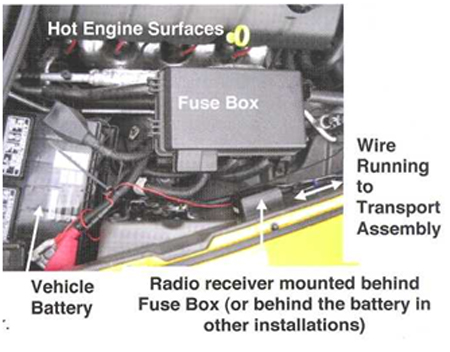
Mounting the Receiver:
1. Locate the receiver on the fender panel such that radiated heat from the engine is blocked. Suggested locations are behind the fuse box or battery. The black and red wires from the receiver can be directly connected to the battery in the "Connecting Wires to Motor" part of the install, since the current draw is extremely low.
2. Feed the two-lead wire with motor connections from the receiver in between the radiator baffle and the body so it exits forward below the car on the passenger side. Pull it a foot or so out in front of the car.
3. Plug the wires into the motor and secure them per "Install Wire Sheathing" & "Connecting Wires to Motor".
4. Then, attach the receiver to the fender-well using the double-backed tape provided.
5. Clean up the wiring by covering conductors with cut lengths from one of the two wire sheaths. Loop up extra wire and secure it as needed.
6. For maximum receiver range, extend the antenna and keep it separated from other wire conductors.
7. Complete the connection to the battery after the leads are attached to the motor.
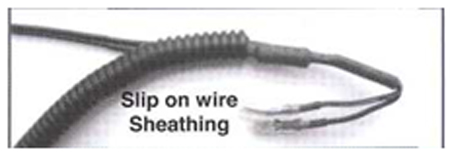
Install Wire Sheathing
1. Slip the other 12" length of wire sheathing over the two-lead wire near where it connects to the motor, as shown.
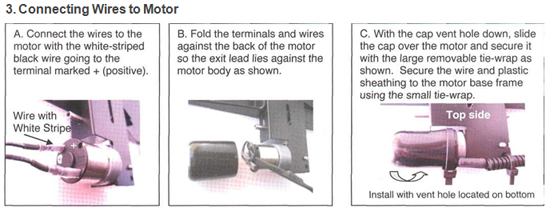
Connecting Wires to Motor
Installing the License Plate Transport Base Frame
1. Use a jack or ramps to lift the left corner of the car slightly to allow room for marking and drilling the mounting holes.
2. Slowly pull the plastic plate mount out from the base into the up position by holding on to the motor while pulling the center of the plastic mount.
3. Have a helper hold the base plate up against the bottom of the bumper so the plate mount is vertical when it contacts the front bumper as shown below.
4. The fore and aft position of the base plate screwed to the bottom of the bumper determines the vertical angle of the license plate when it is up. Slots allow a final fine adjustment.
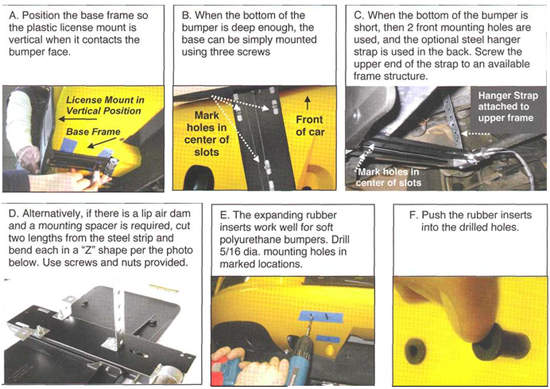
5. Install the mounting screws while leaving them loose enough to allow final fore and aft adjustment of the base plate.
6. Stick the two foam pads on the back of the plastic license plate mount where it will contact the bumper (see first picture).
7. Move the base plate so the license plate is 90 degrees with the ground when the plate is up and the foam pads on the license mount are contacting the bumper. About three screw driver turns on each screw will set the rubber inserts securely.
8. Install the license plate using the four stainless steel #10 x 3/8" long screws provided.
Installation instructions provided by Show-N-Go
