Talk to a Mustang Sales Tech
1-877-887-1105
M-F 8:30A-11P, Sat-Sun 8:30A-9P
$20K Sweeps! 10 Chances to Win! Enter Daily >

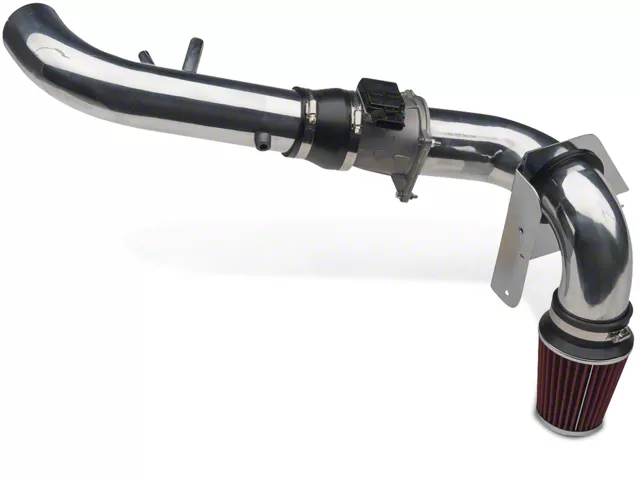
SR Performance Cold Air Intake (96-04 Mustang GT)

Item 14001
Verify parts fit and get product recommendations.
Mustang Sales Techs: Connect Now M-F 8:30A-11P, Sat-Sun 8:30A-9P
$0.00
Our Price

$89.99

FREE Shipping on orders over $119 Market Price $105.99 You Save 15% ($16.00) Up to 10% off for Military & First Responders! See Details

Will this fit your Vehicle?

Select a different vehicle Help?
Update or Change Vehicle
Ship to: Ashburn - 20149
Sorry, please enter a valid US or CA postal code
We're sorry, zip can't be updated at this time.
Recommended Install Shops
How It Works
Install Shops are available near Ashburn - 20149

Add Local Shop Installation

Total cost of service $175.00
    Create a list
    Add to New List

    Saved - View your saved items

    We're sorry. We couldn't save this product at this time.

      Video Review & Installation

      Justin: If you're looking for a super affordable intake for that '96 to '04 GT at home that will really pop under the hood, well, then the SR Performance kit might just be the one for you. Now, the SR Performance polish intake will be the most affordable in the category by a pretty hefty margin and will be a direct bolt-on no-tune-required option that can be had for right around 120 bucks.Now, install according to the site, it's gonna get a soft one out of three wrenches on the difficulty meter, and take about an hour or so to complete from start to finish as we'll show you later in the video. So, let's just cut right to the chase here, guys, and call this thing what it is, and that is a budget-friendly or entry-level intake, and that's pretty much it, right? It's not gonna have some of the more elaborate features such as a fancier airbox, maybe a rotomolded plastic intake tube with brand name stamped all over it. Instead, this system from SR is as barebones as it gets.Now, that's not to say it doesn't perform as intended because it does, and the well over 100 five-star reviews definitely represent that. However, I do wanna point out again that it's one of only a couple intakes currently in the category available with the polished finish. The other is gonna be from BBK, which is, by the way, more than double the price of the SR option on the table here today. So, again, if you want that flashy intake, but you don't necessarily need the big brand name behind it, then the SR Performance is certainly gonna be a great choice.Now, put aside the fact that again, this is an entry-level intake. You are still receiving everything, most, if not all intakes in the category will deliver. Let's start out with that polished aluminum intake tube here, guys. Again, pretty shiny right out of the box. But I'm OCD, I'd probably shine this thing up just a little bit more to really make it pop under the hood.Now, you're also receiving another staple in the intake category, your reusable high-flow oiled filter. This thing is washable, it is reusable, certainly save you some dough in the long run. You're also getting your polished heat shield here, and then, of course, all of the couplers, clamps, and hardware needed to get everything in place. So, a very complete kit from start to finish.Now, the SR Performance option will reuse your factory mass airflow housing, that's kind of a standard in the category as well. And that heat shield that is included with the kit will help block out some of that hot engine bay air from actually entering the filter along with the fact that this is a filter in the fender design, much like the rest of the two-valve kits here for this particular gen.Now, a couple other things to keep in mind here, guys. Outside of what's included, this kit does not require the use of any custom or can tuning, so owners out there can just bolt this up and go without the need for anything else. The SR option is not currently CARB-certified, so owners out there in California, for instance, just kind of keep that in mind.Now, outside of that, what are we talking benefit-wise? Well, obviously, you're getting a nice flash under the hood from that polished finish. And you can also look forward to things like improved throttle response, definitely a noticeable increase in growl coming from that 406 underneath hard acceleration. And then, of course, there's a little bit of power expectation, right?Now, this will vary dramatically, depending on the car you're bolting it up to, the condition of the intake you are replacing. But I typically like to tell guys, high single digits, low double digits without the tune is pretty much par for the course here and is what should be expected, again, without using any tuning. But again, don't just take my word for it here, guys. A lot of really good reviews on this intake from fellow two-valve owners out there. So, please read up on some of those, check out some of their images before ultimately pulling the trigger. I always encourage you guys to do that because it's really nice to hear from fellow two-valve owners about their experience with this particular kit.But now we wanna shift gears and get into the installation here, guys. And again, this is gonna be a very simple job in the driveway or garage. One out of three wrenches is what you can expect. It's pretty much wrenching 101, right? A great place to get started for Mustang owners maybe new to wrenching. I always like recommending an intake first because they're pretty much as easy as it gets. But now to help you even further, feel free to check out our detailed walkthrough and tool breakdown right now.Man: Tools used for this install, electric ratchet, 10-millimeter ratcheting wrench, an extension, 7-millimeter, 8-millimeter, and 10-millimeter socket. Hey, guys. I'm gonna show you how to install our cold air intake here on our '99 Mustang, so let's get started. So, first thing we're gonna do now we have our hood open is we're gonna remove our vacuum hoses here. We have two electrical connectors here, an 8-millimeter for two hose clamps. We're gonna undo this clamp here and we're gonna remove this whole top hose and get it outta the way and then we'll remove our box down here.All right. First thing we're gonna do is remove our PCV tube, just slide that right out. Then our vacuum tube here, just pull that off. I'm gonna take my 8-millimeter on my electric ratchet here, loosen up our clamp. Now we'll go down here and undo our electrical connectors. So, now we'll undo our two electrical connectors, this one here, that one there.Now, there's two different ways to take this off. We could loosen this up right now, remove the whole air intake tube and then remove this as the second piece, or you could undo this right here and this whole unit will come out in one section. So, what we're gonna do next is we're just gonna flick this lever just like that, get it out the way, and now we'll just remove it from the top here and pull this completely right out.So, now all I'm going to do is remove this 8-millimeter right here with my 8-millimeter socket on my electric ratchet and I'll get that bolt out, grab a hold of the air box and slide it right out. So, now that we got our old stock air intake removed from our vehicle, we're going to install our new cold air intake. We're gonna have some things we gotta put together first. We have a rubber sleeve here that's gonna go on the front, a rubber sleeve that's gonna go on in the back. We gotta remove the mass airflow and attach it to this pipe here.So, we're gonna get started. I'm gonna put the rubber sleeves on first, then we'll remove our mass airflow and get that bolted up to the rest of our pipe. So, the first thing we're gonna do is we're gonna take this sleeve here and get this in place over the top of our tube here. I'm gonna put it on about halfway. That gives it enough room for this part to go on the throttle body. And I'm gonna take and slide over top our two clamps. And I like to make our clamps go the same way, so that's easier for tightening and loosening. So, I'll push this one over to there. And the same with this one, just slide it and get it in place. So, that's ready.Next, we'll install our bottom one, then we'll take this one and we'll get this one in place too. Again, I'm gonna keep my clamps together so that they're in the same position so it's easier for tightening. So, now we'll go and remove our mass airflow sensor. So, first thing we're gonna do over here, we're gonna remove our air intake sensor. Should just come out like that.Next, I'm gonna take my 8-millimeter on my electric gun, loosen up the hose clamp and get that loose. We'll be able to pull it off of the mass airflow. So, now we have our intake tube off here. I'm just gonna take a 10-millimeter wrench in here, loosen these four nuts up, and remove our mass air and we'll get ready to install this onto our new cold air intake.So, now I have our cold air intake here on the table. What I'm gonna do, we're gonna remove these black caps here, pull these off. I'm gonna take this tube that they give us here. We're gonna slide that on this one here, and that way, that'll hook up to our PCV and get it on as far as we can like that. Now we'll take our air intake temp sender here, push that through our rubber grommet here like that. We also have this rubber seal, which is gonna go inside this piece here. That's gonna hold our tube into our wheel well.So next, what we're gonna do is we're gonna take these two 10-millimeter bolts that we have here and these nuts and I'm gonna get 'em started here in place like that. This one here, also a little flat washer that they supply you that we're gonna put on here. We're gonna get them started. I'm gonna take my 10-millimeter wrench here, hold the nut. I'm gonna take my 10-millimeter on my electric ratchet here and we're gonna run this in, tighten them up like that. Same with this one here.Now, once we got those tight like that, what you're gonna do is take your...these are like little alignment bushings that go in the bottom. There's a rubber grommet in your body there off the old air box that keeps the air box down in place. Just gonna run these on till they get tight. I'm just gonna run 'em on by hand and tighten them by hand like that. Same with this one.Now that we have those done, we'll take this, install this on our other pipe, and then start installing our mass airflow sensor. So, now that we have everything installed on our bracket here, we're gonna take this, slide it through our bracket like that, get it in place. And that'll allow us to have access here. And we have this rubber gasket, it's going to go here. We're gonna put our mass airflow sensor on here. We're gonna use the bolts, the 10-millimeters and the nuts supplied in the kit.So, I'll start by installing this using washers and get this started. Same with this one here. We'll get two started. Hold it in place. It doesn't look like these flat washers are the ones, so we're just gonna use the nuts just like we took off. Same with this one here. Now we'll take the rest of our hardware here, get it installed. Another 10-millimeter. Same one here, a washer, 10-millimeter.And I'm gonna take my wrench and take my gun, see if I can get in here with it. It's a 10-millimeter socket with a 1/4-inch drive electric ratchet. I'll hold my 10-millimeter on the other side, drill that down to the bottom one here. Come over to our top one. I'm just gonna rotate this to get to this one here. And now we have our mass air flow hooked up. Now we'll take the other side of our tube and we'll install that onto here and just get everything fit. Plus, we'll also install our air filter on the end of this.So, now that we have our mass air hooked up, we're going to take our factory rubber bushing here that's out of our old air box, slide that in place like that. Next, we'll install our air filter, just take it, get it on. I'm just gonna hold it there. Take a 7-millimeter here on my electric gun like that. Now we're ready to take this piece and install it into our vehicle.So, now we got everything bolted up. I'm gonna install our air intake tube here. We're gonna slide it into place, drop it down in, spin it around, get our bracket into place here. We got our factory bushing here. And take this, get this started, and get our alignment things down in here and get these in place into our rubber grommet. Now we have it sitting in there. We'll install our upper intake tube, get that all hooked up, then tighten this back up, and we'll be just about wrapped up.So, now we're gonna install our upper intake tube. I'm gonna slide it over there, lift up on our mass air flow sensor and get this started down here. Being that it's brand new, it's sometimes a little tough to get 'em to mesh together. I'm gonna move the clamp back there a little bit. That might help. There we go. It was just the hose clamp holding it up.So, we'll get the hose clamp outta the way here, loosen it up a little bit, and that's gonna hold it into place. Make sure we get our dowels that they give us in the kit where they have to be. Now we'll get our hose clamps all tightened up here started and then we'll hook our vacuum hoses up. So, now we're gonna tighten these two up here first followed by this one. Then we'll go up here to our intake, bolt it into place. Make sure your clamp don't come off, make sure it stays...try to make it look as straight possible. And I'll do the same with this one here.Next, we'll go back and tighten our rubber bushing up. So, now we're gonna come down here. I've got my 8-millimeter on my 3/8 gun. Now again, those clamps were 7 millimeters, so we used the 7-millimeter on these. This, we're going to use an 8-millimeter. So, I'm just gonna run this in, and that'll hold that in place. Now that we have those all done, we'll go up and install our vacuum tubes.So, now we're going to install our PCV here. We're gonna install it into our plastic tube that we stuck on prior, just like that. And we'll install our vacuum tube here. Next, we'll install our electrical connectors. Now we'll install this electrical connector here for our air temp sender and then our mass airflow sensor. And that'll wrap up this install.That wraps up this review and install of our SR Performance Cold Air Intake for '96 to '04 GT Mustangs. Thanks for watching, and for all things Mustang, keep it right here at americanmuscle.com.

      Product Information

      Features, Description, Reviews, Q&A, Specs & Installation

      Features & Specs

      • Add up to 35 HP and 54 TQ With Optional Tune
      • Reusable High Flow Air Filter
      • Polished Aluminum Finish
      • Simple Installation
      • Fits 1996-2004 GT Mustangs, Excludes 01 Bullitt

      Description

      Improves Horsepower. This SR Performance Cold Air Intake kit completely replaces the factory air box and restrictive paper filter element in your 1996-2004 4.6 GT mustang with a high flow filter assembly for a noticeable increase in horsepower and throttle response while filtering out destructive power robbing dust particles. This CAI pulls cooler denser air from inside the inner fender well to make more power that you can feel.

      Reusable Filter. Included in this kit is a High Flow reusable air filter. So no need to go out and buy a new filter every few thousand miles. Just clean the filter, re-oil it, save money, and go!

      Polished Finish.
      A SR Performance Cold Air Intake not only improves horsepower and acceleration, but it also improves your Mustang's under hood appearance with a striking polished aluminum finish. Now you can have the best of both worlds, performance and style.

      Simple Install. SR Performance Cold Air Intake kits are relatively easy to install with basic hand tools. No extra modifications are required for the installation. See the video on the installation tab for an overview of the installation process.

      Application. This SR Performance Cold Air Intake is specifically designed for the 1996-2004 GT Mustangs equipped with the 4.6L V8 engine. It is not compatible with the 2001 Bullitt.

      Please Note. The MAF housing and sensor is not included with the SR Performance Cold Air Intake.

      SR Performance

      Fitment:

      Details

      SR Performance 14001

      CA Residents: WARNING: Cancer and Reproductive Harm - www.P65Warnings.ca.gov

      Installation & What's in the Box

      Installation Info

      What's in the Box

      • (1) 3" Straight Through Coupler
      • (1) 3.5" - 3" Step Down Coupler
      • (3) 65mm - 89mm Hose Clamp
      • (2) 78mm - 101mm Clamp
      • (1) Gasket
      • (2) Anchor
      • (6) Nylon Lock Nut
      • (6) 1" Bolt
      • (6) Small Washer
      • (2) Large Washer
      • (1) 4" Hose
      • (1) Fender Shield
      • (1) Cone Filter w/ Open End
      • (1) 3.5" Pipe
      • (1) 3" Pipe

      4.4

      Customer Reviews (500+)

        Questions & Answers

        10 More Questions

        Will It Fit My Mustang

        • GT - 96, 97, 98, 99, 00, 01, 02, 03, 04

        Does not fit 2001 Bullitt

            Related Mustang Categories